Chevrolet Sonic Repair Manual: Rear Brake Backing Plate Replacement
- Removal Procedure
-
Warning:
Refer to Brake Dust Warning.
- Raise and support the vehicle. Refer to Lifting and Jacking the Vehicle.
- Remove the tire and wheel assembly. Refer to Tire and Wheel Removal and Installation.
- Remove the rear wheel speed sensor, if equipped. Refer to Rear Wheel Speed Sensor Replacement.
- Remove the rear brake cylinder. Refer to Rear Brake Cylinder Replacement.
- Remove the brake shoes. Refer to Brake Shoe Replacement.
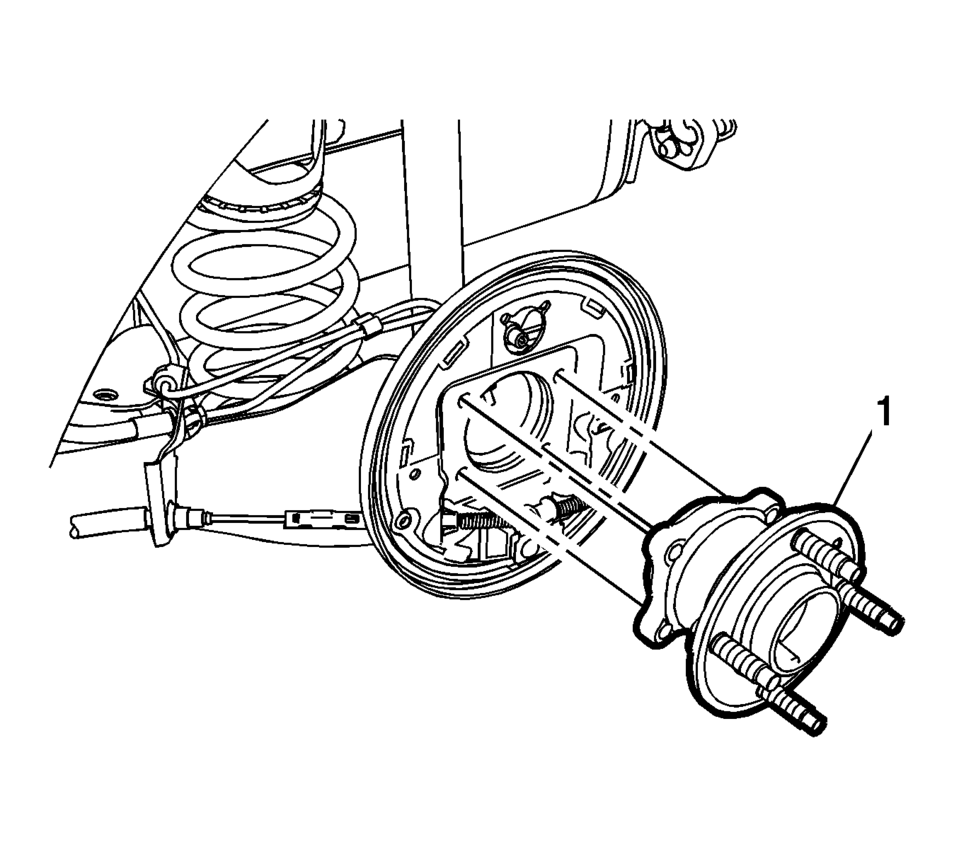
- Remove the rear wheel bearing and hub assembly (1). Refer to Rear Wheel Bearing and Hub Replacement.
- Disconnect the front park brake cable from the park brake cable connector (1).
- Remove the rear brake backing plate (2).
- If necessary, remove the park brake cable from the rear brake backing plate by compressing the park brake cable locking tab.

Note:
The park brake cable connector is part of the cable attached to the rear brake backing plate.
- Installation Procedure
-
- If removed, install the park brake cable to the rear brake backing plate.
- Ensure the park brake cable locking tab is fully engaged in the rear brake backing plate.
- Insert the front park brake cable into the park brake cable connector (1).
- Install the rear brake backing plate (2).
- Install the rear wheel bearing and hub assembly (1). Refer to Rear Wheel Bearing and Hub Replacement.
- Install the rear wheel speed sensor, if equipped. Refer to Rear Wheel Speed Sensor Replacement.
- Install the rear brake cylinder. Refer to Rear Brake Cylinder Replacement.
- Install the brake shoes. Refer to Brake Shoe Replacement.
- Install the tire and wheel assembly. Refer to Tire and Wheel Removal and Installation.
 Parking Brake Cable Replacement (Drum Brake)
Removal Procedure
Remove the front floor console. Refer to Front Floor Console Replacement.
Ensure that the parking brake lever is in the fully released position.
Us ...
 Rear Brake Cylinder Overhaul
Disassembly Procedure
Warning: Refer to Brake Dust Warning.
Warning: Refer to Brake Fluid Irritant Warning.
Raise and support the vehicle. Refer to Lifting and J ...
Other materials:
Passenger Sensing System
The vehicle has a passenger sensing system for the front outboard passenger position.
The passenger airbag status indicator will light on the instrument panel when the
vehicle is started.
United States
Canada
The words ON and OFF, or the symbol for on and off, will be visible during the
...
Selecting an Auxiliary Device
Connect the auxiliary device to the AUX input terminal. Play will begin when
the system has finished reading the information on the device.
If the storage device is already connected, press
, audio, Source
, select AUX from the drop down menu.
...
Warning & Indicator Lights
Warning/indicator lights (red)
Warning/indicator lights (yellow)
Warning/indicator lights (other)
( white )
(
green )
Checking lights
In the Nissan Armada, the warning and indicator light system is designed to immediately
inform the driver about the vehicle’s condition, ...

0.0053