Chevrolet Sonic Repair Manual: Transmission Case Cleaning and Inspection
|
Callout |
Component Name |
|---|---|
|
Caution: Do not use abrasive pads or bristle devices to clean the sealing surfaces. Abrasive pads produce a fine grit that can effect transmission function. Abrasive pads can also remove enough metal to create oil leaks. Caution: After cleaning the transmission components, allow to air dry. Do not use cloth or paper towels in order to dry any transmission components. Lint from the towels can cause component failure. Caution: Do not reuse cleaning solvents. Previously used solvents may deposit sediment which may damage the component.
|
|
|
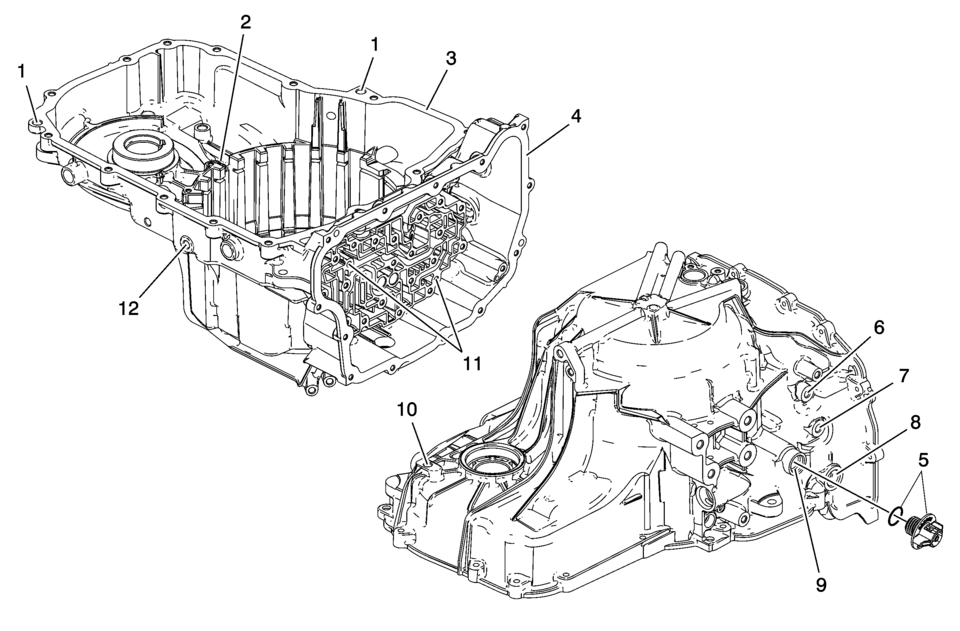
1 |
Torque Converter Housing Locating Pin Procedure
Inspect the torque converter housing locating pins. Specification
The locating pins installed height is 7.4 mm (0.29 in). |
|
2 |
Fluid Trough Check Ball Specification
The check ball installed depth is 11 mm (0.43 in). |
|
3 |
Converter Housing Sealing Surface |
|
4 |
Control Valve Body Cover Sealing Surface |
|
5 |
Fill Cap Seal |
|
6 |
Transmission Fluid Cooler Pipe Sealing Surface |
|
7 |
Fluid Pressure Test Plug Caution: Refer to Fastener Caution.
12 Y (106 lb in) |
|
8 |
Manual Shift Shaft Seal Surface |
|
9 |
Fluid Fill Cap Sealing Surface |
|
10 |
Fluid Level Plug Tighten
12 Y (106 lb in) |
|
11 |
Valve Body Locating Pin Procedure
Inspect the valve body locating pins. Specification
The locating pins installed height is 5.8 mm (0.22 in). |
|
12 |
Drain Plug Tighten
12 Y (106 lb in) |

 Transmission Control Replacement
Transmission Control Replacement
Callout
Component Name
Preliminary Procedures
Remove the front floor console. Refer to
Front F ...
Other materials:
Windshield Header Courtesy Lamp Replacement
=i_ii.=========
Windshield Header Courtesy Lamp Replacement
Callout
Component Name
1
Windshield Header Courtesy Lamp
Procedures
Grasp the courtesy lamp assembly and pull downward to release the
retainer clips ...
Water Outlet Replacement (LUV)
Removal Procedure
Drain the engine coolant system. Refer to Cooling System Draining and
Filling.
Remove the following:
Engine coolant air bleed hose (1)
Engine coolant temperature sensor (2) and connector clip (3)
Heated oxygen senso ...
The C300 competes well on fuel economy
Title: "2023 Mercedes-Benz C300: A Detailed Look at Efficiency, Interior, and Customization Options"
The 2023 Mercedes-Benz C300 presents a compelling choice for luxury sedan enthusiasts, offering a blend of performance, efficiency, and customizable features. Here's a breakdown of wh ...

0.007