
Chevrolet Sonic Repair Manual: Control Valve Body Cleaning and Inspection (Gen 2)
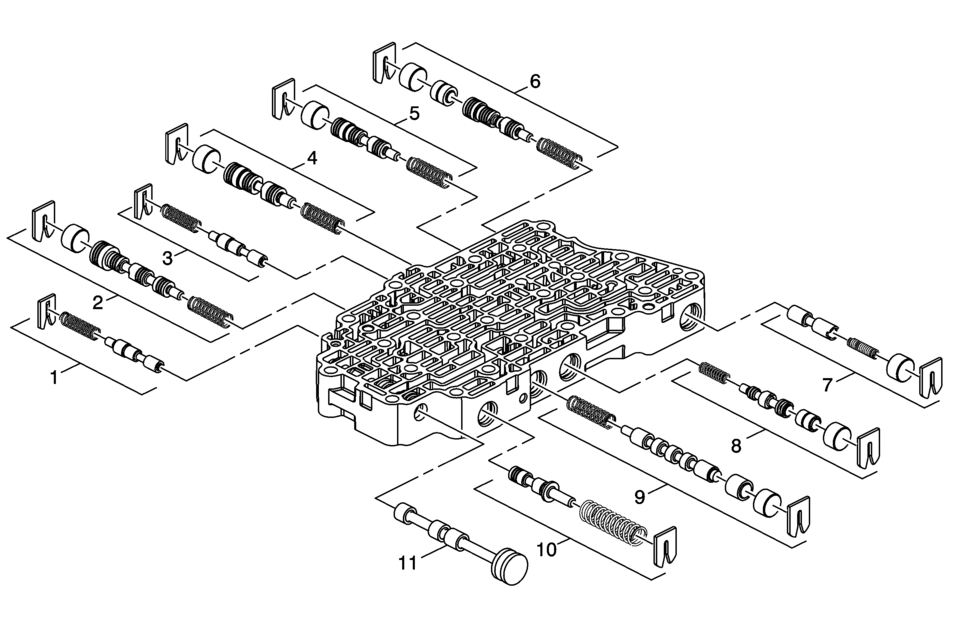
|
Callout |
Component Name |
|---|---|
|
Warning: Valve springs can be tightly compressed. Use care when removing retainers and plugs. Personal injury could result. Caution: After cleaning the transmission components, allow to air dry. Do not use cloth or paper towels in order to dry any transmission components. Lint from the towels can cause component failure. Caution: Do not reuse cleaning solvents. Previously used solvents may deposit sediment which may damage the component. Preliminary Procedure
Clean and inspect all valve components and the valve body. The control valve body assembly is only replaceable as an assembly. |
|
|
1 |
Low-Reverse and 4?? Clutch Boost Valve Train |
|
2 |
Low-Reverse and 4?? Clutch Regulator Valve Train |
|
3 |
1??? Clutch Boost Valve Train |
|
4 |
1??? Clutch Regulator Valve Train |
|
5 |
2? Clutch Regulator ValveTrain |
|
6 |
3? Reverse Clutch Regulator Valve Train |
|
7 |
Defualt Override Valve Train |
|
8 |
TCC Regulator Apply Valve Train |
|
9 |
Clutch Select Valve Train |
|
10 |
Actuator Feed Limit Valve Train |
|
11 |
Manual Valve |
 Control Valve Body Assembly Removal
Table 1:
Control Valve Body Cover Removal
Table 2:
Control Solenoid (With Body and TCM) Valve Assembly
Removal
Table 3:
Control Valve Body Assembly Removal
...
 Control Valve Body Cover Installation
Control Valve Body Cover Installation
Callout
Component Name
1
Input Speed Sensor Connector
2
...
Other materials:
Finish Care
Application of aftermarket clearcoat sealant/wax materials is not recommended.
If painted surfaces are damaged, see your dealer to have the damage assessed and
repaired. Foreign materials such as calcium chloride and other salts, ice melting
agents, road oil and tar, tree sap, bird droppings, ...
Generator Replacement (LUW)
Removal Procedure
Disconnect the negative battery cable. Refer to Battery Negative Cable
Disconnection and Connection.
Raise and support the vehicle. Refer to Lifting and Jacking the Vehicle.
Remove the drive belt. Refer to Drive Belt Replacement.
Remove t ...
Air Inlet Assembly Replacement
Air Inlet Assembly Replacement
Callout
Component Name
Preliminary Procedures
Remove the Heater and Air Conditioning Evaporator and Blower Module.
Refer to Heater and Air Conditioning Evaporator and Blower Module Removal
a ...

0.0057