Chevrolet Sonic Repair Manual: Cylinder Head Cleaning and Inspection
- Valve Cleaning and Inspection
-
- Clean the valves of carbon, oil and varnish. Carbon can be removed with a wire brush. Varnish can be removed by soaking in Parts Immersion Solvent.
- Clean the valve guides.
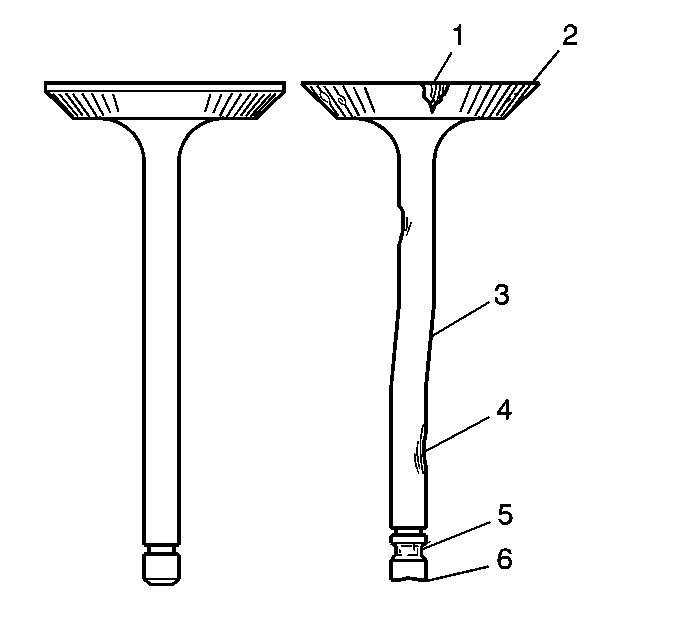
- Inspect the valve stem for wear (4).
- Inspect the valve key groove for chipping or wear (5). Replace the valve if chipped or worn.
- Inspect the valve face for burning or cracking (1). If pieces are broken off, inspect the corresponding piston and cylinder head area for damage.
- Inspect the valve stem for burrs and scratches. Burrs and minor scratches may be removed with an oil stone.
- Inspect the valve stem for straightness and the valve head for bending or distortion (3) using V blocks. Bent or distorted valves must be replaced.
- Clean the deposits from the valve face. Inspect the valve face for grooving.
- Replace the valve if the face is grooved. Valve faces cannot be machined. If worn, or damaged, the valves must be replaced.
- The valves may be lightly lapped to the valve seats.
Warning:
Bodily injury may occur if the cleaning solvent is inhaled or exposed to the skin.
Note:
Do not scratch the valve stem with the wire brush.
- Cylinder Head and Gasket Surface Cleaning and Inspection
-
- Remove the spark plugs. Refer to Spark Plug Replacement.
- Inspect the cylinder head gasket and mating surfaces for leaks, corrosion and blow-by. If the gasket has failed, use the following faults to determine the cause:
- Improper installation.
- Loose or warped cylinder head.
- Missing, off location or not fully seated dowel pins.
- Corrosion in the seal area around the coolant passages.
- Chips or debris in the cylinder head bolt holes.
- Bolt holes in the cylinder block not drilled or tapped deep enough.
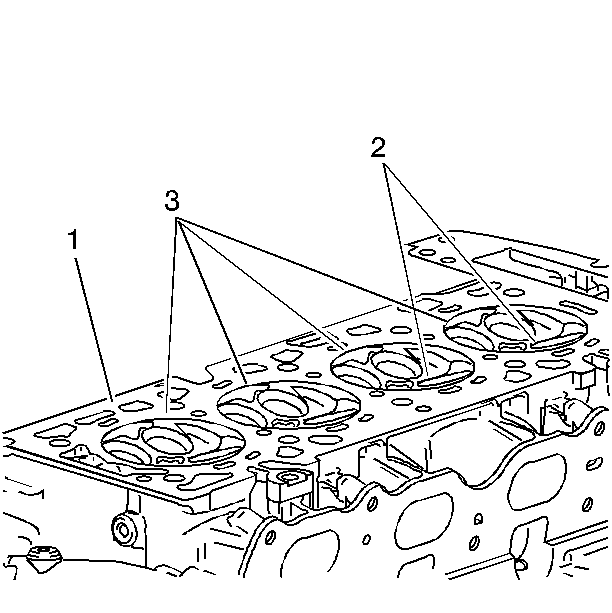
- Inspect the cylinder head gasket surface.
- Cylinder head may be reused if corrosion is found only outside a 4 mm (0.375 in) band around each combustion chamber (1).
- Replace the cylinder head if the area between the valve seats is cracked (2).
- Replace the cylinder head if corrosion has been found inside a 4 mm (0.375 in) band around each combustion chamber (3).
- Clean the cylinder head bolts.
Note:
Do not use a wire brush on any gasket sealing surface.
- Clean the cylinder head. Remove all varnish, soot and carbon to the bare metal.
- Clean the valve guides.
- Clean the threaded holes. Use a nylon bristle brush.
- Clean the remains of the sealer from the plug holes.
- Inspect the cylinder head bolts for damaged threads or stretching and damaged heads caused by improper use of tools.
- Replace all suspect bolts.
- Inspect the cylinder head for cracks. Check between the valve seats and in the exhaust ports.
Note:
Do not attempt to weld the cylinder head, replace it.
- Inspect the cylinder head deck for corrosion, sand inclusions and blow holes.
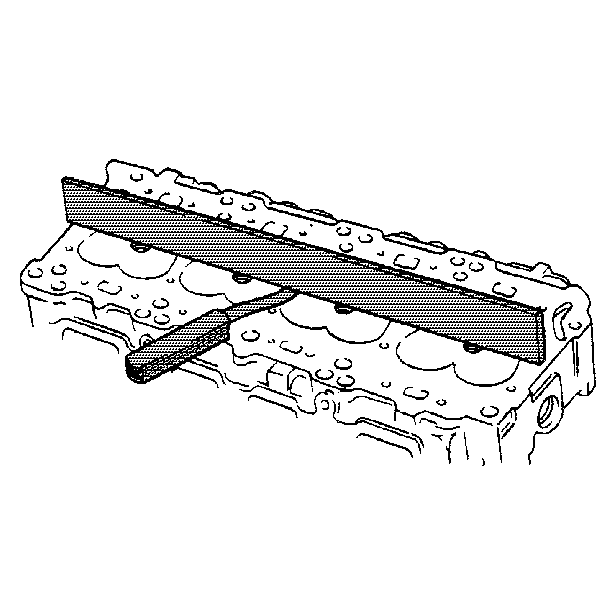
- Inspect the cylinder head deck surface for flatness. Refer to Engine Mechanical Specifications. If the cylinder head is out of specification, replace the cylinder head. Do not machine the cylinder head.
- Inspect all the threaded holes for damage. Threads may be reconditioned with thread inserts.
- Inspect the sealing surfaces.
- Inspect the cylinder head plugs.
 Cylinder Head Assemble
Special Tools
EN-958 Valve Stem Seal Installer
EN-8062 Valve Spring Compressor
EN-8062-5 Adapter
EN-50717-2 Compressor Assembly of EN-50717 Kit
For equivalent regional tools, refer to S ...
 Cylinder Head Disassemble
Special Tools
EN-840 Pliers/Remover
EN-8062 Valve Spring Compressor
EN-8062-5 Adapter
EN-50717-2 Compressor Assembly of EN-50717 Kit
For equivalent regional tools, refer to Special Tool ...
Other materials:
Rear Compartment Lid Hinge Torque Rod Replacement
Rear Compartment Lid Hinge Torque Rod Replacement
Callout
Component Name
Warning: Refer to Hood Hold-Open Device Warning.
Preliminary Procedure
Open and support the rear compartment lid.
Special Tools
BO-125 ...
Engine Coolant Thermostat Installation
Caution: Refer to Engine Coolant Thermostat Housing Caution.
Clean the engine coolant sealing surfaces.
Install the engine coolant seal (1).
Install the engine coolant thermostat assembly (2).
Caution: Refer to Fastener Caution.
Install the 4R ...
Evaporative Emission System Hose/Pipe Replacement
Removal Procedure
Disconnect the evaporative emission pipe (1). Refer to Plastic Collar
Quick Connect Fitting Service.
Remove the plastic retainer (1) and disconnect the evaporative emission
pipe (2).
Lift and support t ...

0.0079