Chevrolet Sonic Owner's Manual: Dinghy Towing All except RS Model with Automatic Transmission
When dinghy towing a vehicle with an automatic transmission, the vehicle should be run at the beginning of each day and at each RV fuel stop for about five minutes. This will ensure proper lubrication of transmission components.
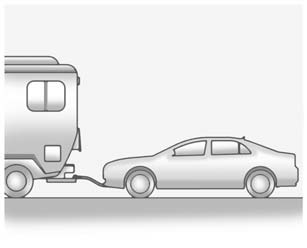
To dinghy tow the vehicle from the front with all four wheels on the ground:
1. Position the vehicle to tow and then secure it to the towing vehicle.
2. Shift the automatic transmission to P (Park) or a manual transmission into 1 (First) gear and turn the ignition to LOCK/OFF.
3. Set the parking brake.
4. To prevent the battery from draining while the vehicle is being towed, remove the following fuse from the instrument panel fuse block: (DLIS). See Instrument Panel Fuse Block for more information.
5. Turn the ignition to ACC/ ACCESSORY.
6. Shift the automatic transmission to N (Neutral) or a manual transmission to Neutral.
7. Release the parking brake.
Remember to reinstall the DLIS fuse once the destination has been reached.
Caution
If 105 km/h (65 mph) is exceeded while towing the vehicle, it could be damaged. Never exceed 105 km/h (65 mph) while towing the vehicle.
Caution
Towing the vehicle from the rear could damage it. Also, repairs would not be covered by the vehicle warranty. Never have the vehicle towed from the rear.
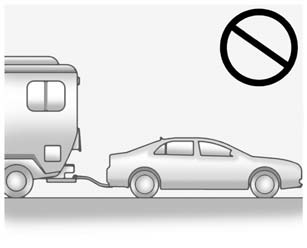
 Dinghy Towing RS Model with Automatic Transmission
Caution
If the vehicle is towed with all four wheels on the ground, the drivetrain
components could be damaged. The repairs would not be covered by the vehicle warranty.
Do not tow the vehicle ...
 Dolly Towing from the Front
The vehicle can be towed from the front using a dolly. To tow the vehicle using
a dolly, follow these steps:
1. Attach the dolly to the tow vehicle following the dolly manufacturer's instruct ...
Other materials:
Stabilizer Shaft Link Replacement
Stabilizer Shaft Link Replacement
Callout
Component Name
Preliminary Procedure
Raise and Support the vehicle. Refer to Lifting and Jacking the
Vehicle.
Remove the tire and wheel assembly. Refer to Tire and Wheel Removal
...
Clutch and Differential Housing Assemble
Special Tools
R-0007761 Universal Handle for Pullers and Installers
R-0407009 Countershaft Front Bearing Driver
R-0407010 Input Shaft Needle Bearing Puller and Driver
R-0407014 Gearshift Device Bushing Driver ?E#8201;Use with R-0007761
S-9707500 Axle Shaft Seal Installer
Fo ...
Turbocharger Wastegate Regulator Solenoid Valve Replacement
Charge Air Bypass Regulator Solenoid Valve Replacement
Callout
Component Name
Preliminary Procedure
Disconnect the radiator outlet hose from the water inlet. Refer to
Water Inlet Replacement.
1
T ...

0.0063