
Chevrolet Sonic Repair Manual: Driver or Passenger Seat Shoulder Belt Replacement (with A69)
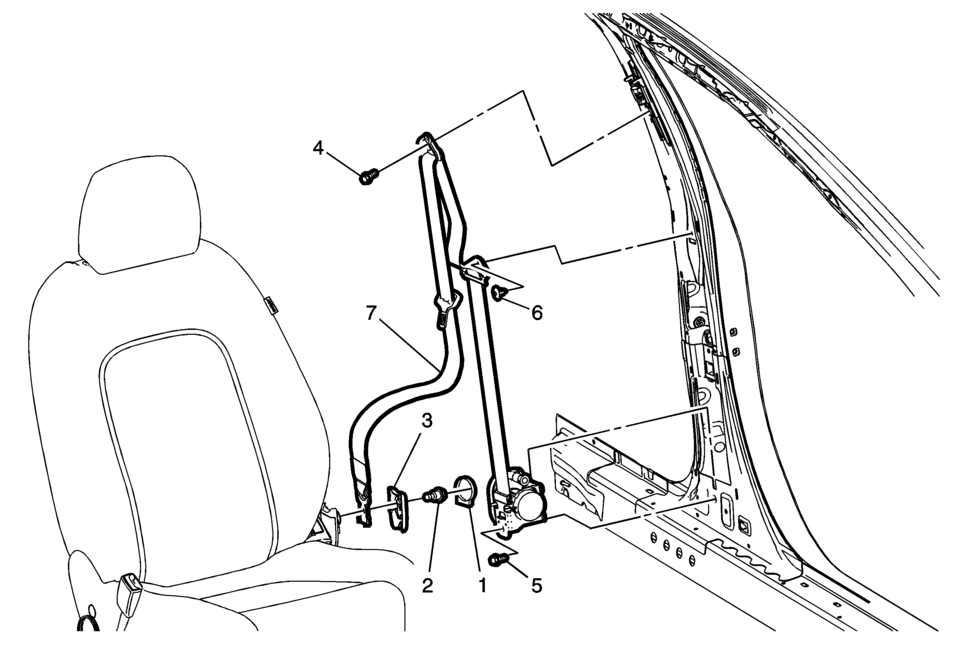
|
Callout |
Component Name |
|---|---|
|
Warning: Refer to SIR Warning. Warning: Refer to SIR Inflator Module Handling and Storage Warning. Warning: Refer to SIR Seatbelt Pretensioner Handling Warning. Warning: In order to prevent accidental deployment and the risk of personal injury, do not dispose of an undeployed inflatable restraint seat belt pretensioner as normal shop waste. Undeployed seat belt pretensioners contain substances that could cause severe illness or personal injury if their sealed containers are damaged during disposal. Use the following deployment procedures to safely dispose of an undeployed seat belt pretensioner. Failure to observe the following disposal methods may be a violation of federal, state, or local laws.
|
|
|
1 |
Driver or Passenger Seat Belt Tensioner Cover |
|
2 |
Driver or Passenger Seat Belt Tensioner Cover Fastener Caution: Refer to Fastener Caution.
7.5?€‰Y (66?€‰lb?€‰in) |
|
3 |
Driver or Passenger Seat Belt Tensioner Cover |
|
4 |
Driver or Passenger Seat Shoulder Belt Fastener Tighten
45?€‰Y (33?€‰lb?€‰ft) |
|
5 |
Driver or Passenger Shoulder Belt Retractor Fastener Tighten
45?€‰Y (33?€‰lb?€‰ft) Note: When the seat belt retractor is replaced with a new one, there is no thread in the nut welded to the retractor. This is normal as the bolt will make the thread in the welded nut when the bolt is tightened. |
|
6 |
Driver or Passenger Seat Belt Push On Retainer Procedure
Use a flat-bladed tool to remove locking pin in retainer. |
|
7 |
Driver or Passenger Seat Shoulder Belt Retractor Assembly Procedure
|
 Driver or Passenger Seat Removal and Installation
Driver or Passenger Seat Removal and Installation
Callout
Component Name
Warning: Refer to SIR Warning.
Preliminary Pr ...
 Driver or Passenger Seat Shoulder Belt Replacement (without A69)
Driver or Passenger Seat Shoulder Belt Replacement
Callout
Component Name
Warning: Refer to SIR Warning.
Warning: ...
Other materials:
Dome Lamp Bulb Replacement
Dome Lamp Bulb Replacement
Callout
Component Name
Preliminary Procedure
Remove the windshield header courtesy lamp. Refer to Windshield Header
Courtesy Lamp Replacement
1
Dome Lamp Bulb
...
Rear Side Door Window Regulator Motor Replacement
Rear Side Door Window Regulator Motor Replacement
Callout
Component Name
Warning: Refer to Glass and Sheet Metal Handling Warning.
Preliminary Procedure
Remove the rear side door window regulator. Refer to Rear ...
Intake Manifold Installation
Clean the sealing surfaces.
Install the intake manifold (1) along with a NEW intake manifold gasket.
Caution: Refer to Fastener Caution.
Install the 6 intake manifold bolts (1) and tighten to 20 Y (15 lb ft).
...

0.0062