
Chevrolet Sonic Repair Manual: Engine Front Cover with Oil Pump Replacement
- Removal Procedure
-
- Disconnect the battery negative cable. Refer to Battery Negative Cable Disconnection and Connection.
- Set the engine to TDC. Refer to Camshaft Timing Chain Inspection.
- Raise and support the vehicle. Refer to Lifting and Jacking the Vehicle.
- Remove the front wheelhouse liner extension, right side. Refer to Front Wheelhouse Liner Inner Front Extension Replacement.
- Remove the air conditioning compressor. Refer to Air Conditioning Compressor Replacement.
- Remove the air conditioning compressor bracket. Refer to Air Conditioning Compressor Bracket Removal.
- Remove the crankshaft balancer. Refer to Crankshaft Balancer Replacement.
- Remove the oil pan. Refer to Oil Pan Replacement.
- Lower vehicle.
- Remove the drive belt tensioner. Refer to Drive Belt Tensioner Replacement.
- Remove the generator from above. Refer to Generator Replacement.
- Remove the water pump pulley and the water pump. Refer to Water Pump Replacement.
- Remove the camshaft position actuator solenoid valves. Refer to Camshaft Position Actuator Solenoid Valve Removal.
- Loosen the camshaft sprocket bolts until the camshaft position exciter wheels are free to rotate. Refer to Camshaft Timing Chain Adjustment.
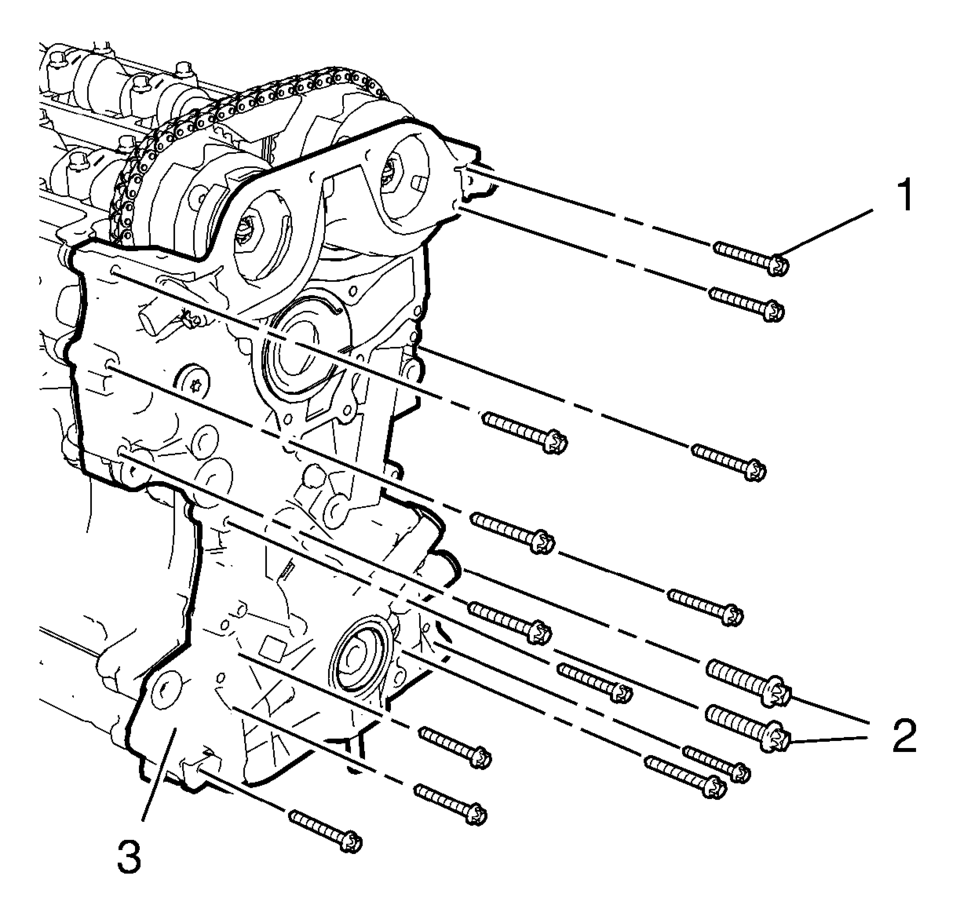
- Remove the 13 engine front cover bolts M6 (1).
- Remove the 2 engine front cover bolts M10 (2).
- Remove the engine front cover (3).
- Remove the camshaft timing chain. Refer to Camshaft Timing Chain Replacement.
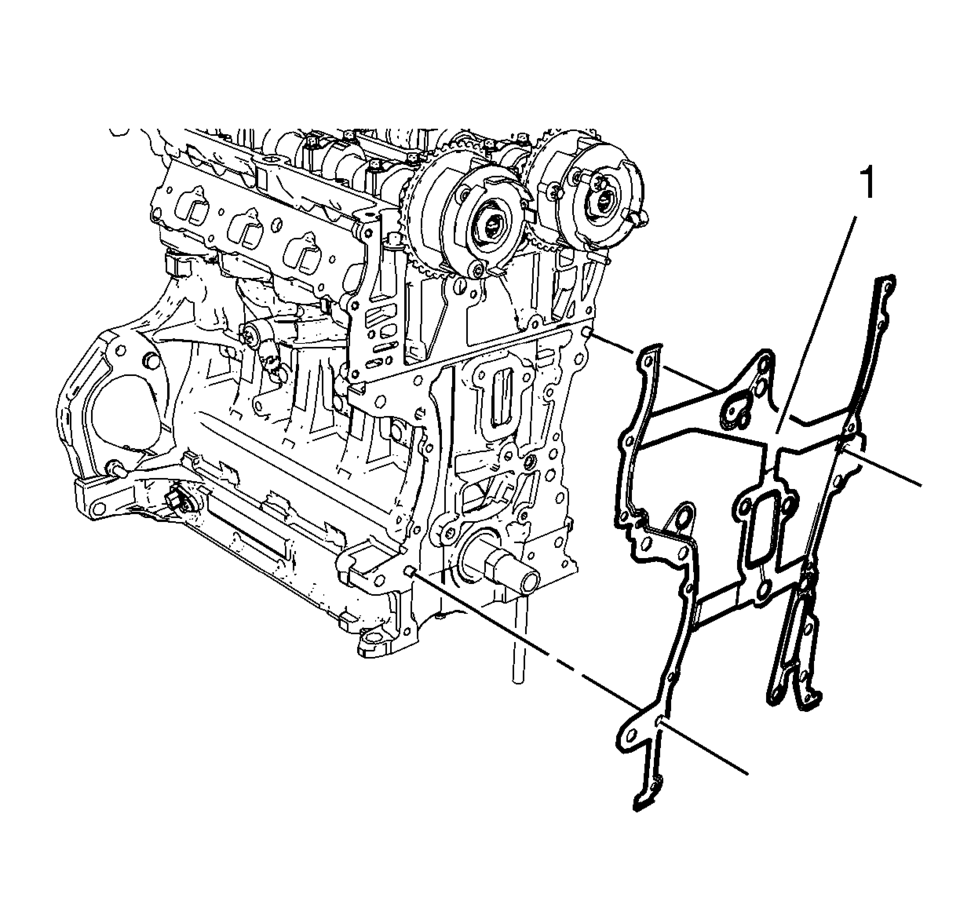
- Remove the engine front cover gasket (1).
- Remove the intake and exhaust camshaft position sensors from the engine front cover. Refer to Camshaft Position Sensor Replacement.
Note:
Removal of timing chain is necessary to get access to engine front cover gasket.
- Installation Procedure
-
- Install the intake and exhaust camshaft position sensors to the engine front cover. Refer to Camshaft Position Sensor Replacement.
- Clean the engine front cover sealing surfaces on engine block and cylinder head.
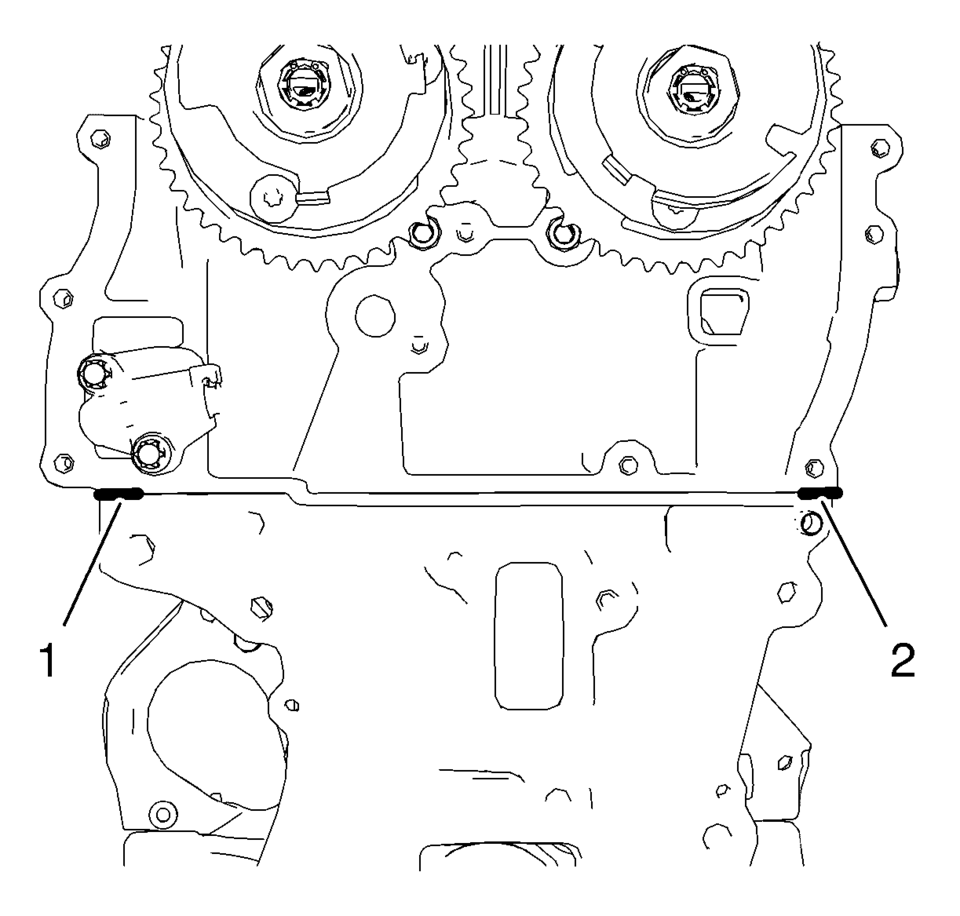
- Apply sealing compound to the shown areas (1) and (2). Refer to Adhesives, Fluids, Lubricants, and Sealers.
- Install a NEW engine front cover gasket (1).
- Install the timing chain. Refer to Camshaft Timing Chain Replacement.
- Install the engine front cover (3).
- Install the 13 engine front cover bolts M6 (1).
- Install the 2 engine front cover bolts M10 (2).
- Tighten the 13 engine front cover bolts M6 to 8 Y (71 lb in)
.
- Tighten the 2 engine front cover bolts M10 to 35 Y (26 lb ft)
.
- Tighten the camshaft sprockets, install the upper timing chain guide and remove all special tools. Refer to Camshaft Timing Chain Adjustment.
- Install the 2 camshaft position actuator solenoid valves. Refer to Camshaft Position Actuator Solenoid Valve Replacement.
- Install the water pump and the water pump pulley. Refer to Water Pump Replacement.
- Install the generator from above. Refer to Generator Replacement.
- Install the drive belt tensioner. Refer to Drive Belt Tensioner Replacement.
- Install the air conditioning compressor bracket. Refer to Air Conditioning Compressor Bracket Installation.
- Install the air conditioning compressor. Refer to Air Conditioning Compressor Replacement.
- Install the crankshaft balancer. Refer to Crankshaft Balancer Replacement.
- Install the drive belt. Refer to Drive Belt Replacement.
- Install the engine mount bracket. Refer to Engine Mount Bracket Replacement - Right Side.
- Install the engine mount. Refer to Engine Mount Replacement - Right Side.
- Install the camshaft cover. Refer to Camshaft Cover Replacement.
- Install the air cleaner assembly. Refer to Air Cleaner Assembly Replacement.
- Raise the vehicle.
- Install the oil pan. Refer to Oil Pan Replacement.
- Install the front wheelhouse liner extension, right side. Refer to Front Wheelhouse Liner Inner Front Extension Replacement.
- Lower the vehicle.
- Connect the battery negative cable. Refer to Battery Negative Cable Disconnection and Connection.
- Fill up engine oil. Refer to Engine Oil and Oil Filter Replacement.
Note:
The thickness of the sealing bead should be 2 mm (0.0787 in)
.
Note:
Mind the guide sleeves.
Note:
Mind the guide sleeves when installing the engine front cover. The complete installation procedure of the engine front cover should not take longer than 10 minutes.
Caution:
Refer to Fastener Caution.
Note:
Engine should be adjusted and fixed in TDC position.
 Engine Front Cover and Oil Pump Removal
Set engine to TDC. Refer to Camshaft Timing Chain Inspection.
Remove the 13 engine front cover bolts M6 (1).
Remove the 2 engine front cover bolts M10 (2).
...
 Oil Pump Cleaning and Inspection
Remove the external rotor with the internal rotor.
Visually inspect the components.
Install the external and the internal rotors.
Inspect the axial clearance of the rotors in respect to ...
Other materials:
Rear Side Door Window Weatherstrip Replacement (Hatchback)
Rear Side Door Window Weatherstrip Replacement
Callout
Component Name
Preliminary Procedure
Remove the rear side door window . Refer to Rear Side Door Window Replacement.
1
Rear Side Door Window ...
Outside Rearview Mirror Replacement (Manual)
Outside Rearview Mirror Replacement
Callout
Component Name
Preliminary Procedures
Remove the front side door upper front trim panel. Refer to Front
Side Door Upper Front Trim Panel Replacement.
Remove the outside rearview ...
Front Wheel Drive Shaft Seal Replacement - Torque Converter Housing Side
Front Wheel Drive Shaft Seal Replacement - Torque Converter Housing
Side
Callout
Component Name
1
Front Wheel Drive Shaft Oil Seal Assembly
Special Tools
DT-23129 Universal Seal Remover
DT-47790 Seal Insta ...

0.0064