
Chevrolet Sonic Repair Manual: Front Differential Carrier Cleaning and Inspection
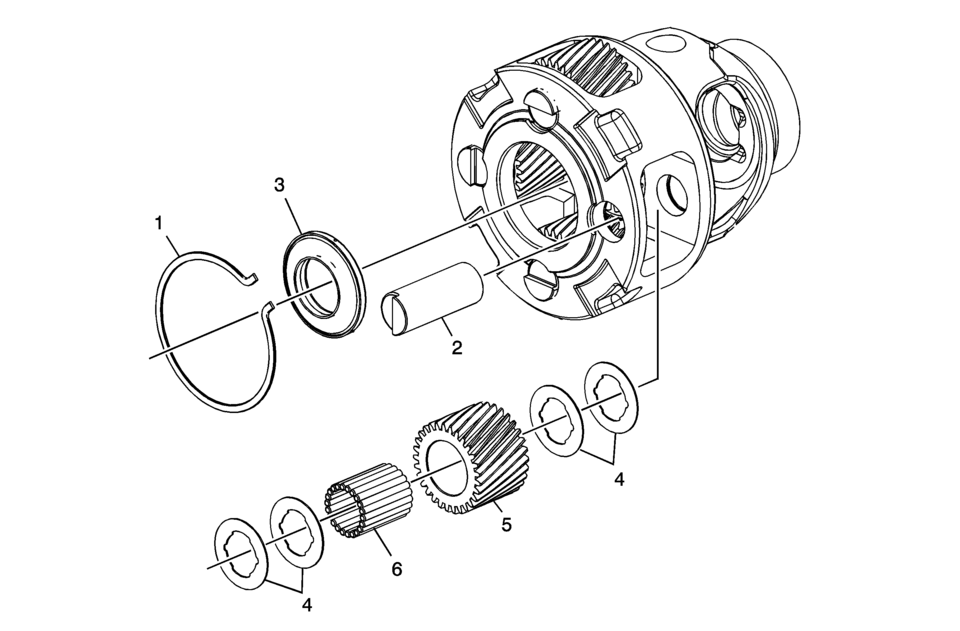
|
Callout |
Component Name |
|---|---|
|
Caution: After cleaning the transmission components, allow to air dry. Do not use cloth or paper towels in order to dry any transmission components. Lint from the towels can cause component failure. Caution: Do not reuse cleaning solvents. Previously used solvents may deposit sediment which may damage the component. Caution: Keep thrust washers with the gear it was matched to. The thrust washers are selective sizes and it is difficult to identify the proper washer thickness. Improper assembly can cause premature failure of the differential assembly.
|
|
|
1 |
Front Differential Pinion Gear Shaft Retainer |
|
2 |
Front Differential Pinion Gear Pin |
|
3 |
Sun Gear to Differential Housing Bearing Assembly |
|
4 |
Front Differential Pinion Gear Washer |
|
5 |
Front Differential Pinion Gear |
|
6 |
Front Differential Planetary Pinion Gear Bearing Roller |

 Front Differential Carrier Installation (6T30)
Front Differential Carrier Installation
Callout
Component Name
1
Final Drive Sun Gear
2
Diff ...
Other materials:
Hood Rear Weatherstrip Replacement
in
Hood Rear Weatherstrip Replacement
Callout
Component Name
1
Hood Rear Weatherstrip
Procedure
The hood rear weatherstrip is held in place with 10?€‰plastic retainers
that are part of the air inlet grille. ...
Rear Wheelhouse Panel Liner Extension Replacement
Rear Wheelhouse Panel Liner Extension Replacement
Callout
Component Name
Preliminary Procedure
Remove the tire and wheel assembly. Refer to Tire and Wheel Removal and
Installation.
1
Rear Wheelh ...
Brake Rotor Assembled Lateral Runout Measurement
Special Tools
CH-41013 Rotor Surfacing Kit
CH-42450-A Wheel Hub Resurfacing Kit
CH-45101 Hub and Wheel Runout Gauge
CH-45101-100 Conical Brake Rotor Washers
For equivalent regional tools, refer to Special Tools.
Warning: Refer to Brake Dust Warning.
Note:
B ...

0.0069