Chevrolet Sonic Repair Manual: Front Side Door Upper Hinge and Lower Hinge Replacement
|
Callout |
Component Name |
|---|---|
|
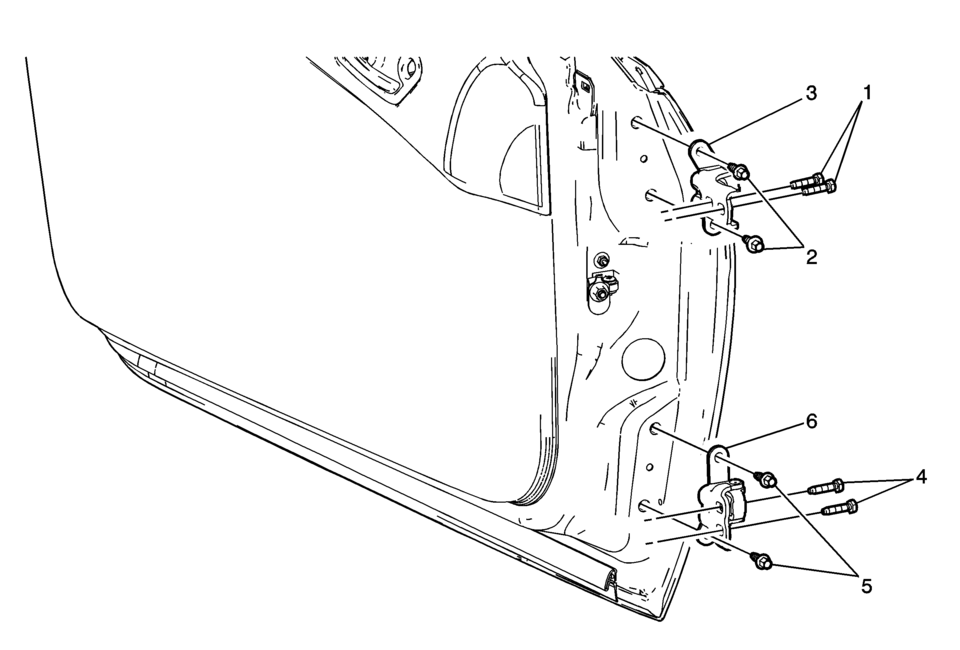
1 |
Front Side Door Upper Hinge to Body Bolt (Qty:?‚ā¨‚Äį2) Caution: Refer to Fastener Caution.
32?‚ā¨‚ÄįY (24?‚ā¨‚Äįlb?‚ā¨‚Äįft) |
|
2 |
Front Side Door Upper Hinge to Door Bolt (Qty:?‚ā¨‚Äį2) Tighten
25?‚ā¨‚ÄįY (18?‚ā¨‚Äįlb?‚ā¨‚Äįft) |
|
3 |
Front Side Door Upper Hinge |
|
4 |
Front Side Door Lower Hinge to Body Bolt (Qty:?‚ā¨‚Äį2) Tighten
32?‚ā¨‚ÄįY (24?‚ā¨‚Äįlb?‚ā¨‚Äįft) |
|
5 |
Front Side Door Lower Hinge to Door Bolt (Qty:?‚ā¨‚Äį2) Tighten
25?‚ā¨‚ÄįY (18?‚ā¨‚Äįlb?‚ā¨‚Äįft) |
|
6 |
Front Side Door Lower Hinge Procedure
If the door striker needs adjust. Refer to Front Side Door Lock Striker Adjustment. |
 Front Side Door Upper Front Trim Panel Replacement
Front Side Door Upper Front Trim Panel Replacement
Callout
Component Name
1
Front Side Door Upper Front Trim Panel Assem ...
 Front Side Door Weatherstrip Replacement - Body Side
Front Side Door Weatherstrip Replacement - Body Side
Callout
Component Name
Preliminary Procedures
Remove the upper center pillar t ...
Other materials:
Remote Vehicle Speed Limiting Description and Operation
Certain vehicles equipped with OnStar¬ģ now have an additional feature that allows
for remote limiting of the vehicle's speed. This OnStar¬ģ feature is called Stolen
Vehicle Slow-Down and is now part of the OnStar¬ģ Stolen Vehicle Assistance service.
This feature, when used in conjunction ...
Headlamp Housing Bracket Replacement
Headlamp Housing Bracket Replacement
Callout
Component Name
Preliminary Procedure
Remove the front bumper fascia. Refer to Front Bumper Fascia Replacement.
1
Headlamp Housing Bracket Screw (Qty:? ...
Vehicle information display warnings and indicators
Engine start operation indicator
In the Nissan Armada, this indicator is displayed when the gear selector is positioned
in P (Park), confirming that the vehicle is in a safe state for engine start.
This symbol informs the driver that the Nissan Armada engine can be started by
pressing the ...

0.0053