Chevrolet Sonic Repair Manual: Headlining Trim Panel Replacement (Hatchback without Sunroof)
|
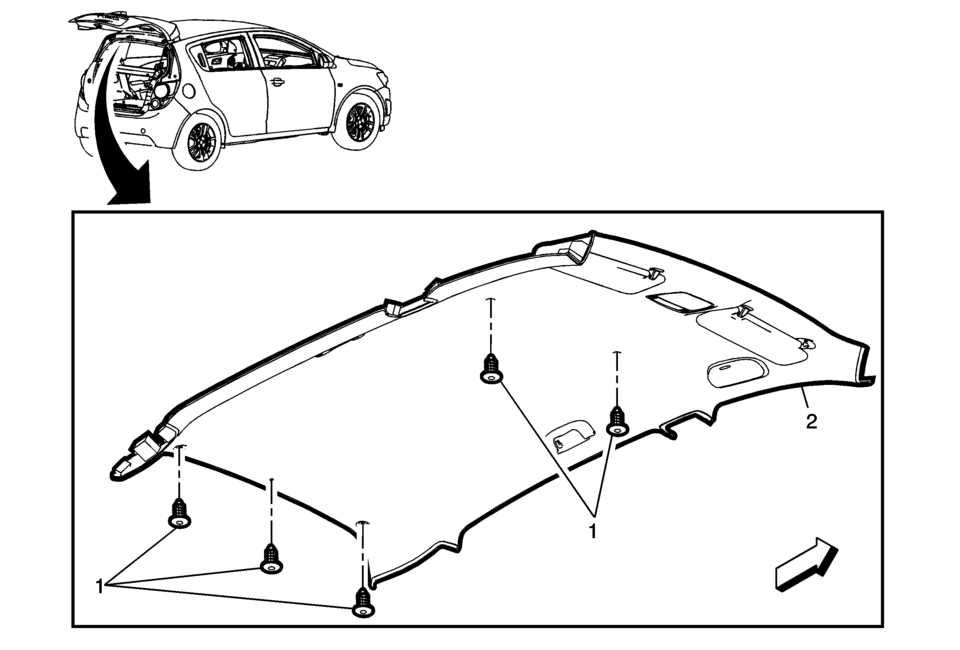
Callout |
Component Name |
|---|---|
|
Warning: Do not attempt to repair or alter the head impact energy-absorbing material glued to the headliner or to the garnish trims. If the material is damaged, replace the headliner and/or the garnish trim. Failure to do so could result in personal injury. Caution: If a vehicle is equipped with a head curtain inflator module ensure that the inflator module and tether are undamaged. If tether or curtain airbag are damaged in any way, they must be replaced. Caution: Use care when working around the head curtain inflator module. Sharp tools may puncture the curtain airbag. If the head curtain inflator module is damaged in any way, it must be replaced.
|
|
|
1 |
Headliner Trim Panel Retainer?€‰(Qty:?€‰5) |
|
2 |
Headliner Trim Panel Assembly Procedure
Disconnect the electrical connectors. Note: When installing a new headliner, tape any unused connector to the headliner with a high adhesive tape. |
 Headlining Trim Panel Replacement (Hatchback with Sunroof)
Headlining Trim Panel Replacement
Callout
Component Name
Warning: Do not attempt to repair or alter the head impact
energ ...
 Headlining Trim Panel Replacement (Sedan with Sunroof)
Headlining Trim Panel Replacement
Callout
Component Name
Warning: Do not attempt to repair or alter the head impact
energ ...
Other materials:
Rear Seat Belt Buckle Replacement
Rear Seat Belt Buckle Replacement
Callout
Component Name
Preliminary Procedure
Remove the rear seat cushion. Refer to Rear Seat Cushion Removal and
Installation.
1
Rear Seat Belt Buckle Fastener ...
Clutch and Differential Housing Assemble
Special Tools
R-0007761 Universal Handle for Pullers and Installers
R-0407009 Countershaft Front Bearing Driver
R-0407010 Input Shaft Needle Bearing Puller and Driver
R-0407014 Gearshift Device Bushing Driver ?E#8201;Use with R-0007761
S-9707500 Axle Shaft Seal Installer
Fo ...
Cylinder Head Cleaning and Inspection
Valve Cleaning and Inspection
Warning: Bodily injury may occur if the cleaning solvent is
inhaled or exposed to the skin.
Note: Do not scratch the valve stem with the wire brush.
Clean the valves of carbon, oil and varnish. Carbon can be remove ...

0.0047