Chevrolet Sonic Owner's Manual: License Plate Lamp
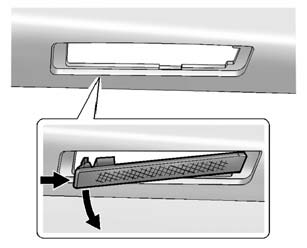
Lamp Assembly
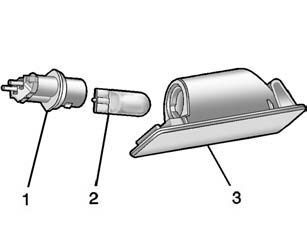
Bulb Assembly
1. Bulb Socket
2. Bulb
3. Lamp Assembly
To replace one of these bulbs:
1. Push the left end of the lamp assembly toward the right.
2. Turn the lamp assembly down to remove it.
3. Turn the bulb socket (1) counterclockwise to remove it from the lamp assembly (3).
4. Pull the bulb (2) straight out of the bulb socket (1).
5. Push the replacement bulb straight into the bulb socket and turn the bulb socket clockwise to install it into the lamp assembly.
6. Turn the lamp assembly into the lamp assembly opening engaging the clip side first.
7. Push on the lamp side opposite the clip until the lamp assembly snaps into place.
 Taillamps, Turn Signal, Stoplamps, and Back-Up Lamps
Sedan Taillamp Shown, Hatchback Taillamp Similar
1. Back-up Lamp
2. Turn Signal Lamp
3. Stop Lamp/Taillamp
4. Sidemarker Lamp
To replace one of these bulbs:
1. Open the trunk.
2. Remove the ...
 Replacement Bulbs
For replacement bulbs not listed here, contact your dealer. ...
Other materials:
Safety Function Override
If the battery on the vehicle has been recharged or disconnected, or is not working,
the windows will need to be reprogrammed for the express-up feature to work. Before
reprogramming, replace or recharge the vehicle's battery.
To program the driver window:
1. With the ignition in ACC/ ACCE ...
Control Valve Body Assembly Disassemble (Gen 1)
Control Valve Body Assembly Disassemble
Callout
Component Name
1
Control Solenoid Valve Support
2
Control Valve Body Bolt M5 x 40.5 (Qty: 1)
3
...
Automatic Transmission Flex Plate Removal
Special Tools
EN-652 Automatic Transmission Flex Plate Holder
For equivalent regional tools, refer to Special Tools.
Install the EN-652 holder (1) to hold the automatic
transmission flex plate (2).
Loosen the 6 automatic transmission flex plate bolts.
Re ...

0.0054