Chevrolet Sonic Repair Manual: Oil Pan Installation
Special Tools
EN-49980 Guidance Pins
For equivalent regional tools, refer to Special Tools.
- Clean the sealing surfaces from old sealing material, dirt, oil and grease.
- Apply sealing compound to the oil pan. Refer to Adhesives, Fluids, Lubricants, and Sealers.
- Apply sealing compound to the groove of the engine front cover (1). Refer to Adhesives, Fluids, Lubricants, and Sealers.
- Apply sealing compound around the screw bore (2) of the crankshaft bearing cap tie plate.
- Install the 2 EN-49980 pins (1) and (2) to the shown oil pan screw bores.
- Carefully install the oil pan. Guide the oil pan with EN-49980 pins (2) and the equivalent screw bores (1).
- Hold the oil pan with 4 oil pan bolts.
- Remove EN-49980 pins.
- Install the remaining 12 oil pan bolts and hand tighten.
- Lay a straight edge (1) against the oil pan and engine block. Using a rubber mallet, adjust the transition in area (2) until there is no clearance between oil pan and the straight edge.
- Tighten the 16 oil pan bolts to 10 Y (89 lb in)
.
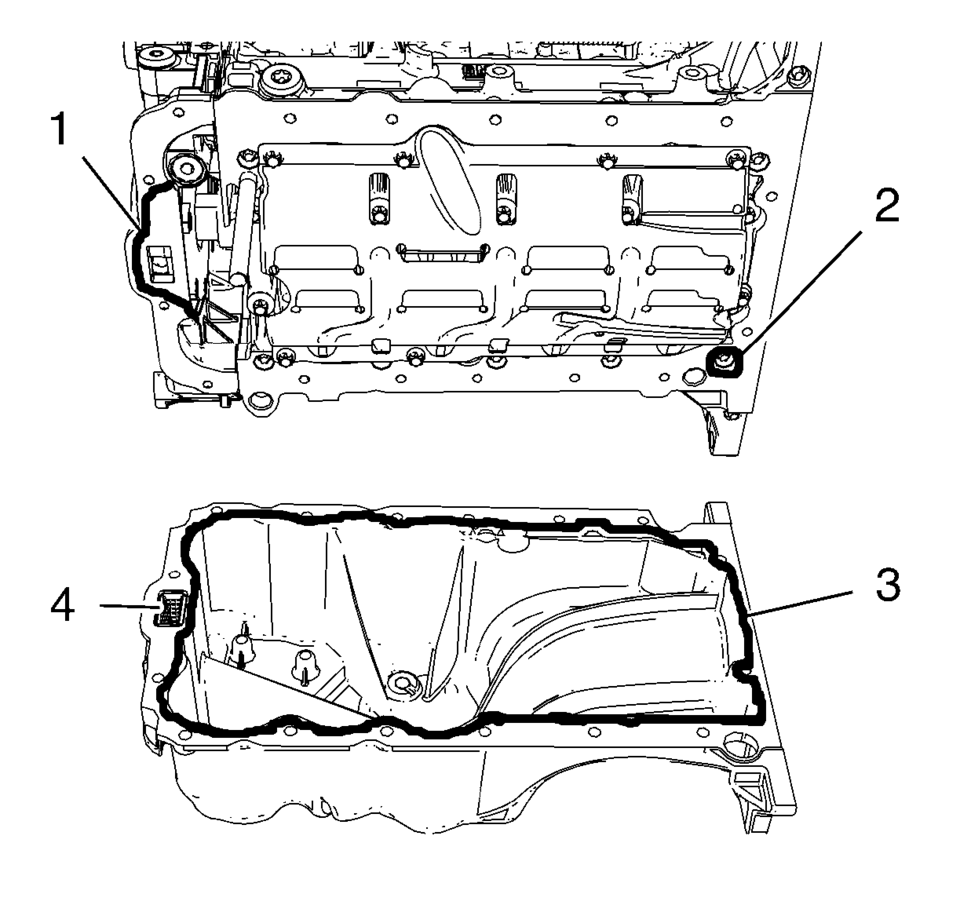
Note:
The sealing bead should be applied close to the inner edge of the oil pan. Take care that the oil suction gallery (4) will not get contaminated with sealing compound or dirt. The thickness of the sealing bead (3) should be 2 mm (0.0787 in).

Note:
The complete installation procedure of the oil pan should not take longer than 10 minutes.

Caution:
Use care when installing the oil pan to prevent disruption of the sealing bead. The sealing bead should remain consistent until the oil pan is mated with the engine. An inconsistent sealing bead can cause an insufficient seal and result in engine damage.

Caution:
Refer to Fastener Caution.
 Oil Pan Cleaning and Inspection
Warning: Wear safety glasses when using compressed air in order
to prevent eye injury.
Caution: To ensure proper engine lubrication, clean clogged or
contaminated oil ga ...
 Oil Pan Removal
Remove the 16 oil pan bolts (1).
Caution: Pry the oil pan carefully in order to prevent damage
to the transaxle case or the oil pan sealing surfaces.
Place a ...
Other materials:
Airbag Roof Side Rail Module Replacement - Rear
Airbag Roof Side Rail Module Replacement - Rear
Callout
Component Name
Warning: In order to prevent SIR deployment, personal injury,
or unnecessary SIR system repairs, do not strike the door or the door
pillar in the ...
Rear Wiper/Washer System Description and Operation
The rear window wiper motor is located inside the hatchback door and is directly
connected to the rear window wiper. Ignition voltage is supplied to the rear wiper
motor through the wiper switch. The hatchback rear window washer systems equipped
with a separate washer fluid pump, hose, and noz ...
Tire Pressure Monitor Operation
This vehicle may have a Tire Pressure Monitor System (TPMS). The TPMS is designed
to warn the driver when a low tire pressure condition exists. TPMS sensors are mounted
onto each tire and wheel assembly, excluding the spare tire and wheel assembly.
The TPMS sensors monitor the air pressure in ...

0.0066