Chevrolet Sonic Repair Manual: Overview (AM-FM Radio)
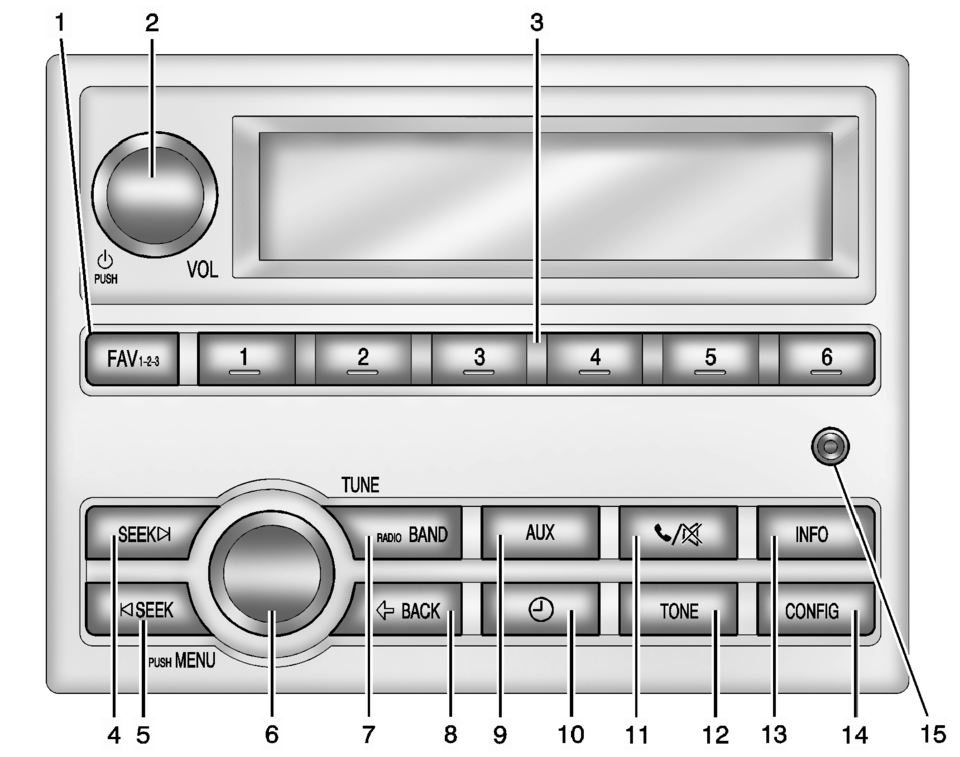
- FAV 1-2-3 (Favorites)
- Radio: Opens the favorites list.
- Turns the system on or off and adjusts the volume.
- Radio: Saves and selects favorite stations.
- Radio: Seeks the next station.
- CD: Selects the next track or fast forwards within a track.
- Radio: Seeks the previous station.
- CD: Selects the previous track or rewinds within a track.
- Radio: Manually selects radio stations.
- CD: Selects tracks.
- Changes the band while listening to the radio.
- Selects the radio when listening to a different audio source.
- Menu: Moves one level back.
- Character Input: Deletes the last character.
- Selects external audio source.
- Opens the Clock menu.
- Mutes the audio system.
- Opens the Tone menu.
- Radio: Shows available information about the current station.
- CD: Shows available information about the current track.
- Opens the Configuration menu.
- 3.5 mm (1/8 in) connection for external devices.
 Home Page (Radio with Touchscreen)
Touchscreen Buttons
Touchscreen buttons show on the screen when available. When a function is
unavailable, the button may gray out. When a function is selected, the button
may highlight ...
 Overview (Radio with CD/USB)
91011121314151617
O /VOL (Power/Volume)
Turns the system on or off and adjusts the volume.
Z (Eject)
Removes a disc from the CD slot.
Buttons 1−6
Radio: Saves a ...
Other materials:
Front Side Door Window Switch Bezel Replacement (Right Side)
Front Side Door Window Switch Bezel Replacement
Callout
Component Name
Preliminary Procedure
Remove the front side door trim. Refer to Front Side Door Trim Replacement.
1
Front Side Door Window S ...
Driver or Passenger Seat Head Restraint Replacement
Driver or Passenger Seat Head Restraint Replacement
Callout
Component Name
1
Driver or Passenger Seat Head Restraint
Procedure
Raise the headrest to the full upward position.
Depress the flush button on the he ...
Automatic air conditioner
Basic information
The automatic climate control system in the Nissan Armada is designed to provide
maximum comfort and convenience for both driver and passengers. You can operate
the system either through the dedicated front air conditioner control panel or directly
via the touchscreen climat ...

0.0076