Chevrolet Sonic Repair Manual: Strut and Shock Absorber Inspection
Note:
The strut assembly DOES NOT have to be removed from the vehicle to perform the following inspection procedure.
Note:
A light film of oil on the top portion of the strut is normal. DO NOT replace the strut for this condition.
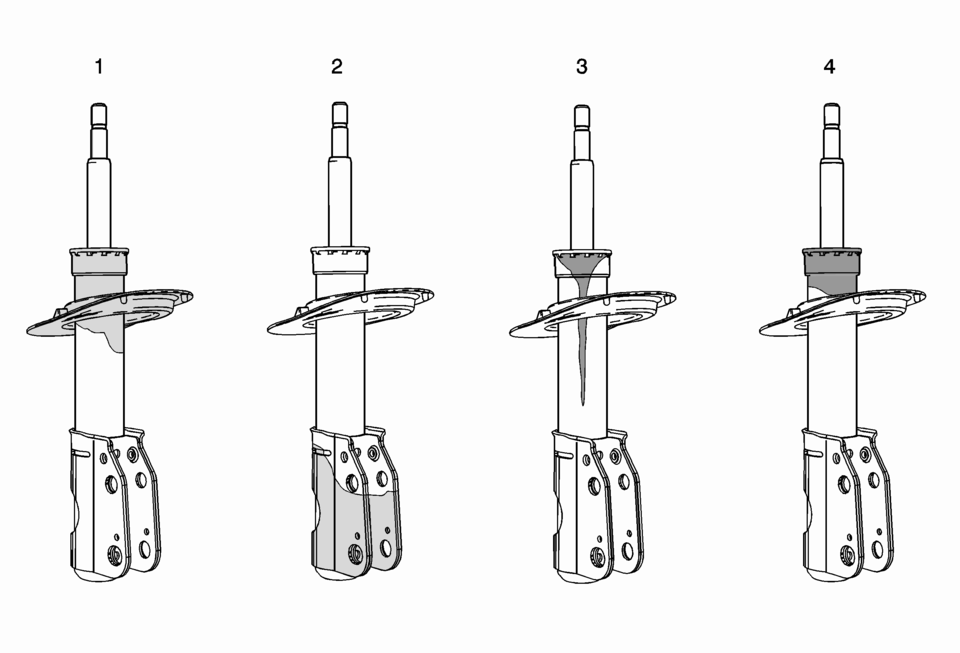
Condition 1
Oil or fluid residue only on the bottom of the strut tube or on other strut components and not originating from the shaft seal, is not a strut related problem. DO NOT replace the strut, look for other external leaks.
Condition 2
Light film/residue on the strut tube, but not on the spring seat and originating from the shaft seal, is a NORMAL condition. DO NOT replace the strut.
Condition 3
Oil drip or trail down the strut tube and originating from the shaft seal, is an ABNORMAL condition. Replace the strut.
Condition 4
Extreme wet film of oil covering the strut tube and pooling in the spring seat and originating from the shaft seal, is an ABNORMAL condition. Replace the strut.
Inspection- Verify the customer's concern is present. If the concern is present, continue to the next step. If the concern is not present, then the vehicle is operating normally.
- Raise and support the vehicle. Refer to Lifting and Jacking the Vehicle.
- Visually inspect each of the shock absorbers or struts for external fluid leaks. Refer to the following conditions 1, 2 , 3 , and 4 for visual inspection.
Note:
The strut assembly DOES NOT have to be removed from the vehicle to perform the following inspection procedure.
- If conditions 1 or 2 are found, continue to step 4.
- If conditions 3 or 4 are found, replace strut. Refer to Strut Replacement.
 Shock Absorber Replacement
Shock Absorber Replacement
Callout
Component Name
Preliminary Procedure
Raise and support the vehicle. Refer to Lifting and Jacking ...
 Strut and Shock Absorber Inspection (Shock Absorber)
Note: The shock absorber assembly DOES NOT have to be removed from
the vehicle to perform the following inspection procedure.
Note: A light film of oil on the top portion of the lower sho ...
Other materials:
Connecting and Controlling an iPod®
Not all iPods can be controlled by the infotainment system.
Connecting an iPod
Connect the iPod to the USB port.
Searching for a Track
Tracks can be searched for by:
Playlists
Artists
Albums
Song Titles
Podcasts
Genres
Audiobooks
Composers
To search for tracks:
1. Turn the ...
Front Wheel Drive Shaft Inner Joint and Boot Replacement
Special Tools
DT-35910 Drive Axle Boot Clamp Pliers
For equivalent regional tools, refer to Special Tools.
Disassemble Procedure
Note: There are types of inner joints available. If the inner
joint is connected with the CV style joint, the inner joint is not serviced
separa ...
Fuel Pressure Sensor Replacement - Fuel Feed Pipe
Fuel Pressure Sensor Replacement - Fuel Feed Pipe
Callout
Component Name
Preliminary Procedure
Relieve the fuel system pressure. Refer to
Fuel Pressure Relief.
Remove the air cleaner assembly. Refer to
Air Cleaner Asse ...

0.0103