Chevrolet Sonic Repair Manual: Transmission Fluid Pump Assemble (6T30)
| Table 1: | Fluid Pump w/Valve Trains Assemble |
| Table 2: | Torque Converter Fluid Seal and Fluid Filter Assembly Assemble |
- Fluid Pump w/Valve Trains Assemble
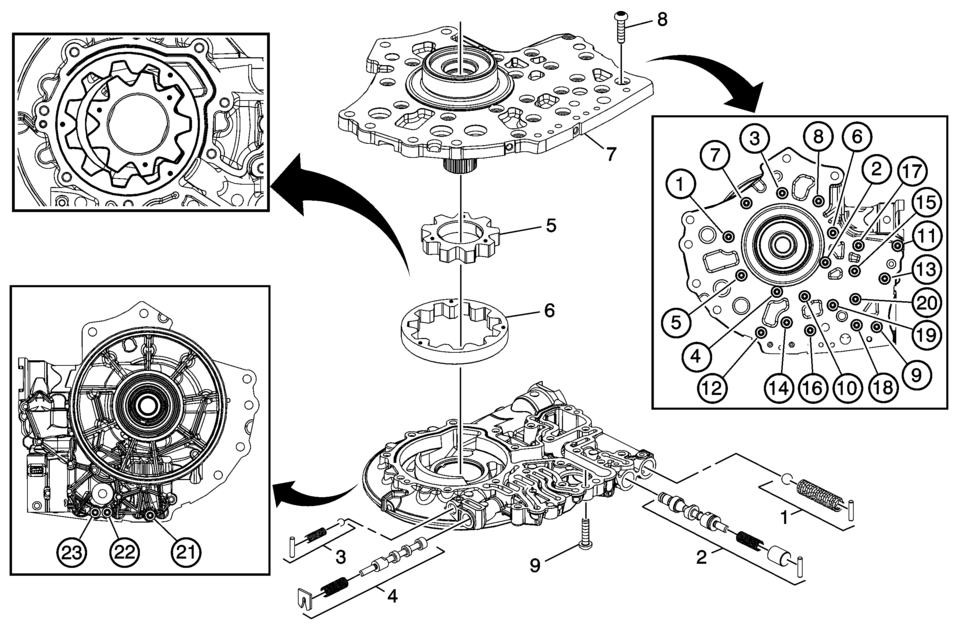
Fluid Pump w/Valve Trains Assemble Callout
Component Name
1
TCC Blow Off Ball Valve Train
2
Pressure Regulator Valve Train
3
Fluid Pump Blow Off Ball Valve Train
4
TCC Control Valve Train
5
Fluid Pump Drive Gear
Note:
The chamfer on the drive gear teeth face towards the pump body.
6
Fluid Pump Driven Gear
Note:
The chamfer on the driven gear O.D. faces the pump body.
7
Fluid Pump Cover
8
Fluid Pump Cover Bolts M6 x 21.5 (Qty: 20)
TightenCaution:
Refer to Fastener Caution.
12 Y (106 lb in)
9
Fluid Pump Cover Bolts M6 x 18.5 (Qty: 3)
Tighten
12 Y (106 lb in)
- Torque Converter Fluid Seal and Fluid Filter Assembly Assemble
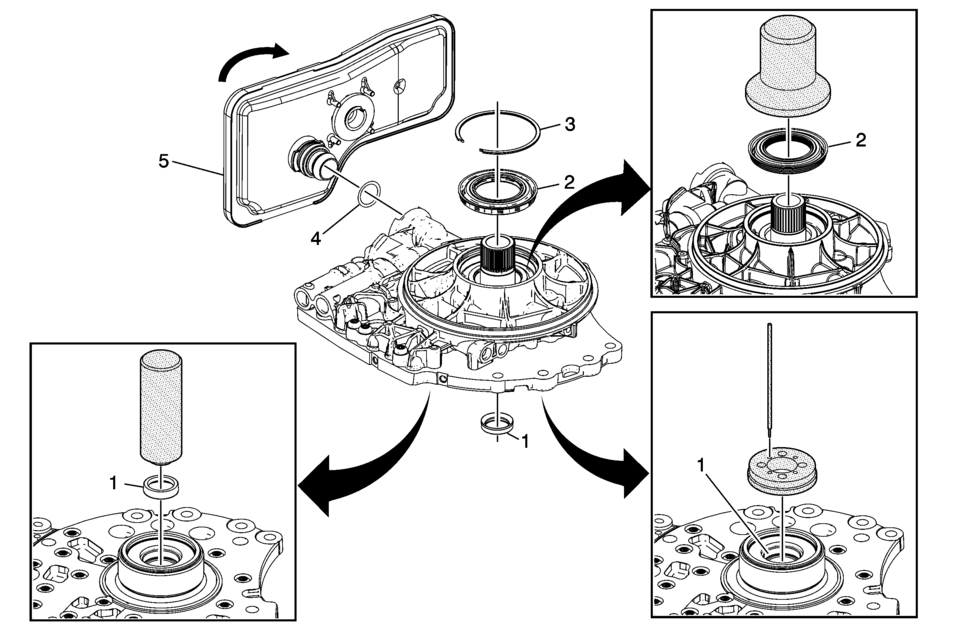
Torque Converter Fluid Seal and Fluid Filter Assembly Assemble Callout
Component Name
1
Torque Converter Fluid Seal Assembly
Special ToolNote:
The fluid seal assembly must be staked in place using DT-49131 seal staking tool to ensure proper seal retention.
- DT-48270 Seal Installer
- DT-49131 Seal Staking Tool
For equivalent regional tools, refer to Special Tools.
2
Torque Converter Fluid Seal
Special Tool
DT-47791 Seal Installer
For equivalent regional tools, refer to Special Tools.
3
Torque Converter Fluid Seal Retainer
4
A/Trans Fluid Filter Seal
5
Fluid Filter Assembly
Note:
Rotate filter 90 degrees to engage locking tangs.
 Transmission Fluid Level and Condition Check
Removal Procedure
Raise and support the vehicle. Refer to
Lifting and Jacking the Vehicle
Remove the front suspension skid plate, if equipped.
Refer to Drivetrain and Front Sus ...
 Transmission Fluid Pump Assemble (6T40/45/50)
Table 1:
Fluid Pump w/Valve Trains Assemble
Table 2:
Torque Converter Fluid Seal and Fluid Filter Assembly
Assemble
Fluid Pump w/Valve Trains Assemble
...
Other materials:
Parking
If the vehicle has a manual transmission, before getting out of the vehicle,
move the shift lever into R (Reverse) if parking on a downhill slope. On a level
surface or an uphill slope, use 1 (First) gear. Firmly apply the parking brake.
Turn the wheels toward the curb for a downhill slope, or ...
Front Side Door Window Replacement
Front Side Door Window Replacement
Callout
Component Name
Warning: Refer to Glass and Sheet Metal Handling Warning.
Preliminary Procedures
Remove the front side door trim panel. Refer to Front Side Door
Tr ...
Battery Positive Cable Replacement
Removal Procedure
Disconnect the negative battery cable. Refer to Battery Negative Cable
Disconnection and Connection.
Remove the underhood fuse block cover.
Remove the battery positive nut (1) and the battery positive cable (2),
from the underhood fus ...

0.0049