Chevrolet Sonic Repair Manual: Air Conditioning (AC) Refrigerant Filter Replacement
Special Tools
GE 39400-A Halogen Leak Detector
For equivalent regional tools, refer to Special Tools.
- Removal Procedure
-
- Recover the refrigerant. Refer to Refrigerant Recovery and Recharging.
- Remove the air conditioning condenser. Refer to Air Conditioning Condenser Replacement.
- Remove the air conditioning receiver and dehydrator plug (4).
- Remove and discard the sealing washers (3).
- Remove the refrigerant filter (2) from the condenser (1).
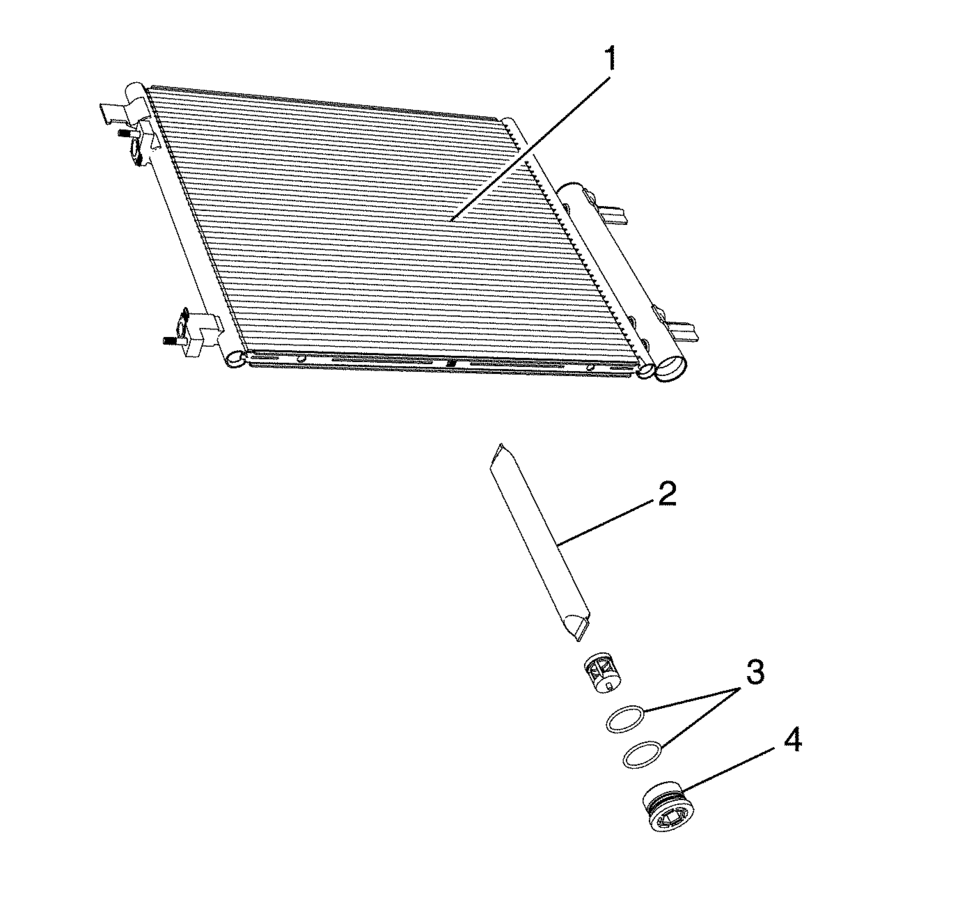
Note:
Cap all A/C components immediately to prevent system contamination.
- Installation Procedure
-
- Uncap A/C components.
- Install new sealing washers (3). Refer to Air Conditioning O-Ring Seal Replacement.
- Install the refrigerant filter (2) into the air conditioning condenser (1).
- Install the air conditioning receiver and dehydrator plug (4).
- Install the air conditioning condenser. Refer to Air Conditioning Condenser Replacement.
- Evacuate and charge the refrigerant system. Refer to Refrigerant Recovery and Recharging.
- Leak test the fittings using the GE 39400-A detector .
 Air Conditioning (A/C) Refrigerant Pressure Sensor Replacement (LUV)
Air Conditioning (A/C) Refrigerant Pressure Sensor Replacement
Callout
Component Name
1
Air Conditioning Refrigerant Pre ...
 Air Conditioning Clutch Assembly Replacement (LDE/LUW/LWE)
Air Conditioning Clutch Assembly Replacement
Callout
Component Name
Preliminary Procedure
Remove the air conditioning compresso ...
Other materials:
Driver or Passenger Seat Shoulder Belt Replacement (with A69)
Driver or Passenger Seat Shoulder Belt Replacement
Callout
Component Name
Warning: Refer to SIR Warning.
Warning: Refer to SIR Inflator Module Handling and Storage
Warning.
Warning: Refer to SIR ...
Spark Plug Replacement
Spark Plug Replacement
Callout
Component Name
Preliminary Procedure
Open the hood.
Remove the engine sight shield.
Remove the ignition coil. Refer to
Ignition Coil Replacement.
1
Spark P ...
Transmission Disassemble (Gen 1)
Special Tools
3-9506289 Universal Adapter
R-0007758 Holding Fixture
S-9407198 Differential Bearing Race Wrench
For equivalent regional tools, refer to Special Tools.
Attach R-0007758 holding fixture (2) to the transmission.
Attach R-0007758 holding fixture (2 ...

0.0057