Chevrolet Sonic Repair Manual: Air Conditioning O-Ring Seal Replacement
- Removal Procedure
-
- Disassemble the A/C refrigerant components. Refer to the appropriate repair procedure
- Cap or tape the A/C refrigerant components.
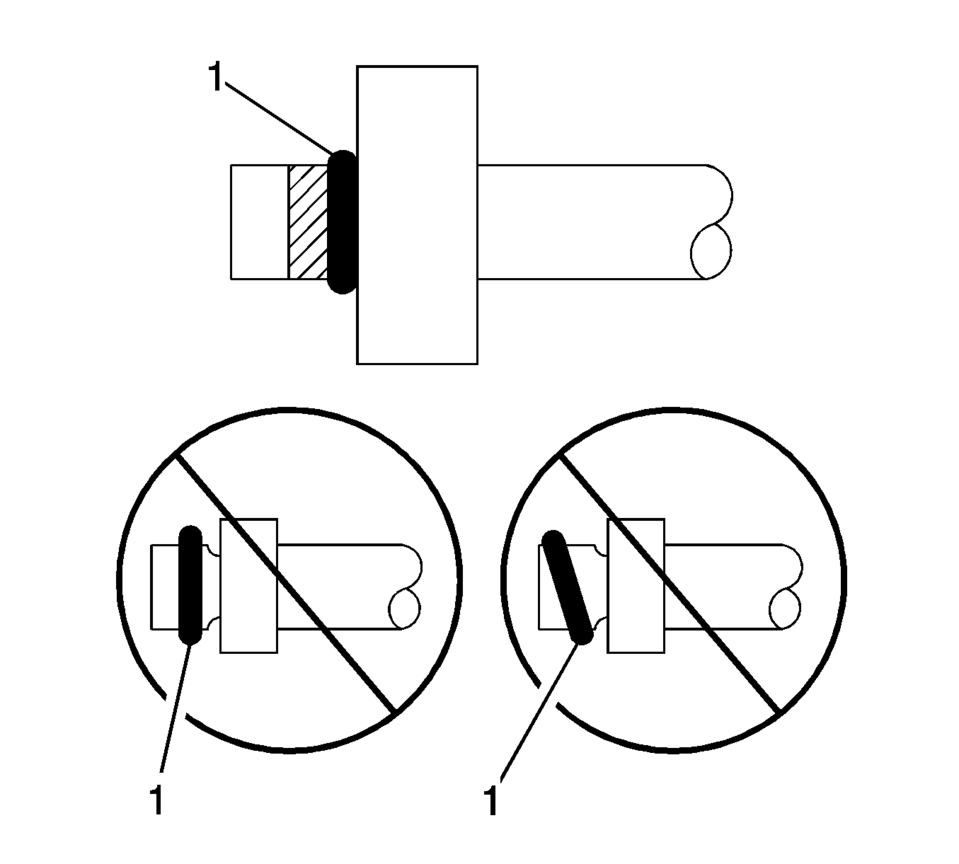
- Remove the O-ring seal (1) from the A/C refrigerant component.
- Inspect the O-ring seal for signs of damage to help determine the root cause of the failure.
- Inspect the A/C refrigerant components for damage or burrs. Repair if necessary.
- DISCARD the O-ring seal.
Note:
Cap or tape the open A/C refrigerant components immediately to prevent system contamination.

- Installation Procedure
-
- Inspect the new O-ring seal for any sign of cracks, cuts, or damage.
- Remove the cap or tape from the A/C refrigerant components.
- Using a lint-free clean, dry cloth, carefully clean the sealing surfaces of the A/C refrigerant components.
- Lightly coat the new O-ring seal with mineral base 525 viscosity refrigerant oil.
- Carefully slide the NEW O-ring seal (1) onto the A/C refrigerant component.
- The O-ring seal (1) must be fully seated.
- Assemble the A/C components.
Refer to the appropriate repair procedure.
Note:
DO NOT allow any of the mineral base 525 viscosity refrigerant oil on the new O-ring seal to enter the refrigerant system.
Note:
DO NOT reuse O-ring seals.
 Air Conditioning Clutch Assembly Replacement (LUV)
Air Conditioning Clutch Assembly Replacement
Callout
Component Name
Preliminary Procedure
Remove the air conditioning compresso ...
 Air Conditioning Refrigerant Service Valve Core Replacement
Special Tools
GE-39400-A Halogen Leak Detector
GE-46246 Valve Core Removal Tool
For equivalent regional tools, refer to Special Tools.
Removal Procedure
Recover the refrigerant ...
Other materials:
Additional Storage Features
Cargo Cover (Hatchback)
Warning
An unsecured cargo cover could strike people in a sudden stop or turn, or
in a crash. Store the cargo cover securely or remove it from the vehicle.
The cargo cover can be used to cover items in the rear of the vehicle.
To remove the cargo cover:
1. Remove both ...
Parking Brake Adjustment (Drum Brake)
Note: The park brake cable adjusting nut is a nylon lock type. Use
ONLY HAND TOOLS whenever tightening or loosening the adjusting nut.
Apply and fully release the park brake several times. Verify that the park
brake lever releases completely.
Turn ON the ignition. Verify the red B ...
Low and Reverse and 1-2-3-4 Clutch Housing Disassemble
Table 1:
Low and Reverse Clutch Piston Removal
Table 2:
1??? Clutch Piston Removal
Low and Reverse Clutch Piston Removal
Low and Reverse Clutch Piston Removal
Callout
Component Name
...

0.0048