Chevrolet Sonic Repair Manual: Low and Reverse and 1-2-3-4 Clutch Housing Assemble (6T40/45/50)
| Table 1: | 1??? Clutch Piston Installation |
| Table 2: | Low and Reverse Clutch Piston Installation |
- 1??? Clutch Piston Installation
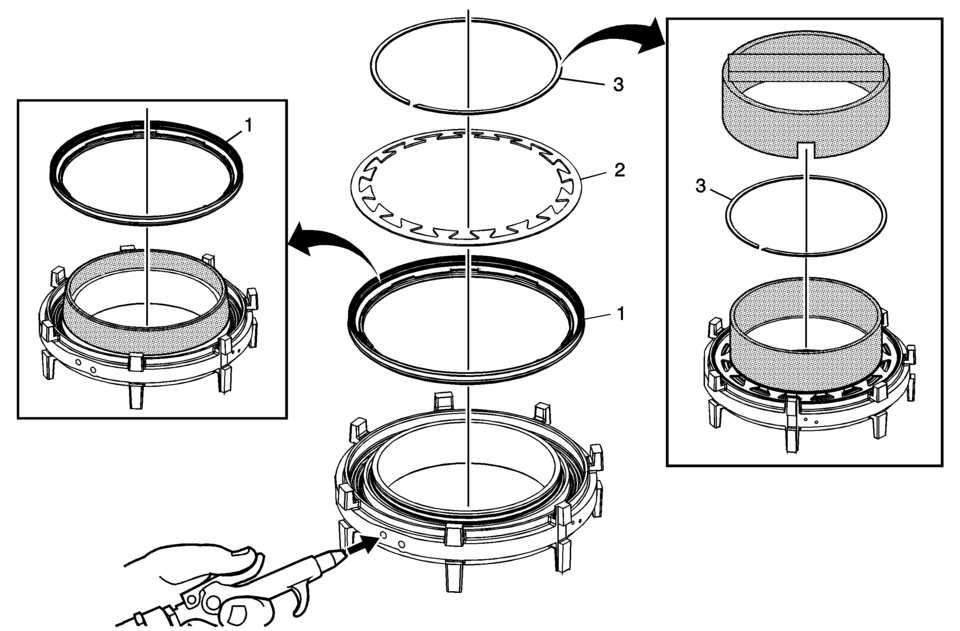
1??? Clutch Piston Installation Callout
Component Name
1
1??? Clutch Piston
Note:
DT-47798 seal protector prevents the piston seal lip from damage during installation. Apply a thin coat of ATF to the I.D. of DT-47798 seal protector to ease the installation of the piston.
Special Tool
DT-47798 Seal Protector
For equivalent regional tools, refer to Special Tools.
2
1??? Clutch Spring
3
1??? Clutch Spring Retainer
Caution:
Regulate the air pressure to 276 kPa (40 psi) maximum. High pressure could cause the piston to over travel and damage the piston seals.
Note:
- Place the retainer onto DT-47799-1 which is part of DT-47799 spring compressor. Compressing the spring using DT-47799-2 which is part of DT-47799 spring compressor, will install the retainer into the retainer groove.
- Apply shop air to the clutch fluid feed hole in the clutch housing to verify proper piston operation.
Special Tool
DT-47799 Clutch Piston Spring Compressor
For equivalent regional tools, refer to Special Tools.
- Low and Reverse Clutch Piston Installation
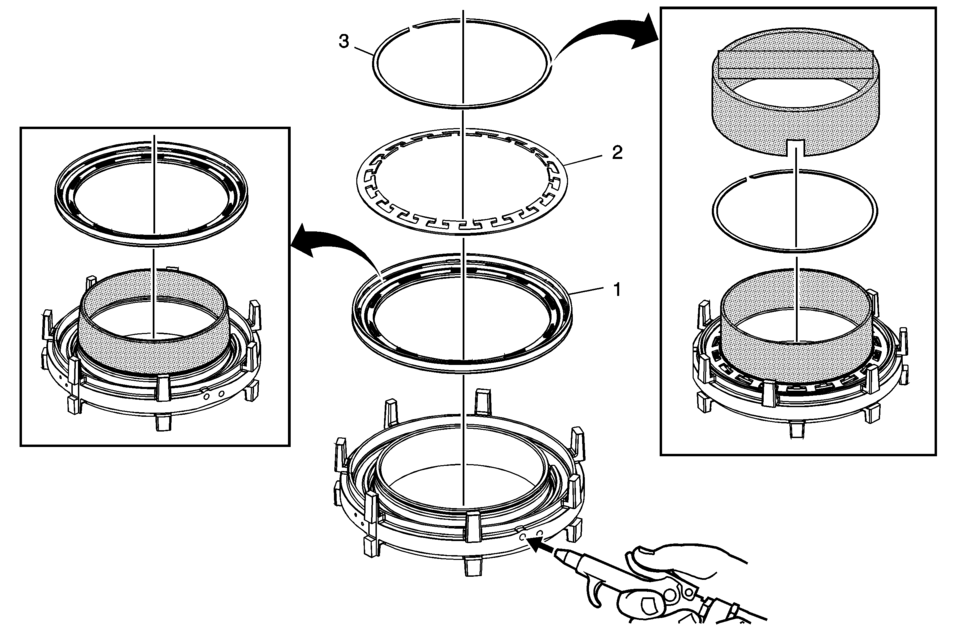
Low and Reverse Clutch Piston Installation Callout
Component Name
1
Low and Reverse Clutch Piston
Note:
DT-47807 seal protector prevents the piston seal lip from damage during installation. Apply a thin coat of ATF to the I.D. of DT-47807 seal protector to ease the installation of the piston.
Special Tool
DT-47807 Clutch Piston Seal Protector
For equivalent regional tools, refer to Special Tools.
2
Low and Reverse Clutch Spring
3
Low and Reverse Clutch Spring Retainer
Caution:
Regulate the air pressure to 276 kPa (40 psi) maximum. High pressure could cause the piston to over travel and damage the piston seals.
Note:
- Place the retainer onto DT-47794-1 which is part of DT-47794 spring compressor. Compressing the spring using DT-47794-2 which is part of DT-47794 spring compressor, will install the retainer into the retainer groove.
- Apply shop air to the clutch fluid feed hole in the clutch housing to verify proper piston operation.
Special Tool
DT-47794 Spring Compressor
For equivalent regional tools, refer to Special Tools.
 Low and Reverse and 1-2-3-4 Clutch Housing Assemble (6T30)
Table 1:
1??? Clutch Piston Installation
Table 2:
Low and Reverse Clutch Piston Installation
1??? Clutch Piston Installation
1??? Clutch Piston Installa ...
 Low and Reverse and 1-2-3-4 Clutch Housing Cleaning and Inspection
Low and Reverse and 1-2-3-4 Clutch Housing Cleaning and Inspection
Callout
Component Name
Caution: After cleaning the transmis ...
Other materials:
Rear Seat Head Restraint Replacement
Rear Seat Head Restraint Replacement
Callout
Component Name
1
Rear Seat Head Restraint
Preliminary Procedures
Depress the large button on the head restraint guide and raise the
head restraint to the full up p ...
Front Differential Carrier Installation (6T30)
Front Differential Carrier Installation
Callout
Component Name
1
Final Drive Sun Gear
2
Differential Carrier Assembly
...
Transmission Mount Bracket Replacement - Rear
Removal Procedure
Raise and support the vehicle. Refer to
Lifting and Jacking the Vehicle.
Remove the front suspension skid plate, if equipped.
Refer to Drivetrain and Front Suspension Frame Skid
Plate Replacement.
Using a suitable jack stand, support the rear of the ...

0.0065