Chevrolet Sonic Repair Manual: Oil Pump Replacement
- Removal Procedure
-
- Remove the engine front cover. Refer to Engine Front Cover with Oil Pump Replacement.
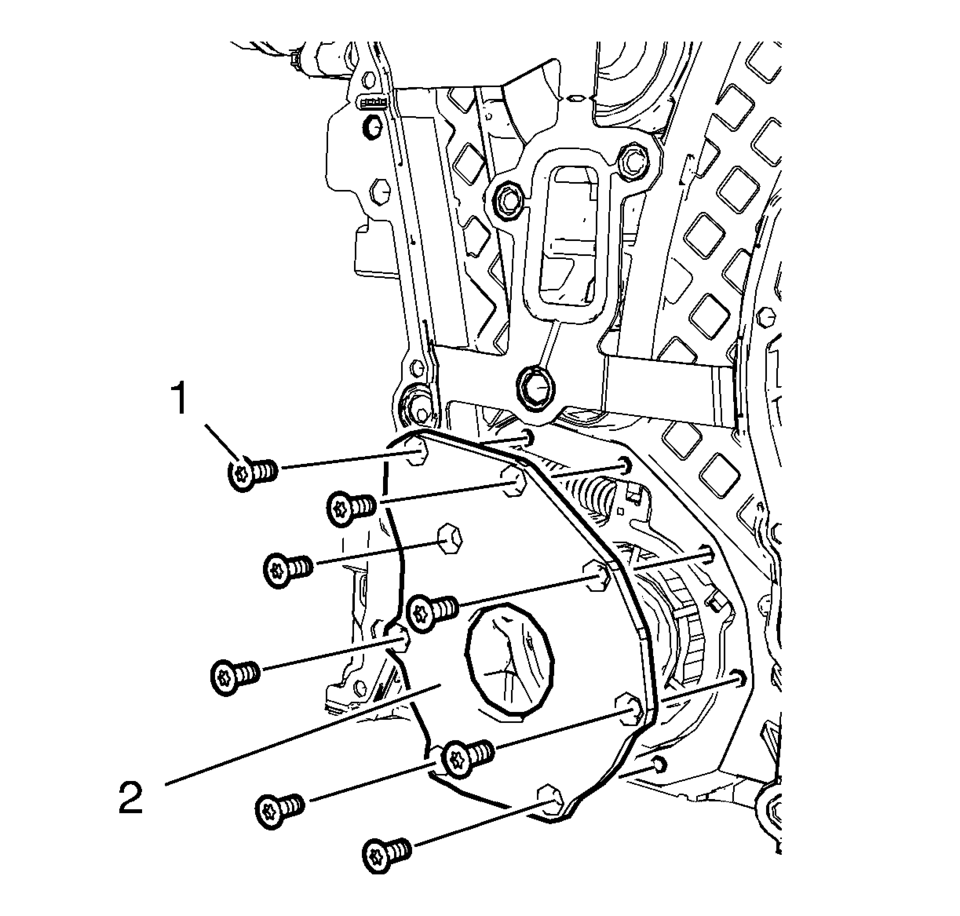
- Remove the 8 oil pump cover bolts (1).
- Remove the oil pump cover (2).
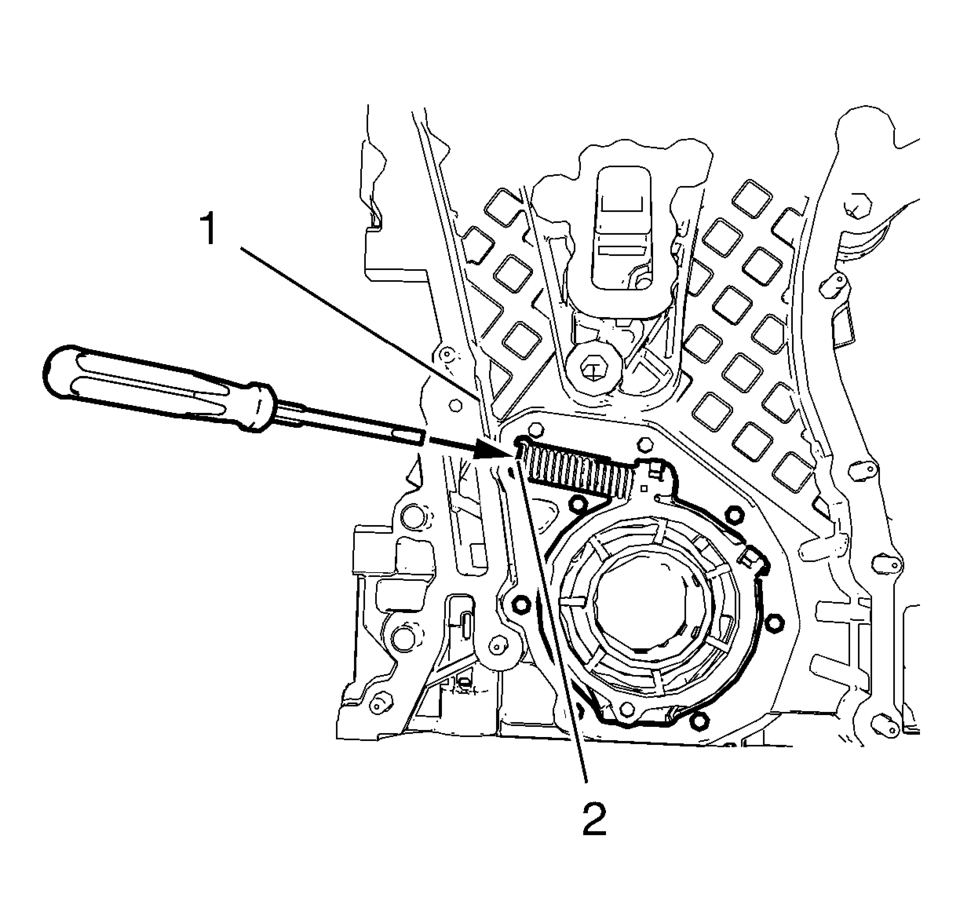
- Protect the engine front cover edge (1) with a suitable piece of plastic.
- Compress the oil pump slide spring with a screw driver and remove the oil pump slide spring in conjunction with the oil pump slide spring pin.
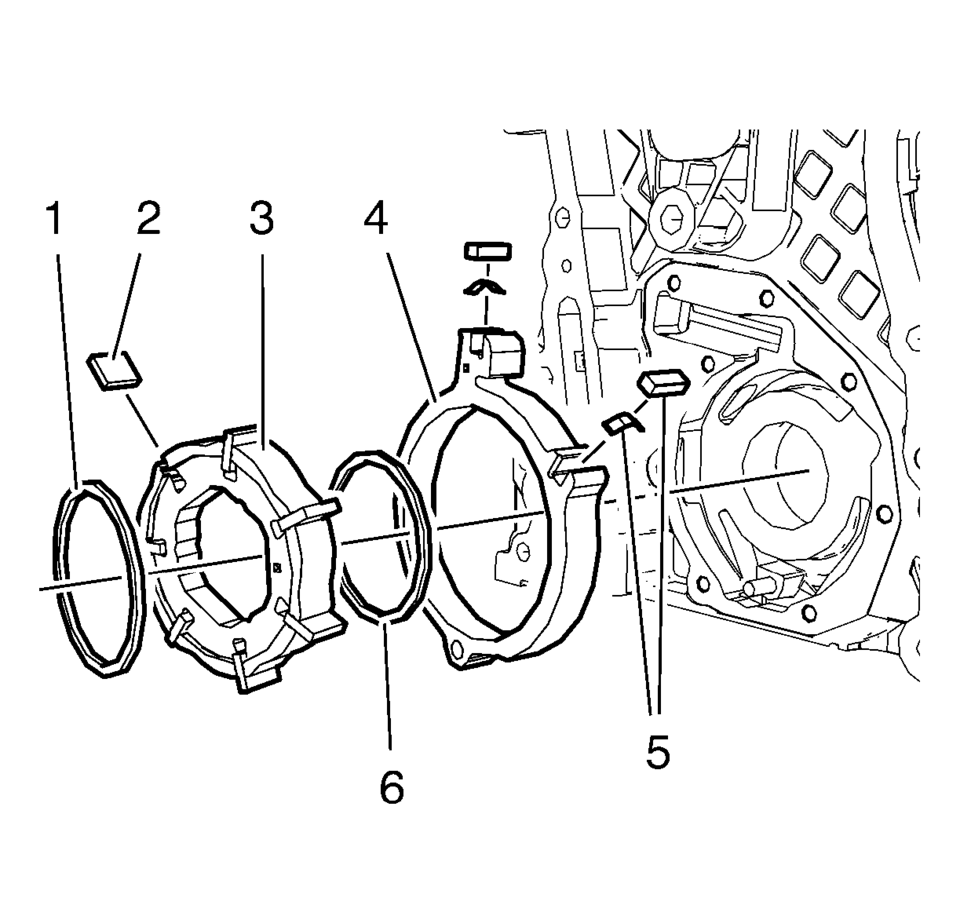
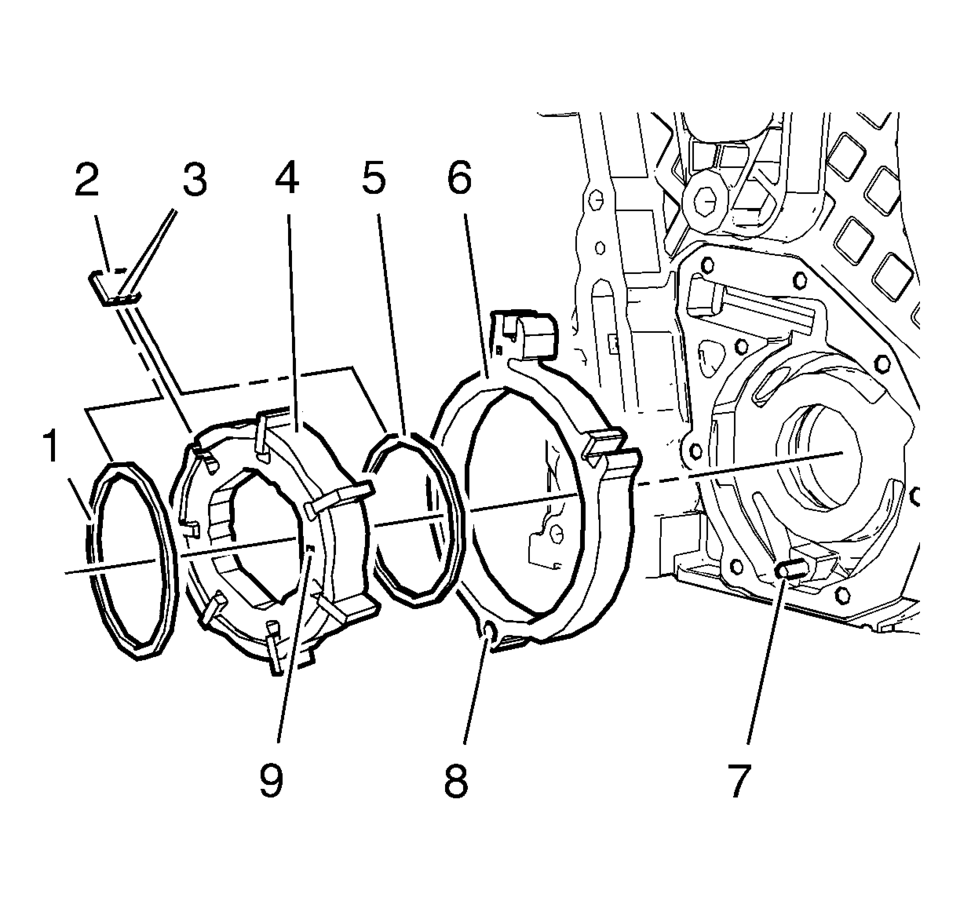
- Remove the oil pump components in the following order:
- Outer oil pump vane ring (1).
- Oil pump vane rotor (3) and the 7 oil pump vanes (2).
- Inner oil pump vane ring (6).
- Oil pump slide (4) and the 2 oil pump slide seals with the 2 oil pump slide seal springs (5).
Warning:
Before removing the spring, cover the spring with a towel to prevent the spring from flying and possibly causing damage or personal injury.
Note:
Insert the screw driver between the oil pump slide spring windings (2).
Note:
Keep the oil pump components in order to aid in installation.
- Cleaning And Inspection Procedure
-
- Inspect the engine front cover for cracks, scratches and damage.
- Inspect the oil pump cover and the engine front cover for flatness.
- Inspect the oil pump vanes, the oil pump vane rotor, the oil pump vane rings and the oil pump slide for localized flatting.
- Inspect the oil pump slide pivot pin for firm seat.
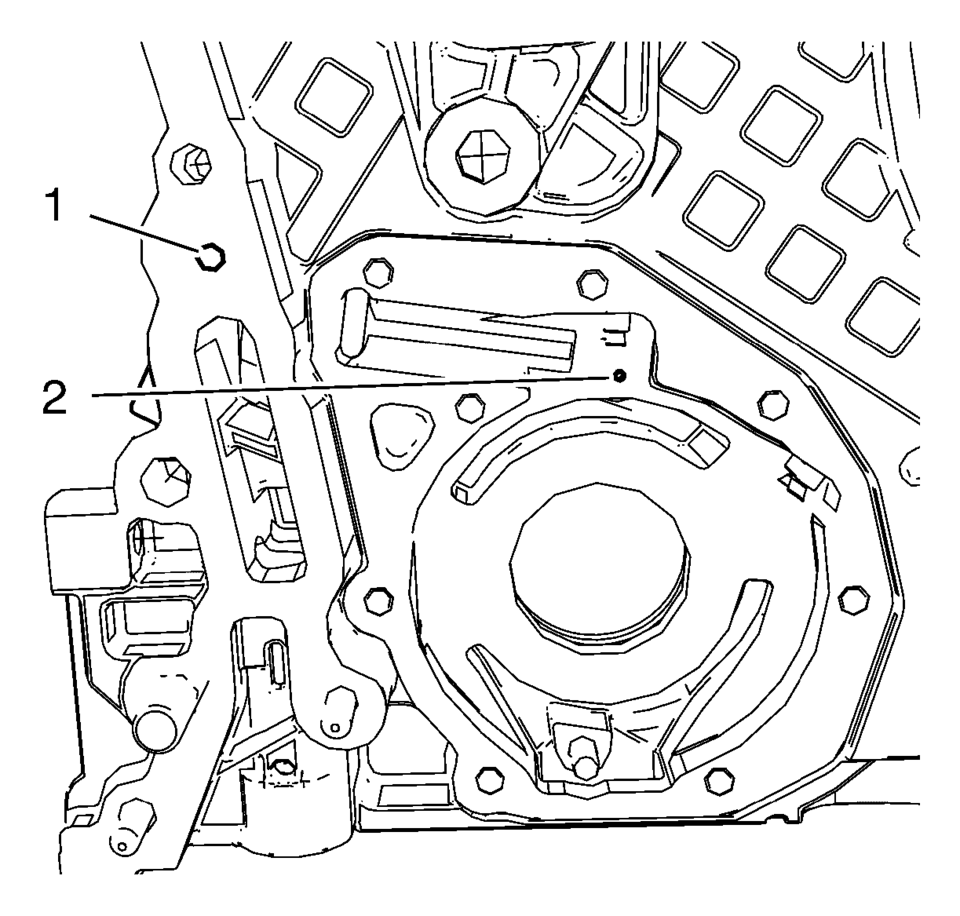
- Clean the oil galleries with solvent and compressed air. Blow compressed air from bore (2) to bore (1).
Warning:
Wear safety glasses when using compressed air in order to prevent eye injury.
Caution:
To ensure proper engine lubrication, clean clogged or contaminated oil galleries in an approved solvent and with compressed air. Failure to clean oil galleries may cause engine damage.
- Installation Procedure
-
- Install the oil pump components in the following order:
- Install the oil pump slide (6).
- Install the inner oil pump vane ring (5).
- Install the oil pump vane rotor (4).
- Install the 7 oil pump vanes (2).
- Install the outer oil pump vane ring (1).
- Install the 2 oil pump slide seals and the 2 oil pump slide seal springs (2) in the position as shown to the 2 grooves (1) of the oil pump slide.
- Protect the engine front cover edge (5) with a suitable piece of plastic.
- Install the oil pump slide spring pin (1) in conjunction with the oil pump slide spring (4). Use a screwdriver to compress the oil pump slide spring. The flat side of oil pump slide spring pin must face upwards.
- Lubricate the oil pump vanes, the oil pump vane rotor, the oil pump slide spring and the chambers (3) with engine oil.
- Inspect the oil pump slide spring mechanism for proper function.
- Measure the oil pump axial and radial clearances and compare with the specified values. Refer to Engine Front Cover and Oil Pump Cleaning and Inspection.
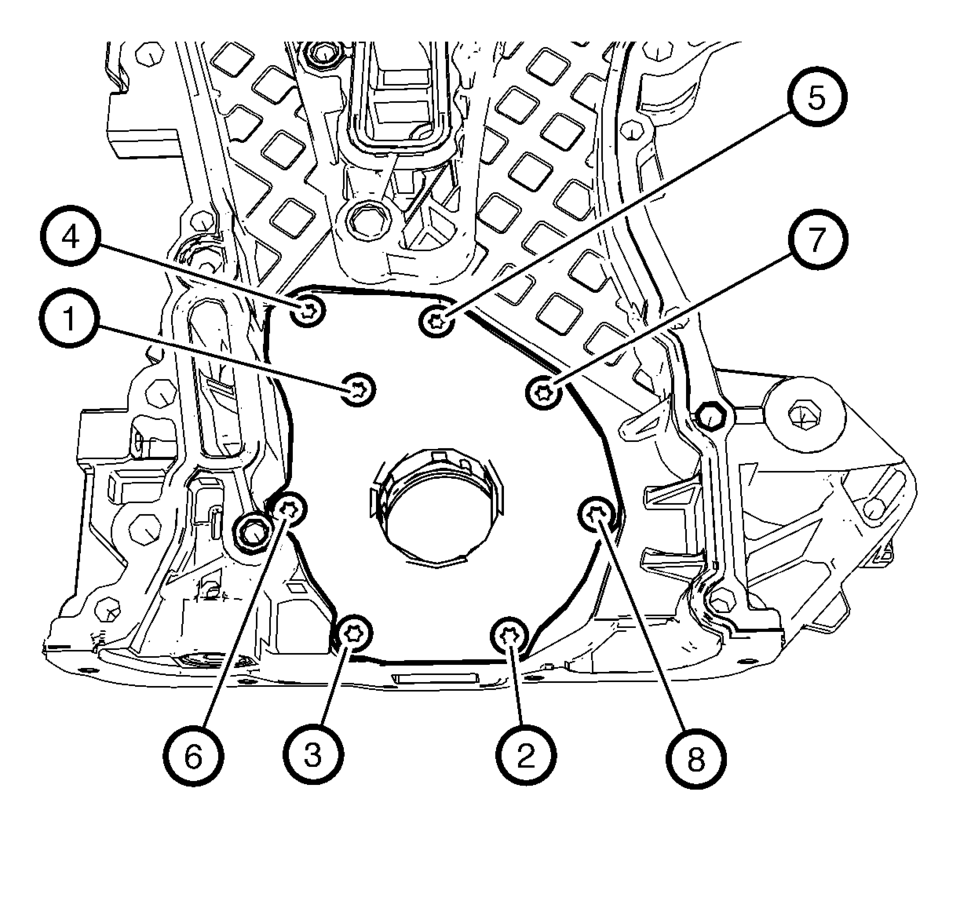
- Install the oil pump cover (2) and the 8 oil pump cover bolts (1).
- Tighten the oil pump cover bolts in a sequence as shown to 8 Y (71 lb in)
.
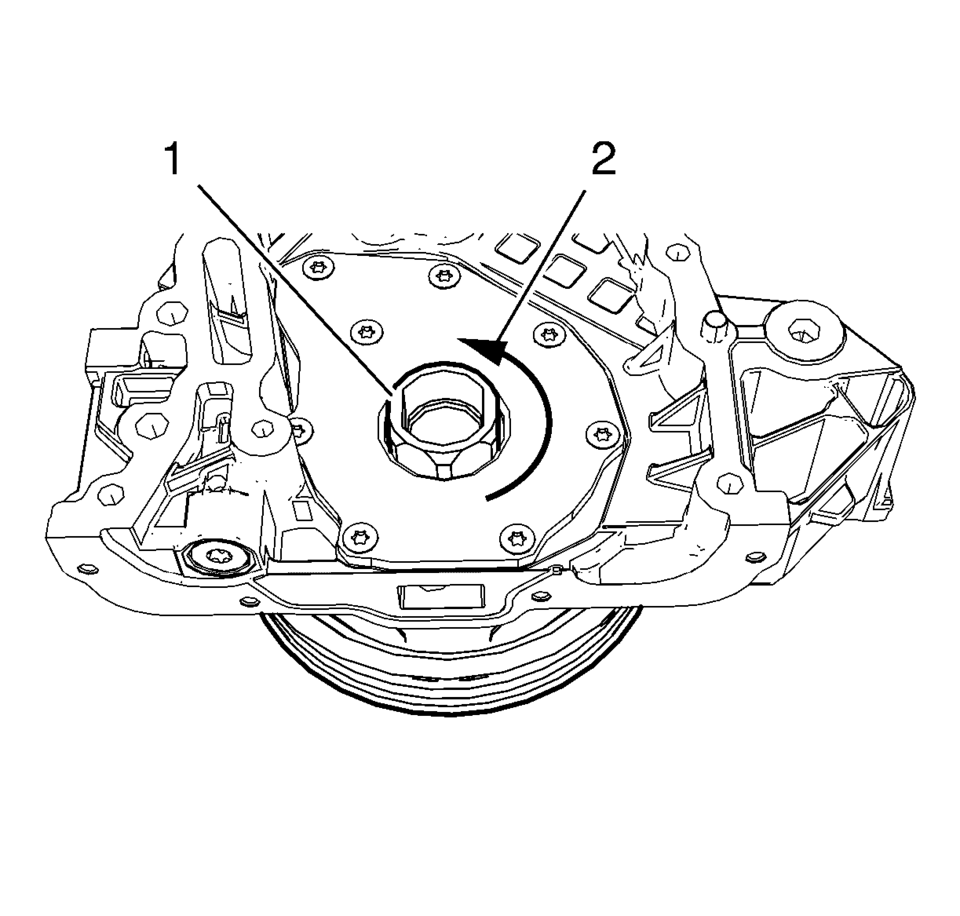
- Install the crankshaft balancer (1) and rotate in shown direction (2) in order to inspect the function of the oil pump mechanism. Crankshaft balancer should rotate easily.
- Remove the timing chain and replace the engine front cover gasket. Refer to Camshaft Timing Chain Replacement.
- Install the timing chain. Refer to Camshaft Timing Chain Replacement.
- Install the engine front cover. Refer to Engine Front Cover with Oil Pump Replacement.
- Measure the oil pressure and compare with the specified values. Refer to Oil Pressure Diagnosis and Testing.
Note:
Oil pump slide spring pin, oil pump slide spring and slide seal and slide seal spring can be ordered as single parts. All other oil pump components can only be ordered as a replacement kit.
Note:
The bore (8) in the oil pump slide must fit smooth-running and without clearance to the oil pump slide pivot pin (7).
Note:
Ensure the mark (9) of the oil pump vane rotor (4) points to the oil pump cover.
Note:
Ensure the flats (3) on the oil pump vanes (2) point to the oil pump vane rotor.
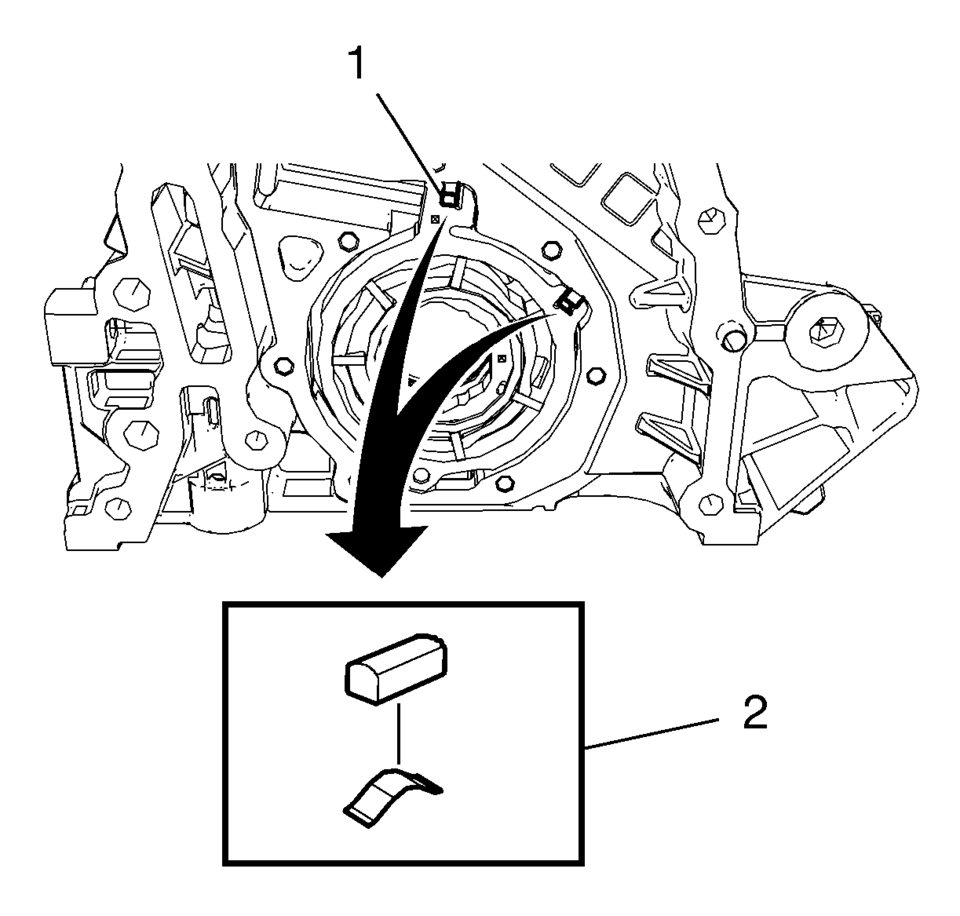

Note:
The length of the removed oil pump slide spring (2) should be 76.5 mm (3.0118 in)
for naturally aspirated engines and 61 mm (2.4016 in)
for turbo engines.
Caution:
Refer to Fastener Caution
 Oil Pump Cleaning and Inspection
Remove the external rotor with the internal rotor.
Visually inspect the components.
Install the external and the internal rotors.
Inspect the axial clearance of the rotors in respect to ...

Other materials:
Radio/Audio System Description and Operation
The entertainment system on this vehicle may have several different configurations
available to it. To determine the specific configuration of the vehicle, please
see the Service Parts ID Label, and refer to RPO Code List.
Each item in the list below represents topics covered in detail below. ...
Battery Positive Cable Replacement
Removal Procedure
Disconnect the negative battery cable. Refer to Battery Negative Cable
Disconnection and Connection.
Remove the underhood fuse block cover.
Remove the battery positive nut (1) and the battery positive cable (2),
from the underhood fus ...
Crankshaft Balancer Removal
Special Tools
EN-652 Flywheel Holder
For equivalent regional tools, refer to Special Tools.
Install the EN-652 holder (1). Lock the flywheel (2) or the automatic
transmission flex plate via the starter ring gear.
Remove and DISCARD the crankshaft balancer bo ...

0.0068