Chevrolet Sonic Repair Manual: Overview (AM-FM Radio)
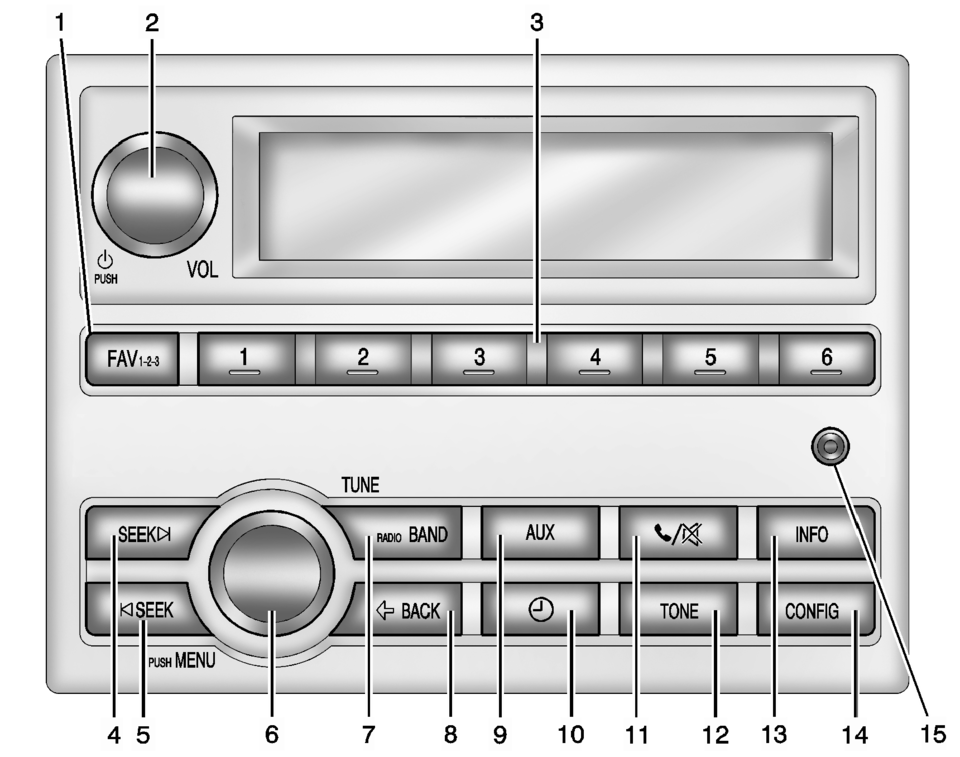
- FAV 1-2-3 (Favorites)
- Radio: Opens the favorites list.
- Turns the system on or off and adjusts the volume.
- Radio: Saves and selects favorite stations.
- Radio: Seeks the next station.
- CD: Selects the next track or fast forwards within a track.
- Radio: Seeks the previous station.
- CD: Selects the previous track or rewinds within a track.
- Radio: Manually selects radio stations.
- CD: Selects tracks.
- Changes the band while listening to the radio.
- Selects the radio when listening to a different audio source.
- Menu: Moves one level back.
- Character Input: Deletes the last character.
- Selects external audio source.
- Opens the Clock menu.
- Mutes the audio system.
- Opens the Tone menu.
- Radio: Shows available information about the current station.
- CD: Shows available information about the current track.
- Opens the Configuration menu.
- 3.5 mm (1/8 in) connection for external devices.
 Home Page (Radio with Touchscreen)
Touchscreen Buttons
Touchscreen buttons show on the screen when available. When a function is
unavailable, the button may gray out. When a function is selected, the button
may highlight ...
 Overview (Radio with CD/USB)
91011121314151617
O /VOL (Power/Volume)
Turns the system on or off and adjusts the volume.
Z (Eject)
Removes a disc from the CD slot.
Buttons 1−6
Radio: Saves a ...
Other materials:
Automatic Transmission Fluid
How to Check Automatic Transmission Fluid
It is not necessary to check the transmission fluid level. A transmission fluid
leak is the only reason for fluid loss. If a leak occurs, take the vehicle to your
dealer and have it repaired as soon as possible.
There is a special procedure for checkin ...
Transmission Rear Mount Replacement
Removal Procedure
Raise and support the vehicle. Refer to
Lifting and Jacking the Vehicle.
Remove and DISCARD the rear transmission mount bracket
to rear mount through bolt (1).
Remove rear transmission mount to frame bolt (3).
Push and hold ...
Cleaning exterior
Basic information
Maintaining the exterior of your Nissan Armada is essential not only for preserving
its visual appeal but also for protecting the paintwork and body components over
time.
To keep the Nissan Armada in optimal condition, wash the vehicle promptly under
the following circumsta ...

0.0064