Chevrolet Sonic Repair Manual: Trim Height Inspection
- Trim Height Measurement
-
Trim height is a predetermined measurement relating to vehicle ride height. Incorrect trim heights can cause the vehicle to bottom out over bumps, damage to the suspension components and symptoms similar to wheel alignment problems. Check the trim heights when diagnosing suspension concerns and before checking the wheel alignment.
Perform the following before measuring the trim heights:
- Check the fuel level. Add additional weight if necessary to simulate a full tank.
- Make sure the passenger and rear compartments are empty, except for the spare tire.
- Make sure the vehicle is on a flat and level surface, such as an alignment rack.
- Check that all the vehicle doors are securely closed.
- Check that the vehicle hood and rear deck lids are securely closed.
- Check for installed after market accessories or modifications that could affect trim height measurement:
- Larger or Smaller than production wheels and tires
- Lifting or Lowering Kits
- Wheel Opening Flares or Ground Affects
Note:
One U.S. gallon of gasoline weighs approximately 6.5 lbs
. One liter of gasoline weighs approximately 0.7 kg
.
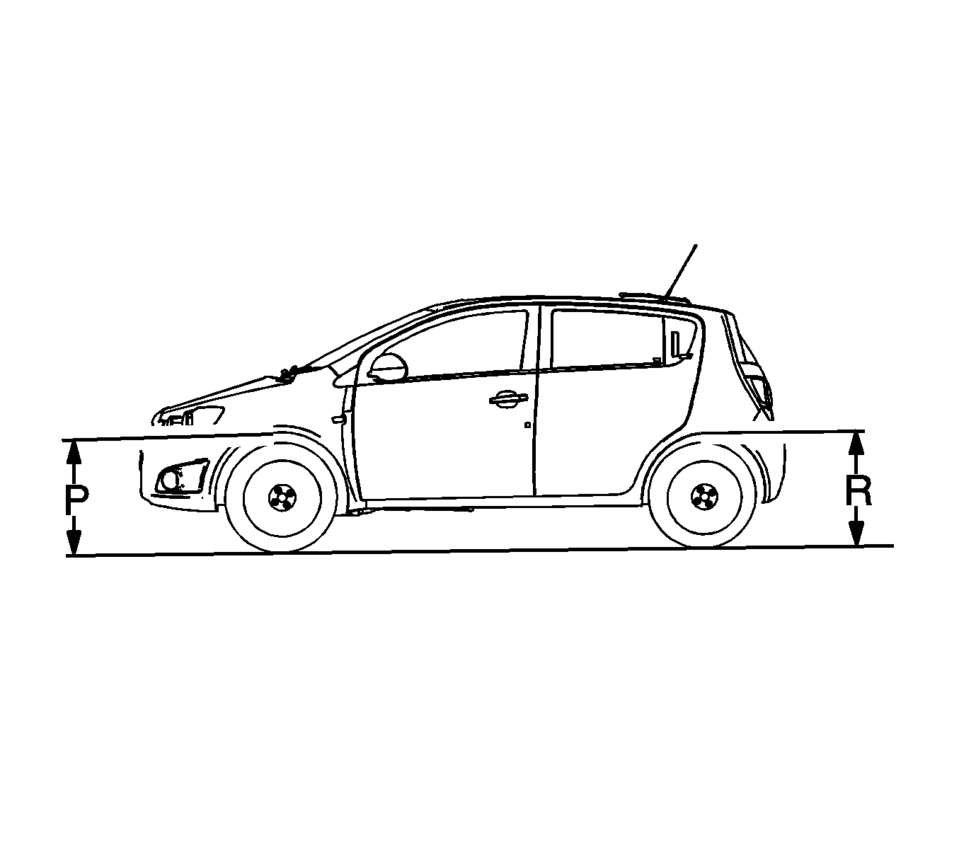
- Measuring the P and R Dimension
Measurement Definitions
P Height: The vertical distance from the ground to the top of the wheel opening through the centerline of the front wheel.
R Height: The vertical distance from the ground to the top of the wheel opening through the centerline of the rear wheel.
Use the following procedures to measure the P and R dimensions:
- Measure from the TOP of the wheel well opening to the ground.
- The left and right P and R height differences should be no more
than 10 mm (0.39 in)
.
- Push the front bumper down a minimum of 25 mm (1 in)
and release. Perform this step three times.
- Measure and record the trim height per the “Measurement Definitions” above.
- Lift the bumper up a minimum of 25 mm (1 in)
and release. Perform this step three times.
- Measure and record the trim height per the “Measurement Definitions” above.
- The true P height measurement is the average of the measurements taken in step 2 and 4. Refer to Trim Height Specifications.
- Repeat the above steps at the rear of the vehicle for the R heights.
- If the P and R heights are outside of the specifications, measure the Z & D heights.
Note:
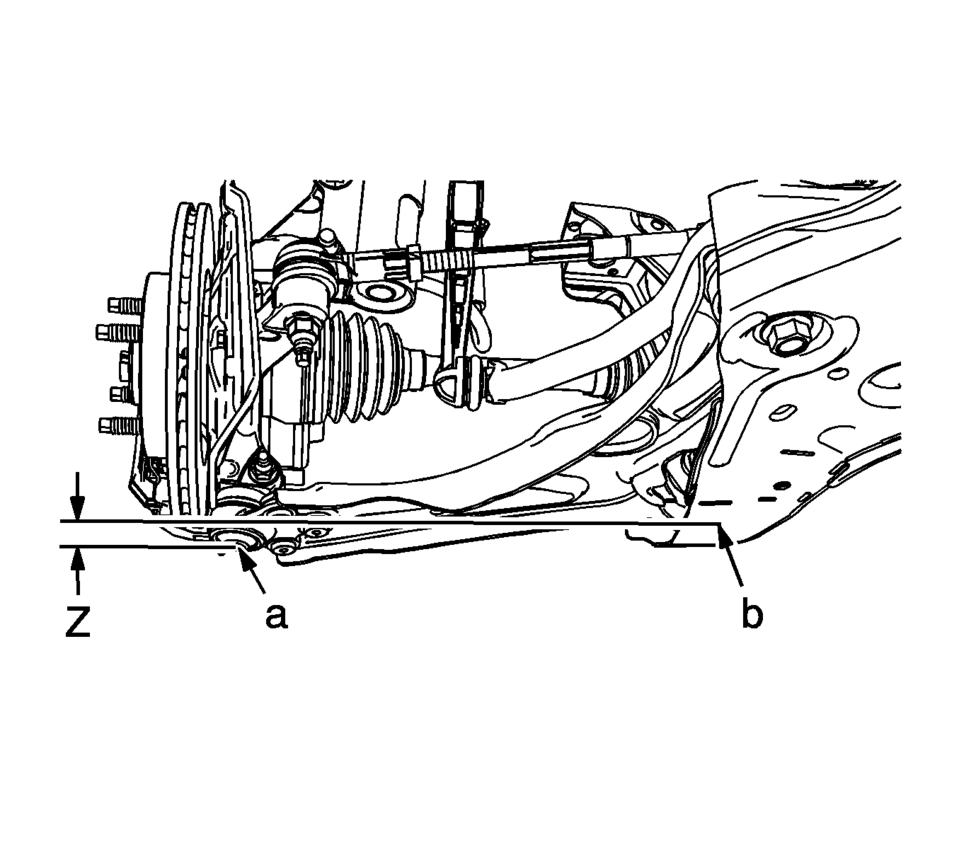
- Measuring the Z Dimension
Measurement Definitions
The Z Height: The vertical distance from the bottom surface of the cradle (b), in line fore/aft with the center of the ball joint (a).
Use the following procedures to measure the Z dimensions:
- Push the front bumper down a minimum of 25 mm (1 in)
and release. Perform this step three times.
- Measure and record the trim height per the “Measurement Definitions” above.
- Lift the front bumper a minimum of 25 mm (1 in)
and release. Perform this step three times.
- Measure and record the trim height per the “Measurement Definitions” above.
- The true Z height dimension is the average of the measurements taken in steps 2 and 4. Refer to Trim Height Specifications.
- If these measurements are out of specifications, inspect for the following conditions:
Note:
The left and right Z height differences should be no more than 10 mm (0.39 in)
.
- Worn or damaged suspension components
- Collision damage
- Push the front bumper down a minimum of 25 mm (1 in)
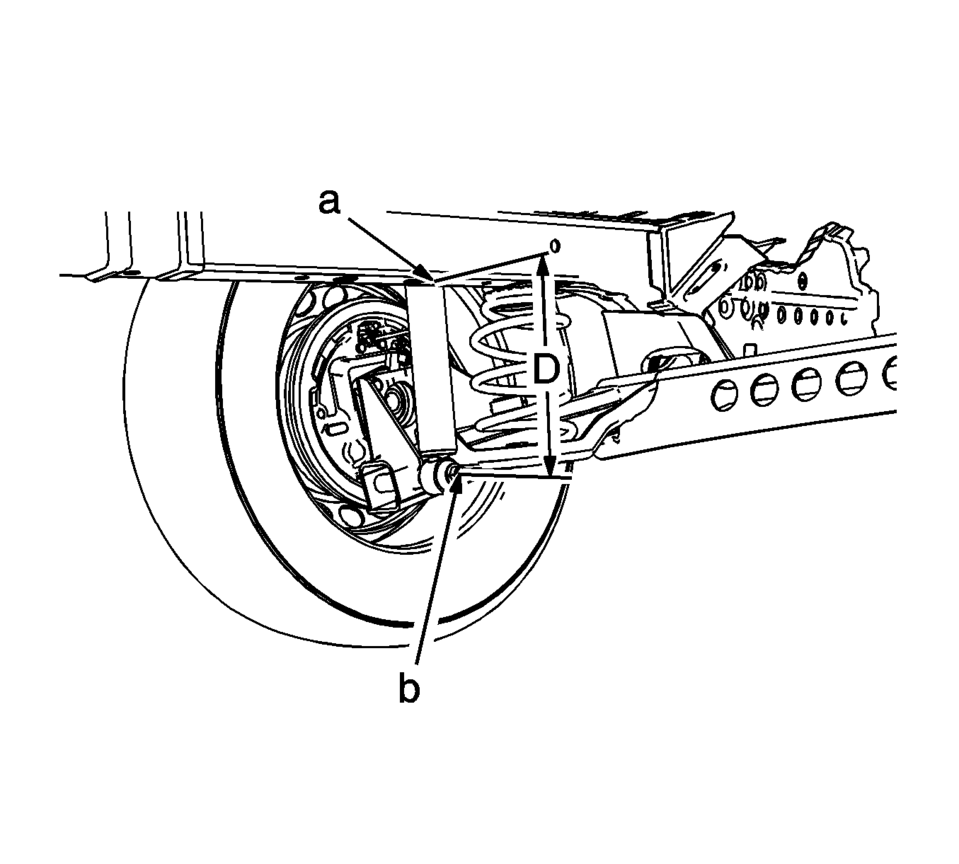
- D Height Measurement
Measurement Definitions
The D Height: The vertical distance from the bottom surface of the body side rail (a) to the center of the lower shock attaching bolt head (b).
Use the following procedure to check the D dimension:
- Push the rear bumper down a minimum of 25 mm (1 in)
and release. Perform this step three times.
- Measure and record the trim height per the “Measurement Definitions” above.
- Lift the rear bumper up a minimum of 25 mm (1 in)
and release. Perform this step three times.
- Measure and record the trim height per the “Measurement Definitions” above.
- The true D height is the average of the measurements taken in steps 2 and 4. Refer to Trim Height Specifications.
- If these measurements are out of specifications, inspect for the following conditions:
Note:
The left and right D height difference should be no more than 10 mm (0.39 in)
.
- Worn or damaged suspension components
- Collision damage
- Push the rear bumper down a minimum of 25 mm (1 in)
 Special Tools
Illustration
Tool Number/ Description
CH-24319-B
CH-43631
J-24319-B
J-43631
Ball Joint Remover
...
 Ball Joint Inspection
Caution: Refer to Vehicle Lifting and Jacking Caution.
Raise the front of the vehicle to allow the front suspension to hang free.
Grasp the tire at the top and the bottom.
Move the ...
Other materials:
Where to Put the Restraint
According to accident statistics, children and infants are safer when properly
restrained in a child restraint system or infant restraint system secured in a rear
seating position.
Whenever possible, children aged 12 and under should be secured in a rear seating
position.
Never put a rear-fa ...
Radiator Inlet Hose Replacement (LDE LUW)
Special Tools
BO-38185 Hose Clamp Pliers
For equivalent regional tools, Refer to Special Tools.
Removal Procedure
Drain the cooling system. Refer to Cooling System Draining and Filling.
Remove the radiator inlet hose clamp (1) at the engine using BO-38185 ...
Heated Oxygen and Oxygen Sensor Caution
Caution: Do not remove the pigtail from either the heated oxygen sensor
(HO2S) or the oxygen sensor (O2S). Removing the pigtail or the connector will
affect sensor operation.
Handle the oxygen sensor carefully. Do not drop the HO2S. Keep the in-line
electrical connector and the louver ...

0.0053