Chevrolet Sonic Owner's Manual: Dinghy Towing All except RS Model with Automatic Transmission
When dinghy towing a vehicle with an automatic transmission, the vehicle should be run at the beginning of each day and at each RV fuel stop for about five minutes. This will ensure proper lubrication of transmission components.
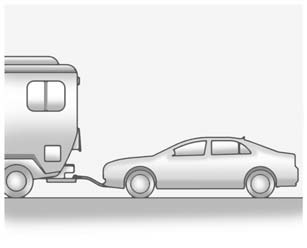
To dinghy tow the vehicle from the front with all four wheels on the ground:
1. Position the vehicle to tow and then secure it to the towing vehicle.
2. Shift the automatic transmission to P (Park) or a manual transmission into 1 (First) gear and turn the ignition to LOCK/OFF.
3. Set the parking brake.
4. To prevent the battery from draining while the vehicle is being towed, remove the following fuse from the instrument panel fuse block: (DLIS). See Instrument Panel Fuse Block for more information.
5. Turn the ignition to ACC/ ACCESSORY.
6. Shift the automatic transmission to N (Neutral) or a manual transmission to Neutral.
7. Release the parking brake.
Remember to reinstall the DLIS fuse once the destination has been reached.
Caution
If 105 km/h (65 mph) is exceeded while towing the vehicle, it could be damaged. Never exceed 105 km/h (65 mph) while towing the vehicle.
Caution
Towing the vehicle from the rear could damage it. Also, repairs would not be covered by the vehicle warranty. Never have the vehicle towed from the rear.
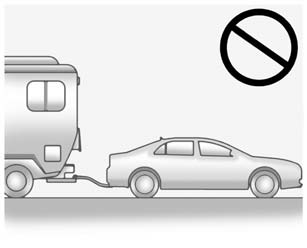
 Dinghy Towing RS Model with Automatic Transmission
Caution
If the vehicle is towed with all four wheels on the ground, the drivetrain
components could be damaged. The repairs would not be covered by the vehicle warranty.
Do not tow the vehicle ...
 Dolly Towing from the Front
The vehicle can be towed from the front using a dolly. To tow the vehicle using
a dolly, follow these steps:
1. Attach the dolly to the tow vehicle following the dolly manufacturer's instruct ...
Other materials:
Rear License Plate Lamp Bulb Replacement (Sedan)
Rear License Plate Lamp Bulb Replacement
Callout
Component Name
Preliminary Procedure
Remove the rear license plate lamp housing. Refer to Rear License Plate
Lamp Replacement.
1
License Plate La ...
Liftgate Adjustment
Liftgate Adjustment
Callout
Component Name
1
Liftgate
Caution: Refer to Fastener Caution.
Procedure
Loosen the 4 liftgate hinge bolts to adjust the liftgate.
Adjust the liftgate in order to obtai ...
Headlining Trim Panel Replacement (Sedan with Sunroof)
Headlining Trim Panel Replacement
Callout
Component Name
Warning: Do not attempt to repair or alter the head impact
energy-absorbing material glued to the headliner or to the garnish trims.
If the material is damaged ...

0.01