Chevrolet Sonic Repair Manual: Front Disc Brake Mounting and Hardware Inspection
- Inspect the fluid level in the brake master cylinder reservoir.
- If the brake fluid level is midway between the maximum-full point and the minimum allowable level then no brake fluid needs to be removed from the reservoir before proceeding.
- If the brake fluid level is higher than midway between the maximum-full point and the minimum allowable level then remove brake fluid to the midway point before proceeding.
- Raise and support the vehicle. Refer to Lifting and Jacking the Vehicle.
- Remove the tire and wheel assembly. Refer to Tire and Wheel Removal and Installation.
- Grasp the brake caliper housing and try to move the brake caliper housing up/down and forward/reverse in relation to the brake caliper mounting bracket (3). If excessive looseness is observed the brake caliper bracket bushings and/or the brake caliper mounting bolts may need to be replaced.
- Compress the front caliper pistons.
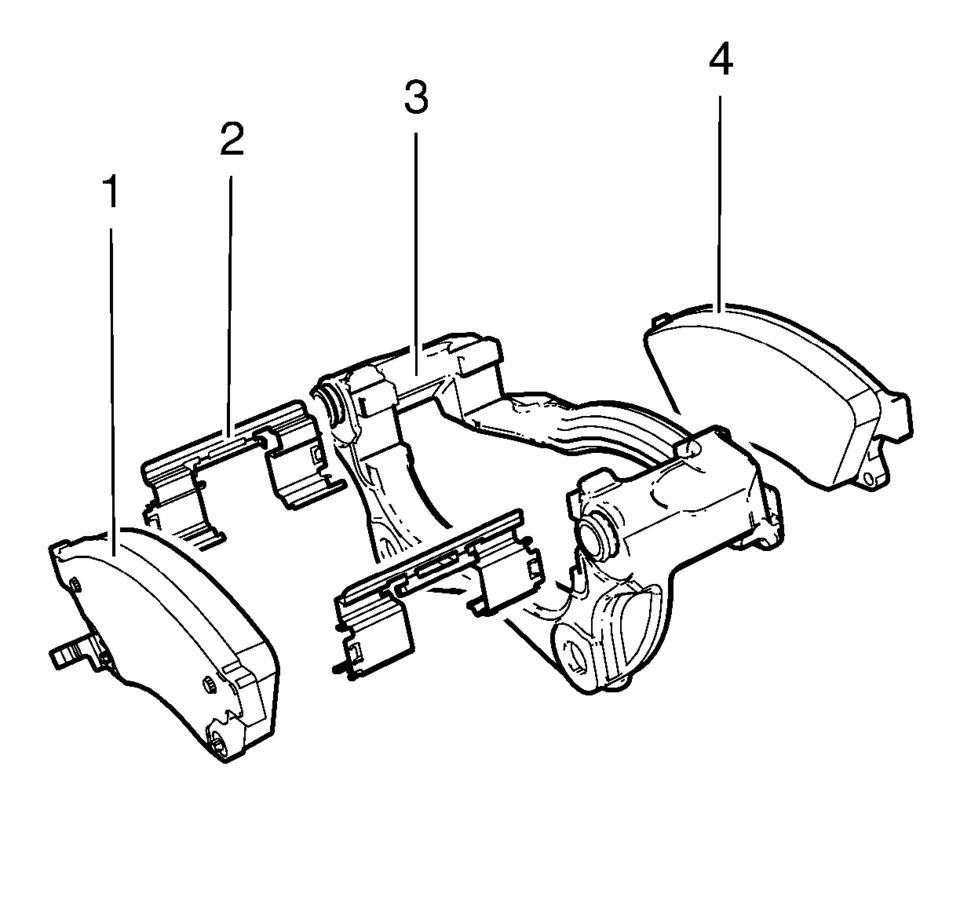
- Install a large C-clamp over the top of the caliper housing and against the back of the outboard pad (1).
- Slowly tighten the C-clamp until the pistons are pushed completely into the caliper bores.
- Remove the C-clamp from the caliper.
- With the pistons compressed into the caliper bores, grasp the brake caliper housing and slide it back and forth on the brake caliper mounting bolts. Check for smooth operation. If the brake caliper housing slide force is high or the brake caliper housing does not slide smoothly, inspect the brake caliper mounting bolts and/or the brake caliper mounting bracket bushings for wear or damage. If wear or damage conditions are found, replacement of the brake caliper mounting bolts and/or the brake caliper mounting bracket bushings is necessary.
- Remove the brake caliper mounting bolts from the brake caliper mounting bracket and support the brake caliper using heavy mechanics wire. Do Not remove the hydraulic brake hose from the caliper. Refer to Front Brake Caliper Replacement.
- Remove the disc brake pads (1, 4) from the brake caliper mounting bracket (3).
- Inspect the disc brake pad mounting hardware for the following:
Warning:
Refer to Brake Dust Warning.

- Missing mounting hardware.
- Excessive corrosion.
- Bent pad retainer spring (2).
- Looseness at the brake caliper mounting bracket (3).
- Looseness at the disc brake pads (1, 4).
- Excessive contaminants in the brake caliper mounting bracket (3) surface and threads.

- Binding
- Seizing
- Looseness in the brake caliper mounting bracket (3).
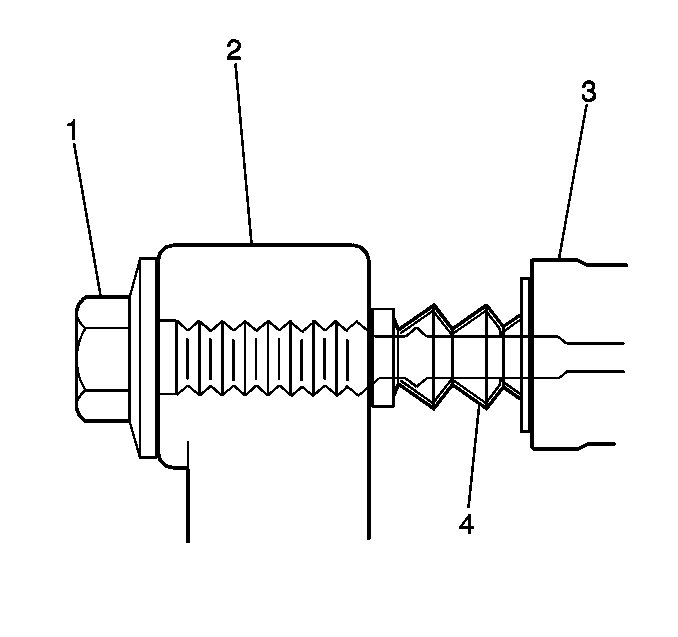
- Bent or damaged brake caliper mounting bolts (1).
- Cracked or torn boots (4).
- Missing boots.
- Bent or damaged brake caliper mounting bracket (3).
- Cracked or damaged brake caliper (2).
 Front Brake Shield Replacement
Removal Procedure
Warning: Refer to Brake Dust Warning.
Raise and support the vehicle. Refer to Lifting and Jacking the Vehicle.
Remove the front tire and wheel assemb ...
 Parking Brake Adjustment (Disc Brake)
Note: The park brake cable adjusting nut is a nylon lock type. Use
ONLY HAND TOOLS whenever tightening or loosening the adjusting nut.
Apply and fully release the park brake several times ...
Other materials:
What to Do with Used Oil
Used engine oil contains certain elements that can be unhealthy for your skin
and could even cause cancer. Do not let used oil stay on your skin for very long.
Clean your skin and nails with soap and water, or a good hand cleaner. Wash or properly
dispose of clothing or rags containing used en ...
Shoulder Belt Replacement - Rear (Sedan)
Shoulder Belt Replacement - Rear
Callout
Component Name
Preliminary Procedure
Remove the rear window panel trim. Refer to Rear Window Panel Trim Replacement.
1
Rear Seat Shoulder Belt Anchor Plat ...
Intake Manifold Tuning Valve Actuator Replacement
Intake Manifold Tuning Valve Actuator Replacement
Callout
Component Name
Preliminary Procedure
Properly raise and support the vehicle. Refer to
Lifting and Jacking the Vehicle.
1
Intake Manifold ...
0.0054
