
Nissan Armada 2025-2026 Owner's Manual: Passenger compartment
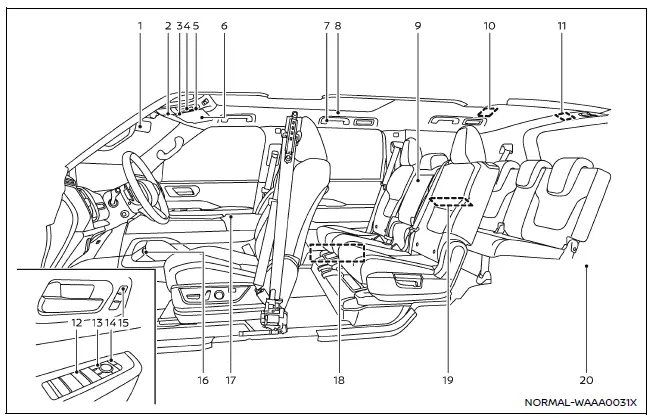
Example
The interior of the Nissan Armada is designed for comfort, technology, and convenience. This section outlines key controls, storage areas, and comfort features that enhance the driving and passenger experience in the Nissan Armada.
- Inside mirror
- Overhead console
- Map lights
- HomeLink Universal Transceiver*
- Microphone**
- Moonroof switch*
- Emergency Call (SOS) button*
- Sun visors
- Assist grips
Coat hooks - Rear personal lights
- Armrest (2nd row seat)*
Cup holders (2nd row seat) - Rear room light
- Cargo light
- Power window switch
- Outside mirror control switch (driver's side)
- Power door lock switches
- Memory seat switches*
- Lower console tray
- Power outlet
- Console box
- Power outlet
- USB charging connector
- Heated seat switches (2nd row seats)*
- Rear air conditioner control switches
- USB charging connector*
- Cup holders (3rd row seat)
USB charging connector* - Cargo area
- Power outlet*
- Cargo floor box
- Luggage hooks
- Jacking tools
*: if so equipped
**: Refer to the separate NissanConnect Owner's Manual.
 Exterior (NISMO models)
Nissan Armada NISMO models feature unique aerodynamic components and sensor placements
that require special handling. These enhancements not only improve performance but
also give the Nissan A ...
 Cockpit
Example
The cockpit of the Nissan Armada is engineered to provide maximum control, comfort,
and advanced driver assistance integration. Every switch and control element is
strategically posit ...
Other materials:
Exterior Lighting
The exterior lamp control is on the instrument panel to the outboard side of
the steering column.
O : Briefly turn to this position to turn the automatic light control off or
on again.
AUTO: Turns the headlamps on automatically at normal brightness, together with
the following:
Parking ...
Hood
To open the hood:
1. Pull the hood release handle inside the vehicle. It is located on the lower
left side of the instrument panel.
2. Go to the front of the vehicle and move the secondary hood release lever toward
the right side of the vehicle.
3. Lift the hood and release the hood pro ...
Charge Air Cooler Inlet Air Hose Replacement
Removal Procedure
Disconnect the battery negative cable. Refer to Battery Negative Cable
Disconnection and Connection.
Remove the front bumper fascia. Refer to Front Bumper Fascia Replacement.
Loosen the charge air cooler inlet air pipe clamp (1) at the ...

0.0092