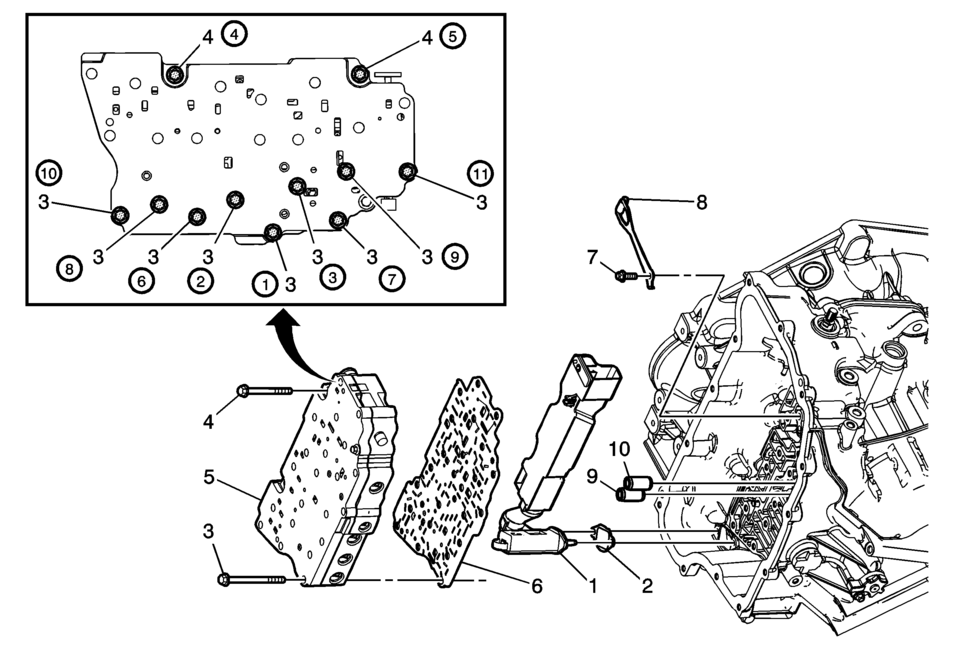
Chevrolet Sonic Repair Manual: Control Valve Body Replacement
|
Callout |
Component Name |
|---|---|
|
Preliminary Procedure
Remove the control solenoid valve and transmission control module assembly. Refer to Control Solenoid Valve and Transmission Control Module Assembly Replacement. |
|
|
1 |
Fluid Level Control Valve |
|
2 |
Fluid Level Control Valve Gasket Procedure
DISCARD the Gasket. Use a NEW gasket ONLY. |
|
3 |
Control Valve Body Bolt M6 x 60 (Qty: 9) Caution: Refer to Fastener Caution. Tip: Tighten in specified sequence.
11 Y (97 lb in) |
|
4 |
Control Valve Body Bolt M6 x 53 (Qty: 2) Tip: Tighten in specified sequence.
11 Y (97 lb in) |
|
5 |
Control Valve Body Assembly Procedure
|
|
6 |
Control Valve Body Spacer Plate Assembly |
|
7 |
Manual Shaft Detent Spring Bolt M6 x 16 (Qty: 1) Tighten
12 Y (106 lb in) |
|
8 |
Manual Shaft Detent Lever Spring Assembly |
|
9 |
1-2-3-4 Clutch Fluid Passage Seal Tip: Discard the seal. It is not reusable. |
|
10 |
Low/Reverse Clutch Fluid Passage Seal Tip: Discard the seal. It is not reusable. |
 Control Valve Body Cover Replacement
Removal Procedure
Disconnect the battery negative cable. Refer to
Battery Negative Cable Disconnection and Connection.
Raise and support the vehicle. Refer to
Lifting and Jac ...

Other materials:
Shoulder Belt Replacement - Rear (Sedan)
Shoulder Belt Replacement - Rear
Callout
Component Name
Preliminary Procedure
Remove the rear window panel trim. Refer to Rear Window Panel Trim Replacement.
1
Rear Seat Shoulder Belt Anchor Plat ...
Front Wheel Drive Shaft Seal Replacement - Left Side
Front Wheel Drive Shaft Seal Replacement - Left Side
Callout
Component Name
Preliminary Procedures
Raise and support the vehicle. Refer to
Lifting and Jacking the Vehicle.
Remove the left wheel drive shaft. Refer to
Fr ...
Brake assist
Brake assist
The Brake Assist system in the Nissan Armada is designed to enhance braking performance
during emergency situations. When the system detects that the driver is applying
the brake pedal with significant force, it automatically increases braking pressure
beyond what a conventional ...

0.0056