Nissan Armada 2025-2026 Owner's Manual: Flat tire
Tire Pressure Monitoring System (TPMS)
The Nissan Armada is equipped with an advanced Tire Pressure Monitoring System (TPMS) that continuously tracks the air pressure in all four tires (excluding the spare tire) to ensure optimal safety and performance.
When tire pressure drops significantly below the recommended level, the Nissan Armada will alert the driver by illuminating the low tire pressure warning light and displaying the message "Tire Pressure Low Add Air" in the vehicle information display.
The TPMS in the Nissan Armada activates when the vehicle is traveling above approximately 16 MPH (25 km/h), ensuring real-time monitoring during normal driving conditions.
WARNING
- If the low tire pressure warning light in the Nissan Armada illuminates
while driving, avoid sudden steering or braking maneuvers. Gradually reduce
speed and move to a safe location as soon as possible.
Driving with under-inflated tires can lead to permanent tire damage, increased wear, and a higher risk of tire failure, which may result in serious accidents or injury.
Check all four tires and inflate them to the recommended COLD tire pressure specified on the Tire and Loading Information label. If the warning light remains on after adjustment, one of the tires may be flat and should be replaced immediately.
- The spare tire in the Nissan Armada is not equipped with TPMS sensors.
When a spare tire is installed, the system will not function properly, and the
warning light will flash for approximately one minute before remaining illuminated.
Have the tire replaced and the TPMS system reset as soon as possible by an authorized NISSAN dealer.
- Using non-approved tires on the Nissan Armada may interfere with TPMS functionality and result in inaccurate readings.
- Do not use liquid or aerosol tire sealants in the Nissan Armada tires, as they may damage the pressure sensors and cause system malfunction.
Changing a flat tire
Basic information
If you experience a flat tire in your Nissan Armada, follow the recommended steps below to safely handle the situation.
Stopping the vehicle
1. Carefully steer the Nissan Armada off the roadway to a safe location, away from traffic.
2. Activate the hazard warning flashers to alert other drivers.
3. Park the Nissan Armada on a flat and stable surface. Apply the parking brake firmly and shift the transmission into the P (Park) position.
4. Turn off the engine to ensure safety during the tire change procedure.
5. Open the hood to make your Nissan Armada more visible to other drivers and roadside assistance personnel.
6. Ensure all passengers exit the Nissan Armada and stand at a safe distance from traffic and the vehicle.
WARNING
- Always confirm that the parking brake is securely engaged and the Nissan Armada transmission is in the P (Park) position before attempting any tire change.
- Never attempt to change a tire on slopes, icy roads, or slippery surfaces, as this may cause the vehicle to shift unexpectedly.
- If traffic conditions are unsafe, do not attempt to change the tire yourself—wait for professional roadside assistance.
Blocking wheels
To prevent movement of the Nissan Armada during lifting, place wheel chocks or blocks at both the front and rear of the wheel diagonally opposite the flat tire.
WARNING
Always secure the vehicle by blocking the wheels, as failure to do so may result in unintended movement and possible injury.
Getting the spare tire and tools
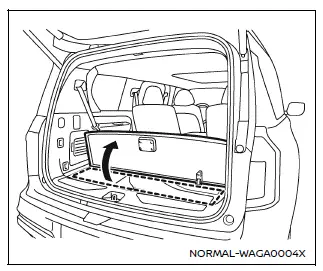
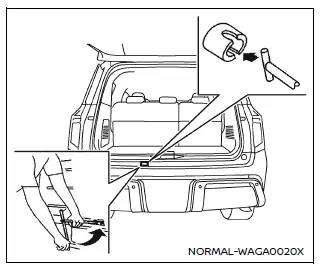
1. Open the liftgate of the Nissan Armada.
2. Lift and secure the cargo floor panel to access the spare tire and tool kit.
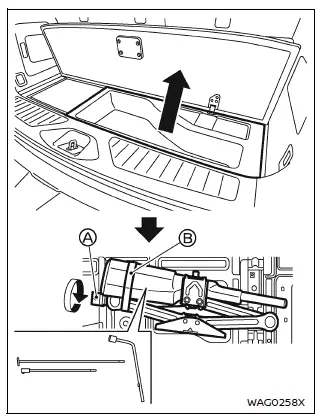
3. Remove the cargo floor storage box from the Nissan Armada to access the spare tire compartment.
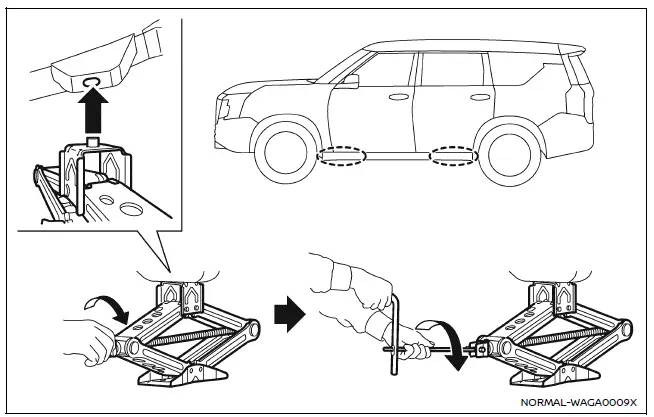
4. Rotate the jack handle holder A counterclockwise and remove the jack along with the necessary tools from the Nissan Armada storage area.
Next, release the hook-and-loop fastener belt B to remove the tool bag, then take out all required tools for the procedure.
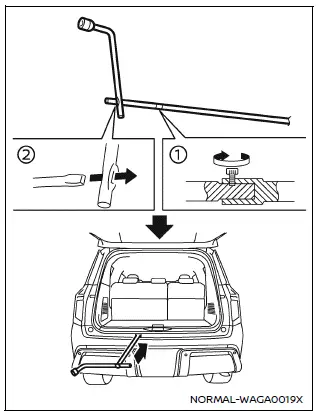
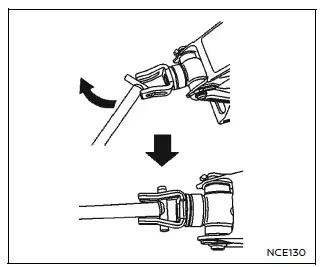
5. Firmly connect the T-shaped end of the jack rod to the extension bar 1, ensuring a secure fit as illustrated for proper operation on the Nissan Armada.
6. Insert the square end of the jack rod into the wheel nut wrench to create a functional handle 2, allowing easier control while operating the mechanism.
7. Locate the oval-shaped access opening positioned above the center section of the rear bumper on the Nissan Armada.
8. Insert the T-shaped end of the jack rod through this opening at the correct angle and guide it toward the spare wheel winch assembly located above the spare tire.
CAUTION
Do not insert the jack rod straight into the opening. The Nissan Armada system is designed for angled insertion as shown to ensure proper engagement with the winch mechanism.
9. Engage the T-shaped end of the jack rod into the matching slot of the spare wheel winch. Apply steady pressure to keep it engaged and rotate the rod counterclockwise to lower the spare tire safely.
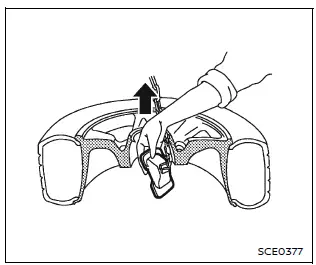
10. Once the spare tire is fully lowered, remove the jack rod and carefully reach beneath the Nissan Armada to detach the hanging plate securing the wheel.
11. Gently slide the spare tire out from under the rear of the Nissan Armada.
If access is restricted, remove the trailer hitch cover located on the lower portion of the rear bumper to gain better clearance.
After preparing the spare tire, remove the rod by pulling it out while slightly moving it left and right, ensuring the extension screw is oriented to the side for smooth removal.
CAUTION
When storing the spare wheel on the Nissan Armada, ensure that the hanging plate is properly centered within the wheel before lifting it back into the storage position.
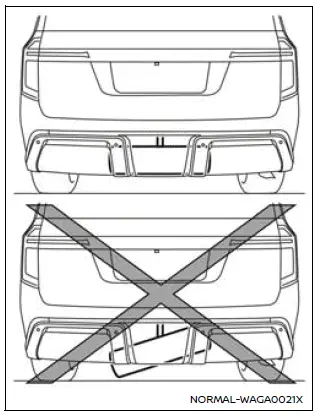
CAUTION
Always store the spare wheel horizontally in the Nissan Armada. Improper positioning, such as storing it at an angle, may cause the wheel to become loose and potentially fall during driving.
If necessary, lower the wheel again, realign the hanging plate correctly, and secure the wheel so that it remains level and stable before final storage.
Jacking up the vehicle and removing the damaged tire
WARNING
- Never position yourself under the Nissan Armada when it is supported only by a jack. If work underneath is required, always use proper safety stands.
- Use only the jack provided with the Nissan Armada. It is specifically designed for this vehicle and should not be used on other vehicles.
- Always use designated jack points on the Nissan Armada.
Never attempt to lift the vehicle using any other structural components.
- Do not raise the Nissan Armada higher than necessary during the tire replacement process.
- Never place blocks or supports under the jack, as this may compromise stability.
- Do not start or run the engine while the Nissan Armada is elevated on
the jack, as this may cause movement and create dangerous conditions.
This is particularly important for vehicles equipped with limited-slip differentials.
- Ensure that no passengers remain inside the Nissan Armada while it is being lifted.
For models with air suspension system, observe the following warnings.
WARNING
- Never place any part of your body between the tire and the Nissan Armada body. The air suspension system may adjust height unexpectedly, leading to serious injury or death.
- Only lift the Nissan Armada when the air suspension is set to NORMAL mode to ensure stability during the procedure.
Carefully read the caution label attached to the jack body and the following instructions.
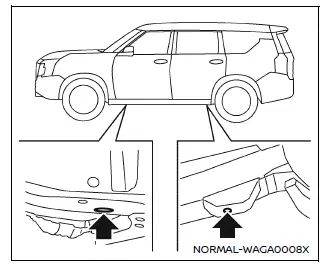
Jack-up point
1. Position the jack securely under the designated jack-up points on the Nissan Armada as illustrated, ensuring proper alignment with the vehicle frame.
The jack must always be placed on a firm, level surface to maintain stability and prevent slipping.
2. Slightly loosen each wheel nut by turning it counterclockwise one or two rotations using the wheel nut wrench. Do not completely remove the nuts until the tire is lifted off the ground.
3. Insert the assembled jack rod into the jack as shown, ensuring it is properly seated for safe operation on the Nissan Armada.
4. Gradually raise the Nissan Armada until the flat tire is fully clear of the ground, providing enough space for removal.
5. To lift the vehicle, firmly grip both the jack lever and rod, and rotate the lever steadily. Maintain control throughout the lifting process to ensure stability.
NOTE:
Before lifting the Nissan Armada, always confirm that the ignition is switched OFF to avoid any unintended movement.
Installing the spare tire
The temporary spare tire provided with the Nissan Armada is intended for emergency use only and should not be used for extended driving.
1. Clean off any dirt, mud, or debris from the contact surfaces between the wheel hub and the spare tire to ensure proper seating.
2. Carefully mount the spare tire onto the hub and hand-tighten the wheel nuts to hold it in place.
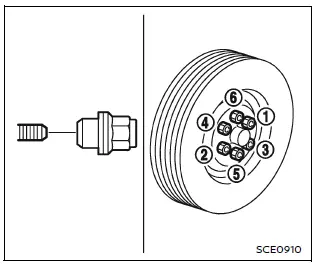
3. Using the wheel nut wrench, tighten the nuts alternately in a crisscross sequence (1, 2, 3, 4, 5, 6) to evenly distribute pressure and properly secure the wheel.
4. Lower the Nissan Armada slowly until the tire makes contact with the ground, then tighten the wheel nuts firmly using the same sequence.
Lower the vehicle completely and ensure all nuts are secure.
WARNING
- Using incorrect wheel nuts or failing to tighten them properly on the Nissan Armada may cause the wheel to loosen or detach while driving, potentially leading to serious accidents.
- Do not apply oil or grease to wheel studs or nuts, as this can reduce friction and cause them to loosen over time.
- After driving approximately 600 miles (1,000 km), recheck and retighten the wheel nuts on the Nissan Armada to ensure continued safety.
- As soon as possible, tighten the wheel nuts to the specified torque using a torque wrench for the Nissan Armada.
Wheel nut tightening torque: 98 ft-lb (133 N·m)
Maintaining proper torque is critical for safe operation of the Nissan Armada. It is recommended to verify torque during routine maintenance intervals.
- Adjust tire pressure to the specified COLD pressure for the Nissan
Armada.
COLD pressure: Measured after the vehicle has been parked for at least three hours or driven less than 1 mile (1.6 km).
Refer to the Tire and Loading Information label located on the driver-side center pillar for correct pressure values.
After inflating the tires to the recommended COLD pressure, the Nissan Armada display may show a higher pressure reading once the vehicle has been driven more than 1 mile (1.6 km). This is due to heat buildup increasing internal tire pressure and is completely normal.
Stowing the damaged tire and tools
1. Carefully place the damaged tire, jack, and tools back into their designated storage compartments in the Nissan Armada.
2. Close and secure the cargo floor cover.
3. Reinstall the cargo floor board properly.
4. Close the liftgate securely.
WARNING
- Always ensure that the spare tire and all tools are securely fastened in the Nissan Armada after use. Loose items may become dangerous projectiles during sudden stops or collisions.
- The temporary spare tire for the Nissan Armada is intended strictly for emergency use and should be replaced with a full-size tire as soon as possible.
 Connection to Roadside Assistance
In the event of a roadside emergency involving your Nissan Armada, professional
Roadside Assistance services are available to provide support.
Refer to your Warranty Information Booklet (U.S.) or W ...
 Jump starting
To start your Nissan Armada engine using a booster battery, it is essential to
carefully follow the proper procedures and safety precautions outlined below to
avoid damage or injury.
WARNING
...
Other materials:
Safety Function Override
If the battery on the vehicle has been recharged or disconnected, or is not working,
the windows will need to be reprogrammed for the express-up feature to work. Before
reprogramming, replace or recharge the vehicle's battery.
To program the driver window:
1. With the ignition in ACC/ ACCE ...
Shoulder Belt Replacement - Rear (Hatchback)
Shoulder Belt Replacement - Rear
Callout
Component Name
Preliminary Procedures
Remove the rear seat cushion. Refer to Rear Seat Cushion Removal
and Installation.
Remove the body lock pillar upper trim. Refer to Body Lock ...
Automatic Transmission Shift Lock Control Description and Operation
The automatic transmission park lock control system is a safety device that prevents
an inadvertent shift out of PARK. The driver must press the brake pedal before moving
the park lever out of the PARK position. The system consists of the following components:
The automatic transmission pa ...

0.0077