Chevrolet Sonic Repair Manual: Fuel Injection Fuel Rail Assembly Replacement
- Removal Procedure
-
- Disconnect battery negative cable. Refer to Battery Negative Cable Disconnection and Connection.
- Remove engine cover. Refer to Engine Cover Replacement.
- Remove the fuel feed pipe from fuel injection fuel rail. Refer to Fuel Feed Pipe Replacement.
- Remove the positive crankcase ventilation pipe from the intake manifold. Refer to Positive Crankcase Ventilation Pipe Removal.
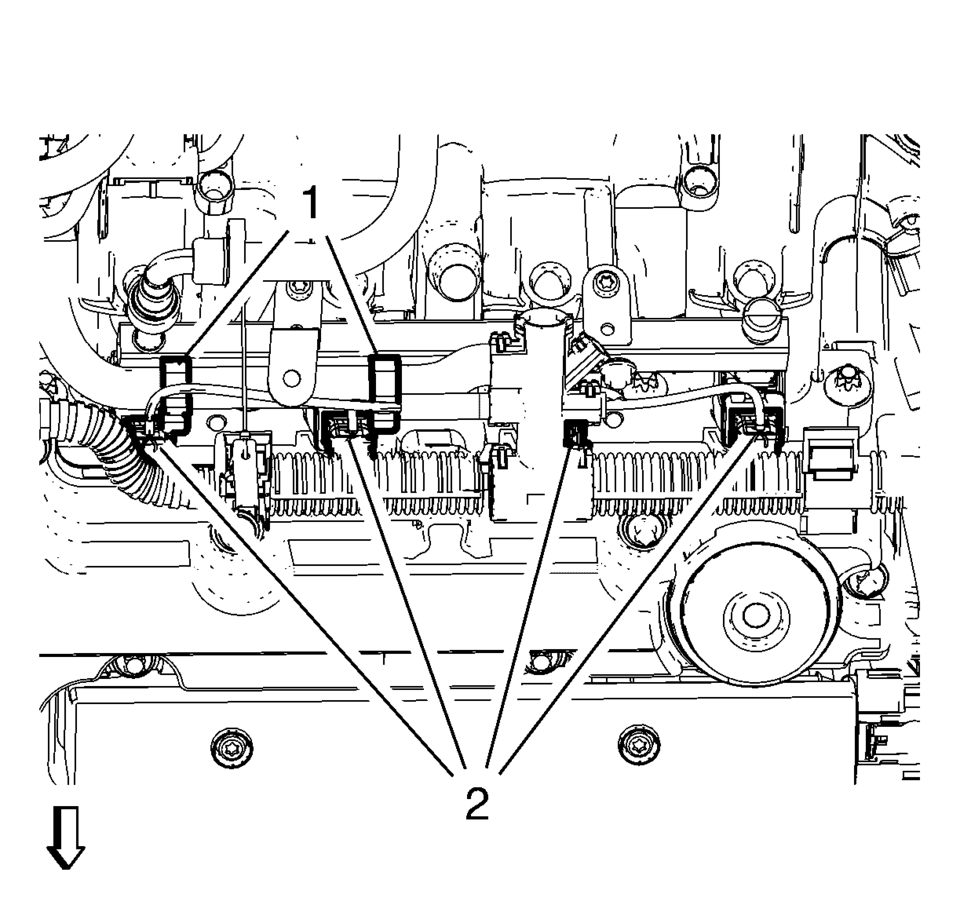
- Disconnect the 4 fuel injector wiring harness plugs (2).
- Unclip the ECM wiring harness from retainer clips (1) and the camshaft cover.
- Remove the ground cable nut (2) and the ground cable.
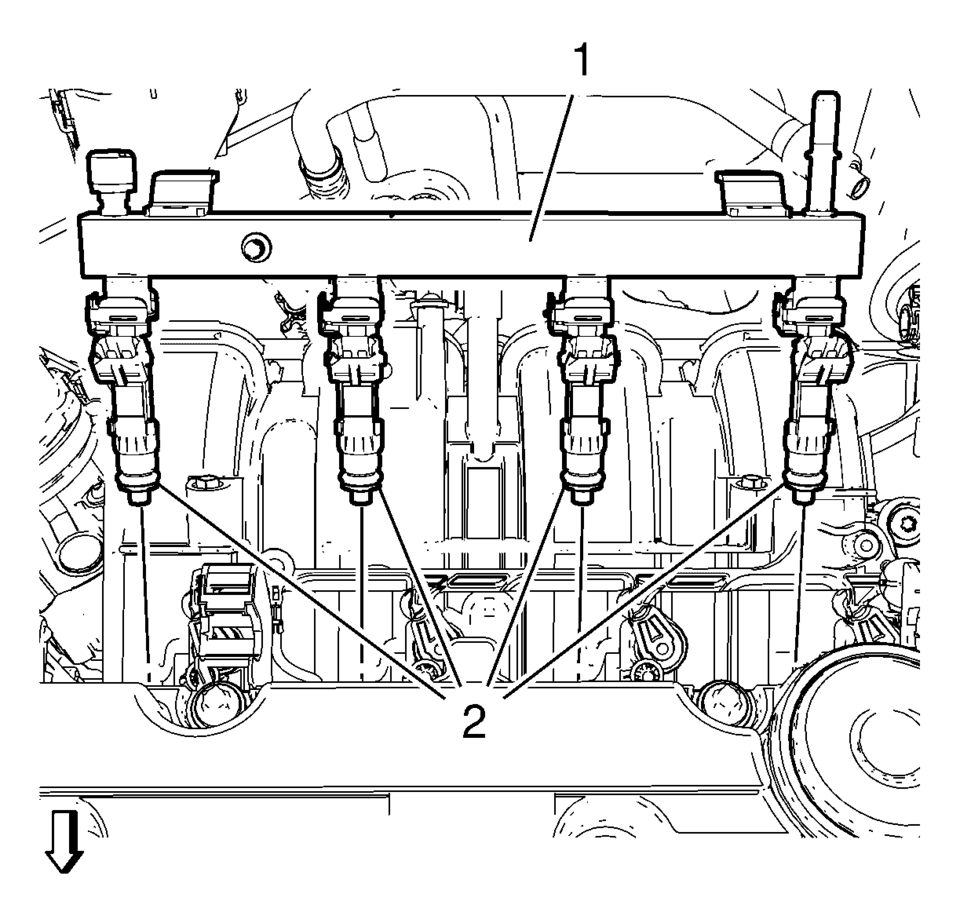
- Remove the 2 fuel injection fuel rail bolts (1).
- Remove the fuel injection fuel rail assembly (1) and the 4 fuel injector seal rings (2).
............., hi

- Installation Procedure
-
- Install the fuel injection fuel rail assembly (1) to the intake manifold. Use NEW fuel injector seal rings (2).
- Install the 2 fuel injection fuel rail bolts (1) and tighten to
7 Y (62 lb in)
.
- Install the ground cable and the ground cable nut (2) and tighten.
- Connect the 4 fuel injector wiring harness plugs (2).
- Clip the ECM wiring harness to the retainer clip (1) and the camshaft cover.
- Remove the positive crankcase ventilation pipe from the intake manifold. Refer to Positive Crankcase Ventilation Pipe Removal.
- Install the fuel feed pipe to the fuel injection fuel rail. Refer to Fuel Feed Pipe Replacement.
- Install the engine sight shield. Refer to Engine Cover Replacement.
- Connect battery negative cable. Refer to Battery Negative Cable Disconnection and Connection.
Note:
Lubricate the 4 fuel injector seal rings (2) with clean engine oil.
Caution:
Refer to Fastener Caution.
............., hi
 Fuel Tank Fuel Pump Module Replacement (Steel Tank)
Special Tools
EN-48279 Fuel Sender Lock Ring Wrench
For equivalent regional tools, refer to Special Tools.
Removal Procedure
Relieve the fuel system pressure. Refer to Fuel Pressure ...
 Fuel Tank Draining
Warning: Refer to Gasoline/Gasoline Vapors Warning.
Note: The fuel tank must be drained with a suitable, commercially-available
fuel removal unit and suction hose - follow safety ...
Other materials:
Oil Level Indicator and Tube Installation
Install a NEW oil level indicator tube gasket.
Install the oil level indicator tube (2).
Caution: Refer to Fastener Caution.
Install the oil level indicator tube bolt (1) and tighten to 15 Y (11 lb ft).
Install the oil dipstick.
...
Automatic air conditioner
Basic information
The automatic climate control system in the Nissan Armada is designed to provide
maximum comfort and convenience for both driver and passengers. You can operate
the system either through the dedicated front air conditioner control panel or directly
via the touchscreen climat ...
Basic information
WARNING
Incorrect use of the Nissan Armada AEB with Pedestrian Detection system can
lead to serious injury or fatal accidents.
The Nissan Armada AEB system is designed as an additional safety feature
and does not replace attentive and responsible driving. The driver must always
remain a ...

0.0048