
Nissan Armada 2025-2026 Owner's Manual: Garage mode system
The Nissan Armada liftgate height can be customized to suit specific environments, such as garages with limited clearance.
1. Open the Nissan Armada liftgate fully.
2. Manually adjust the liftgate to the desired height and hold it in position.
3. Press and hold the liftgate close and lock switch for approximately 3 seconds until two beeps are heard.
The Nissan Armada liftgate will now open to the programmed height. Repeat these steps to adjust the setting.
CAUTION
Do not set the Nissan Armada liftgate height below approximately one-third of its full range. If set lower, the system will automatically adjust it back to a safe minimum height.
Auto closure
When the Nissan Armada liftgate reaches the secondary latch position, the auto-closure system engages and securely pulls the liftgate into the fully closed position.
Avoid applying force during this process, as excessive pressure may damage the mechanism.
CAUTION
- The Nissan Armada liftgate will automatically close from the secondary
latch position.
Keep hands and fingers clear to avoid injury.
- Do not allow children to operate the Nissan Armada liftgate.
Liftgate release lever
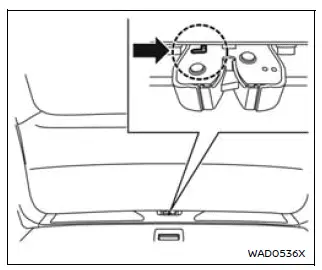
If the Nissan Armada liftgate cannot be opened due to a discharged battery, follow these emergency steps:
1. Fold down the third-row seats to access the cargo area.
2. Insert a suitable tool into the access opening and move the release lever to the left to unlatch the liftgate.
3. Lift the Nissan Armada liftgate manually to open it.
For proper repair and system inspection, it is recommended to contact an authorized Nissan dealer as soon as possible.
The Nissan Armada motion-activated and power liftgate systems provide enhanced convenience, safety, and flexibility, making everyday loading and unloading easier and more efficient.
 Motion-activated liftgate
Example
Example
Basic information
The Nissan Armada features a convenient motion-activated liftgate system that
allows hands-free operation using a simple foot gesture beneath the rear bu ...
 Front, side and rear unique parts (NISMO models)
The Nissan Armada NISMO models are equipped with distinctive aerodynamic and
styling components that enhance both performance and visual appeal at the front,
sides, and rear of the vehicle.
Fr ...
Other materials:
Outside Rearview Mirror Housing Cover Package Installation
Installation Instructions Part Number
95950274
Kit Contents
Tools Required
Procedure
...
Rear Spring, Insulator, and Jounce Bumper Replacement
Rear Spring, Insulator, and Jounce Bumper Replacement
Callout
Component Name
Preliminary Procedure
Raise and support the vehicle. Refer to Lifting and Jacking the Vehicle.
1
Rear Spring
Proced ...
Torque Converter Installation
Torque Converter Installation
Callout
Component Name
1
Torque Converter Assembly
Note: Failure to lower the torque converter straight down
could damage the torque converter clutch lip seal inside the torque ...

0.0055