Nissan Armada 2025-2026 Owner's Manual: How to switch the display
With the ignition switch in the ON position, the Nissan Armada Intelligent Around
View Monitor can be activated either by pressing the CAMERA/
 button or by shifting the transmission into the R (Reverse) position.
Once activated, the Nissan Armada system automatically presents different split-screen layouts depending on the current gear selection, ensuring optimal visibility for each driving situation.
To navigate between the available camera views in the Nissan Armada, press the
CAMERA/
 button again or tap the corresponding icon at the bottom of the display screen.
If the transmission is in the R (Reverse) position, the Nissan Armada provides the following viewing options:
- Rear view combined with bird's-eye view (split screen)
- Rear view combined with front-side view (split screen)
- Rear-wide view for expanded visibility
- Rear zoom view for precise maneuvering
The Nissan Armada 3D view is not available while the transmission is in R (Reverse).
When the transmission is shifted out of Reverse, the Nissan Armada unlocks additional advanced viewing modes:
- Front view combined with bird's-eye view (split screen)
- Front view combined with front-side view (split screen)
- Front-wide view for enhanced forward visibility
- Invisible Hood View for low-speed precision driving
- 3D view (accessible via touchscreen icon)
- Ultra Wide view for extended panoramic coverage
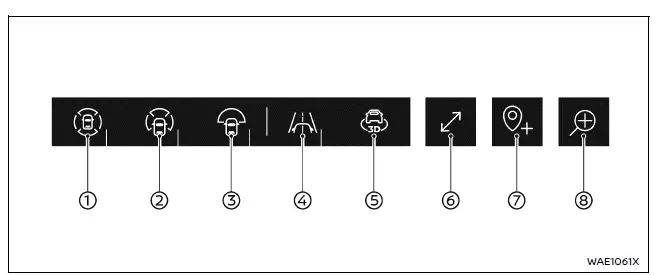
Screen icons (example)
- Bird's-eye view (paired with front or rear view)
- Front-side view* (paired with front or rear view)
- Wide view*
- Invisible Hood View
- 3D view (not available in Reverse)
- Expand/contract control (for Ultra Wide view)
- Save Location feature (for automatic front-wide view activation)
- Rear zoom view
*: The icon appearance may change depending on whether the Nissan Armada is in Reverse.
The Nissan Armada display will automatically exit the Around View Monitor screen under the following conditions:
- When the transmission is in D (Drive) and the vehicle speed exceeds approximately 12 MPH (20 km/h)
- When another screen or system interface is selected
- After approximately 3 minutes of inactivity
Adjusting the screen
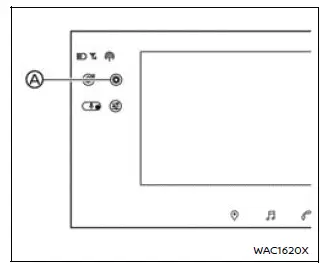
Example
1. Tap the "
 "
key A on the Nissan Armada touchscreen.
"
key A on the Nissan Armada touchscreen.
2. Select the "Vehicle" menu.
3. Choose the "Camera" option.
4. Tap "Display Settings".
5. Adjust the desired parameters using the "+" or "-" controls. The Nissan Armada allows customization of brightness, contrast, tint, color intensity, and black level.
The "Display Settings" menu can also be accessed directly from the Nissan Armada
Around View Monitor screen by tapping the "
 "
shortcut icon.
"
shortcut icon.
NOTE:
For safety reasons, avoid adjusting the Nissan Armada display settings while driving. Always ensure the vehicle is stationary and the parking brake is engaged.
Setting the vehicle color
The Nissan Armada allows you to customize the color of the vehicle representation shown in the bird's-eye and 3D views for better visual clarity and personalization.
To change the vehicle color in your Nissan Armada, follow these steps:
1. Press the CAMERA/
 button.
2. Select any view while the transmission is not in Reverse.
3. Tap the "
 "
key on the touchscreen.
"
key on the touchscreen.
4. Choose the "Vehicle Color" option.
5. Select your preferred color to match your Nissan Armada.
Camera widgets
The Nissan Armada also supports customizable camera widgets that can be added to the home screen for quicker access to frequently used camera functions.
For additional details on configuring the Nissan Armada home screen and widgets, refer to the NissanConnect Owner’s Manual.
This level of customization ensures that the Nissan Armada infotainment and camera system adapts perfectly to the driver’s preferences, enhancing both convenience and usability.
 How to park with predictive course lines
Basic information
WARNING
If the Nissan Armada is equipped with tires of a different size than
standard, the predictive course lines may become inaccurate.
On slippery or snow-covered roads, ...
 Intelligent Around View Monitor system limitations
Basic information
WARNING
The Nissan Armada Intelligent Around View Monitor has inherent limitations.
Ignoring these limitations while operating the vehicle may result in serious injury
or even ...
Other materials:
Hill Start Assist (HSA)
This vehicle has an HSA feature, which may be useful when the vehicle is stopped
on a grade. This feature is designed to prevent the vehicle from rolling, either
forward or rearward, during vehicle drive off. After the driver completely stops
and holds the vehicle in a complete standstill on a ...
Front Seat Armrest Replacement
Front Seat Armrest Replacement
Callout
Component Name
1
Front Seat Armrest Cover Zipper
Procedure
Open the zipper to access the front seat armrest mounting bolt and to
remove the armrest cover
...
Valve Guide Reaming, and Valve and Seat Grinding
Valve Cleaning Procedure
Use soft bristle wire brush to clean any carbon build-up from the valve
head. DO NOT use a wire brush on any part of the valve stem. The valve stem
is chrome plated to provide enhanced wear characteristics. Wire brushing
the stem could remove the chr ...

0.019