Nissan Armada 2025-2026 Owner's Manual: Inside mirror
Basic information
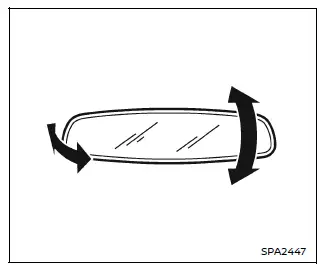
In the Nissan Armada, adjust the inside mirror by carefully setting both its height and angle to achieve optimal rearward visibility and driving comfort.

Manual anti-glare type (if so equipped)
The Nissan Armada manual anti-glare inside mirror can be adjusted to reduce glare from headlights of vehicles behind you.
Pull the adjusting lever 1 to switch to night mode, minimizing glare and improving visibility in low-light conditions.
Push the lever 2 back to its original position during daytime driving to restore full mirror clarity.
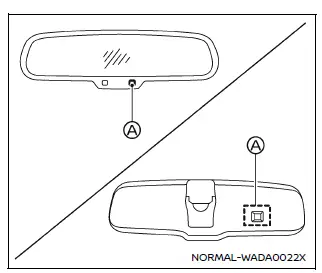
Automatic anti-glare type (if so equipped)
The Nissan Armada automatic anti-glare mirror intelligently adjusts its reflectivity based on the brightness of headlights from vehicles behind.
This system activates automatically when the ignition switch is placed in the ON position, ensuring continuous driving comfort without manual intervention.
Avoid hanging objects on the Nissan Armada mirror or applying cleaning solutions directly to it, as this may interfere with sensor A and reduce system effectiveness.
Intelligent Rear View Mirror (if so equipped)
WARNING
- Improper use of the Nissan Armada Intelligent Rear View Mirror may result
in serious injury or fatal accidents.
- The Nissan Armada Intelligent Rear View Mirror is designed as an
assistive feature and does not replace proper driver awareness.
Always check blind spots and remain attentive to surrounding traffic conditions while driving.
- Do not attempt to modify, disassemble, or tamper with the Nissan
Armada Intelligent Rear View Mirror, camera unit, or wiring.
If smoke, unusual odors, or malfunction occurs, discontinue use immediately and contact a Nissan dealer.
- Never adjust the Nissan Armada mirror settings while driving.
This may distract the driver and lead to loss of control.
- Avoid prolonged focus on the display of the Nissan Armada Intelligent Rear View Mirror during driving, as it may reduce situational awareness.
- Keep the Nissan Armada mirror system away from open flames or extreme heat sources to prevent fire hazards.
- The Nissan Armada Intelligent Rear View Mirror is designed as an
assistive feature and does not replace proper driver awareness.
- Before driving, always adjust the Nissan Armada Intelligent Rear View
Mirror properly.
Switch to the conventional mirror mode and ensure you are seated correctly, then adjust the mirror for a clear rear view.
Driving without proper adjustment may impair visibility when switching to camera display mode.
- If the indicator light turns off while using the Nissan Armada Intelligent
Rear View Mirror in camera mode, switch back to standard mirror mode immediately.
If the issue persists, the system may require professional inspection by a Nissan dealer.
- Strong light sources such as sunlight or high beams may cause glare or
visual distortion on the Nissan Armada mirror display.
In such cases, switch to the traditional mirror mode for safer operation.
- If environmental conditions such as brightness make the Nissan Armada display difficult to read, revert to standard mirror mode for improved clarity.
- If dirt, rain, or snow accumulates on the rear camera lens, the Nissan
Armada Intelligent Rear View Mirror may not display a clear image.
Use the rear window washer/wiper to improve visibility, or switch to conventional mode until the lens is clean.
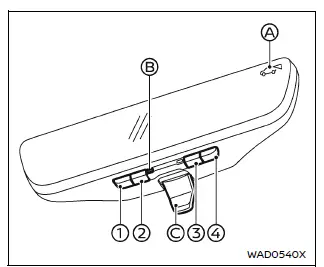
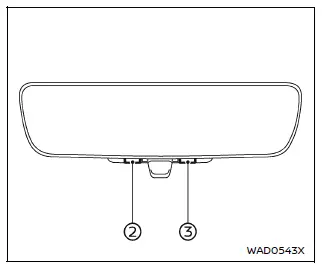
- MENU button
- Left button
- Right button
- Mode select button
- Indicator
- Indicator light
- Mode select lever
The Nissan Armada inside mirror system combines traditional visibility with advanced camera-based technology, offering improved safety, reduced glare, and enhanced driving awareness in various conditions.
Components:
The Nissan Armada Intelligent Rear View Mirror delivers a clear and enhanced rearward view through a high-mounted rear camera system.
This advanced Nissan Armada feature operates in two distinct modes: the traditional reflective mirror mode and the Intelligent Rear View Mirror mode (camera display mode), allowing the driver to choose the most suitable view depending on driving conditions.
Switching between these two modes in the Nissan Armada is performed using the mode select lever C.
When the Intelligent Rear View Mirror camera mode is activated, the indicator A appears on the display and the indicator light B illuminates, confirming that the system is active.
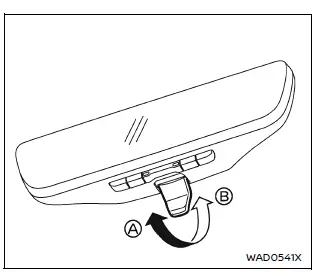
How to change the mode:
The Nissan Armada mirror mode can be changed only when the ignition switch is in the ON position.
- Pull the mode select lever A to activate the Nissan Armada Intelligent Rear View Mirror (camera view mode).
- Push the mode select lever B to return to the standard reflective mirror mode.
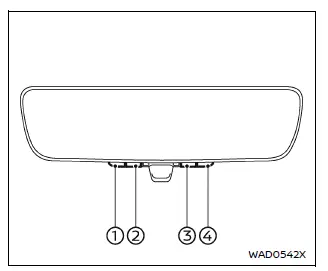
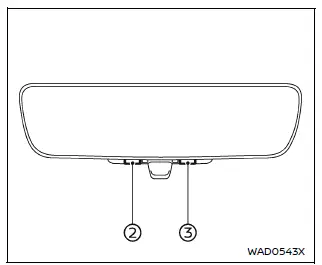
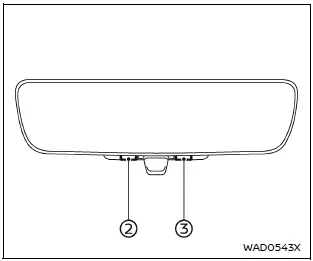
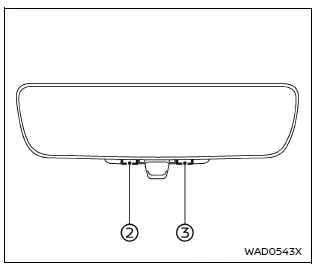
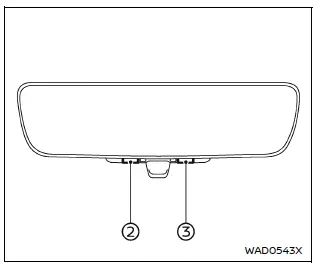
How to make settings of Intelligent Rear View Mirror:
The Nissan Armada Intelligent Rear View Mirror allows full customization of the display, including brightness, camera positioning, text display, and language preferences.
When camera mode is active, press the MENU button 1 to access the settings menu. Use buttons 2 and 3 to navigate through the options, and confirm your selection by pressing button 4.
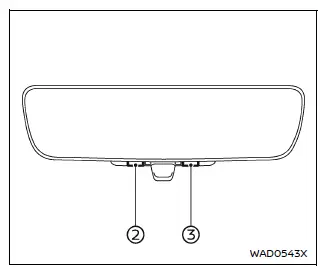
Brightness:
The Nissan Armada display brightness can be adjusted for optimal visibility in various lighting conditions.
- Press the left button 2 to decrease brightness.
- Press the right button 3 to increase brightness.
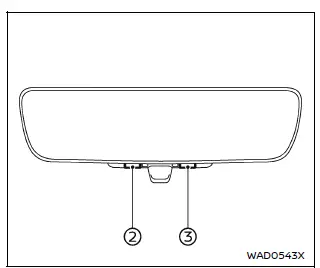
Down/Up:
The vertical angle of the Nissan Armada rear camera view can be fine-tuned to better match your preferred viewing perspective.
- Press the left button 2 to tilt the camera downward.
- Press the right button 3 to tilt the camera upward.
Left/Right:
The horizontal positioning of the Nissan Armada camera image can be adjusted to center the view precisely.
- Press the left button 2 to move the camera view to the left.
- Press the right button 3 to move the camera view to the right.
Rotation:
The Nissan Armada camera display can also be rotated slightly to correct image alignment.
- Press the left button to rotate the image counterclockwise.
- Press the right button to rotate the image clockwise.
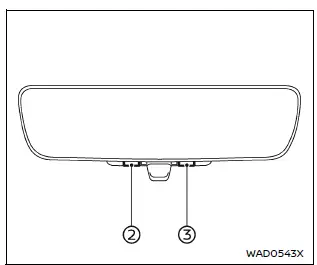
Indication:
The Nissan Armada allows enabling or disabling on-screen textual indicators for a cleaner or more informative display.
- Press the left button 2 to turn OFF text overlays.
- Press the right button 3 to turn ON text overlays.
Dimming Mirror:
The Nissan Armada mirror system includes an automatic anti-glare function that adjusts reflection intensity based on incoming light from vehicles behind.
- Press the left button 2 to disable automatic dimming.
- Press the right button 3 to enable automatic dimming.
Language:
The Nissan Armada display language can be customized for user convenience.
Select the preferred language using buttons 2 or 3. The chosen language setting will remain saved even after restarting the vehicle.
Switch Backlight:
The illumination of the Nissan Armada mirror control buttons can be turned ON or OFF according to user preference.
- Press the button to disable button illumination.
- Press again to enable illumination.
License:
The Nissan Armada system also provides access to license and certification information directly through the display menu.
These advanced customization options ensure that the Nissan Armada Intelligent Rear View Mirror delivers maximum clarity, adaptability, and driving comfort in all conditions.
Intelligent Rear View Mirror system precautions:
NOTE:
- Extended use of the Nissan Armada Intelligent Rear View Mirror while the engine is off may gradually discharge the vehicle battery.
- Avoid placing wireless device antennas near the Nissan Armada Intelligent Rear View Mirror, as electromagnetic interference may distort the displayed image.
- Do not press the control buttons excessively or operate the adjustment lever roughly, as this may lead to malfunction or damage to the Nissan Armada mirror assembly.
- Never rotate the Nissan Armada Intelligent Rear View Mirror body beyond 90Âş, as this may result in permanent damage.
- Avoid applying strong impacts or shocks to the Nissan Armada mirror
housing.
Excessive force may lead to system failure or component damage.
- Do not apply pressure or load to the rear-mounted camera or its protective cover, as this may misalign or damage the Nissan Armada camera system.
- If strong external light reduces visibility on the Nissan Armada display, switch to the conventional rearview mirror mode for improved clarity.
- Close the sunshade (if equipped) when excessive sunlight affects the Nissan Armada Intelligent Rear View Mirror visibility.
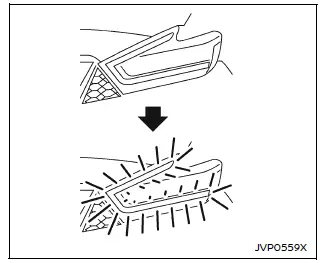
Flicker image (example)
- When LED headlights are captured by the Nissan Armada camera system, slight flickering may occur. This is a normal behavior and not a malfunction.
- Reflections caused by environmental lighting conditions may also result in flickering images on the Nissan Armada display.
- Fast-moving objects may not appear clearly on the Nissan Armada camera display due to system limitations. This is expected behavior.
- Always turn on the Nissan Armada headlights during low-light conditions such as twilight or when driving through tunnels.
- The Nissan Armada Intelligent Rear View Mirror (camera mode) provides
a different perspective compared to a traditional mirror. Objects may appear
at different distances.
Do not rely solely on the display—always remain attentive and drive responsibly.
- Excessive brightness settings on the Nissan Armada display may cause eye strain. Adjust brightness to a comfortable level.
- Use the rear window wiper in rainy conditions. If the Nissan Armada display remains unclear, inspect the rear wiper blade for wear or damage.
- When the rear wiper is in operation, slight flickering on the Nissan
Armada display may occur.
This is normal and does not indicate a malfunction.
- When the rear window becomes fogged, activate the defroster. Use the conventional mirror mode until visibility improves.
- The Nissan Armada display surface may become warm during operation. This is normal and does not affect performance.
- In low-light or long-distance viewing conditions, object colors on the Nissan Armada display may be less distinguishable. This is not a system fault.
System maintenance (Intelligent Rear View Mirror):
- Ensure that both the Nissan Armada mirror surface and rear camera area remain clean at all times for optimal visibility.
- Clean the Nissan Armada mirror and camera lens using a soft, dry cloth.
- When cleaning the rear camera area, use a soft cloth lightly dampened with
water and mild detergent.
Afterward, dry the surface with a clean, soft cloth.
- If the Nissan Armada display remains unclear after cleaning, an oil film may be present on the rear window. Use a suitable glass cleaner designed to remove oil residue.
- Never use alcohol, benzine, thinner, or similar harsh chemicals on the Nissan Armada mirror or camera lens, as they may cause discoloration, deterioration, or system malfunction.
- Do not place stickers or any materials, including transparent ones, over the Nissan Armada rear camera area.
License information:
This Nissan Armada system includes multiple software components that support its advanced functionality.
(1) Software developed by or for Panasonic Automotive Systems Co., Ltd. (Panasonic)
(2) Third-party licensed software integrated into the Nissan Armada system
(3) Open source software (OSS)
The open source software included in the Nissan Armada system is subject to various license agreements and conditions.
For detailed licensing information, refer to the official website: http://car.panasonic.jp/oss/m03xsn9d
The Nissan Armada Intelligent Rear View Mirror system combines cutting-edge camera technology with user-adjustable settings, ensuring enhanced safety, visibility, and driving confidence in a wide range of conditions.
 Mirrors
The Nissan Armada mirror system is designed to provide optimal visibility and
safety, allowing drivers to clearly monitor surrounding traffic conditions and adjust
driving behavior accordingly.
P ...
 Outside mirrors
Basic information
WARNING
Objects reflected in the passenger-side outside mirror of the Nissan Armada
may appear farther away than they actually are. Always exercise caution when changing
lanes ...
Other materials:
Instrument Cluster Upper Bezel Replacement
Instrument Cluster Upper Bezel Replacement
Callout
Component Name
1
Instrument Panel Cluster Upper Bezel
Procedures
Use a flat bladed plastic trim tool in order to disengage the retainers
securing the instrume ...
Fuel Pressure Sensor Replacement - Fuel Feed Pipe
Fuel Pressure Sensor Replacement - Fuel Feed Pipe
Callout
Component Name
Preliminary Procedure
Relieve the fuel system pressure. Refer to
Fuel Pressure Relief.
Remove the air cleaner assembly. Refer to
Air Cleaner Asse ...
Drive belts
Water pump
Alternator
Drive belt automatic tensioner
Crankshaft pulley
Air conditioning compressor
WARNING
Always ensure the ignition switch is OFF before inspecting or servicing the
drive belts on your Nissan Armada. Unexpected engine rotation can cause serious
injury.
1. Ca ...

0.0057