
Nissan Armada 2025-2026 Owner's Manual: Wireless charger
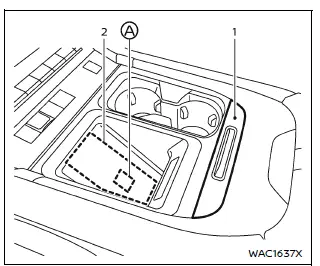
- Lid
- Charging pad
The Nissan Armada wireless charger is conveniently located beneath a lid in the center console. Press the lid to open it, then place your smartphone on the charging pad with the screen facing upward.
Once positioned correctly, the Nissan Armada wireless charging system will begin charging automatically and continue while the ignition remains ON.
NOTE:
The Nissan Armada wireless charger operates only when the vehicle doors are closed. If a door is opened, charging will be interrupted.
WARNING
- Never place metallic objects such as coins between the Nissan Armada charging pad and your smartphone, as this may cause overheating or malfunction.
- Users with pacemakers or other medical devices should consult the manufacturer before using the Nissan Armada wireless charger.
- Do not cover the smartphone with cloth or other materials while charging in the Nissan Armada.
- Never attempt to charge a wet smartphone using the Nissan Armada wireless charger.
- Avoid placing keys, USB drives, or other small metal objects between the charging pad and the device.
CAUTION
- Do not place RFID, NFC, or credit cards between the Nissan Armada charging
pad and the smartphone, as this may result in data loss or damage.
Magnetic storage media may also be affected.
- Ensure the Nissan Armada charging pad is clean and free of dust or debris before use.
- Avoid impacts or pressure on the charging surface.
- Do not spill liquids on the Nissan Armada wireless charging pad.
- Do not use oil, alcohol, or aggressive cleaning agents on the charging surface.
Operation of the wireless charger
For optimal performance in the Nissan Armada, place the smartphone centrally on the charging pad with the screen facing upward.
Align the device with the
 logo A to ensure proper contact with the internal charging coil.
Since coil placement differs between smartphone models, slight repositioning may be necessary to achieve optimal charging efficiency in the Nissan Armada.
NOTE:
- Only Qi-compatible smartphones can be used with the Nissan Armada wireless charger.
- Charging may operate only within certain temperature ranges depending on the smartphone model.
- Leaving the lid open in the Nissan Armada may improve charging performance.
- Removing thick phone cases can enhance charging efficiency.
- Charging may not function with certain smartphone types—refer to your
device manual for compatibility.
Check device specifications before use.
- Devices that are too large or too small may not charge properly in the Nissan Armada.
- If the smartphone is not charging, reposition it toward the center of the Nissan Armada charging pad.
- Never place magnetic cards near the charging pad, as stored data may
be damaged.
This includes credit cards and electronic toll cards.
- The Nissan Armada charging pad can also be used as a storage compartment when not in use.
- If the smartphone moves during driving, reposition it over the
 logo.
logo. - Disable vibration mode on the smartphone to maintain consistent charging.
- If the smartphone becomes warm during use, charging may temporarily stop due to built-in protection features. This is normal operation.
- Charging may pause depending on battery temperature or device status.
- If radio interference occurs, reposition the smartphone to the center of the Nissan Armada charging pad.
- Charging will stop when the Nissan Armada searches for the Intelligent Key.
- Wireless charging will not start if a USB cable is connected to the smartphone.
NOTE:
FCC Notice:
For USA:
This device complies with Part 15 of the FCC Rules. Operation is subject to the following conditions: (1) this device may not cause harmful interference, and (2) it must accept any interference received, including interference that may cause undesired operation.
NOTE:
Changes or modifications not expressly approved may void the user’s authority to operate the Nissan Armada equipment.
For Canada:
This device complies with Innovation, Science and Economic Development Canada standards. Operation is subject to the conditions that the device may not cause interference and must accept any interference received.
 USB (Universal Serial Bus) charging connector
In the Nissan Armada, the Type-C USB charging connector 1 is предназначен exclusively
for charging external devices such as smartphones, tablets, and other portable electronics.
To ...
 Emergency Call (SOS) button
Emergency support
Basic information
In the Nissan Armada, NissanConnect Services provide a comprehensive range of
emergency assistance features designed to support both the driver and passengers
...
Other materials:
Front Bumper Fascia Guide Replacement
Front Bumper Fascia Guide Replacement
Callout
Component Name
Warning: Refer to Eye Protection Warning.
Preliminary Procedure
Remove the front bumper fascia. Refer to Front Bumper Fascia Replacement.
...
Intake Manifold Installation (1.6L LDE)
Clean the sealing surfaces.
Insert the NEW gasket.
Caution: Refer to Fastener Caution.
Install the intake manifold (2) and the 7 intake manifold bolts (1) and
tighten to 20 Y (15 lb ft).
Install the intake manifold supp ...
Transmission Assemble (Gen 2)
Special Tools
3-9506289 Universal Adapter
R-0007758 Holding Fixture
S-9407197 Differential Rotating Tool
S-9407198 Differential Bearing Race Wrench
For equivalent regional tools, refer to Special Tools.
Install the clutch and differential housing assembly (1)
onto ...

0.0072