Chevrolet Sonic Repair Manual: Overview (AM-FM Radio)
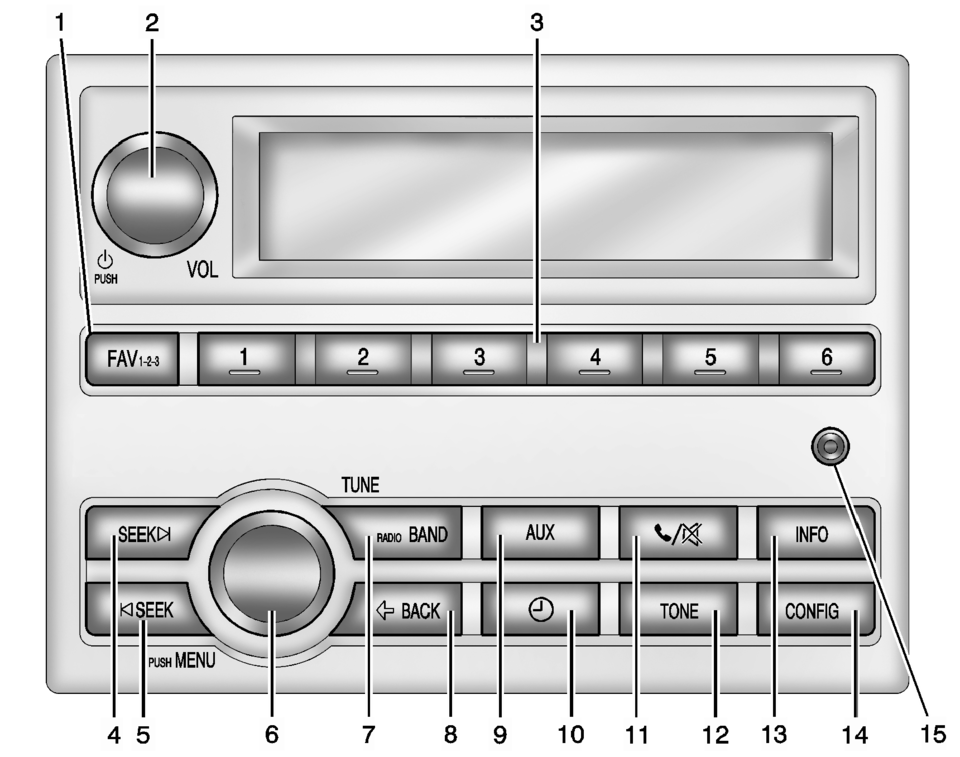
- FAV 1-2-3 (Favorites)
- Radio: Opens the favorites list.
- Turns the system on or off and adjusts the volume.
- Radio: Saves and selects favorite stations.
- Radio: Seeks the next station.
- CD: Selects the next track or fast forwards within a track.
- Radio: Seeks the previous station.
- CD: Selects the previous track or rewinds within a track.
- Radio: Manually selects radio stations.
- CD: Selects tracks.
- Changes the band while listening to the radio.
- Selects the radio when listening to a different audio source.
- Menu: Moves one level back.
- Character Input: Deletes the last character.
- Selects external audio source.
- Opens the Clock menu.
- Mutes the audio system.
- Opens the Tone menu.
- Radio: Shows available information about the current station.
- CD: Shows available information about the current track.
- Opens the Configuration menu.
- 3.5 mm (1/8 in) connection for external devices.
 Operation
Radio Controls without Touchscreen
The infotainment system is operated by using the pushbuttons, multifunction
knobs, menus shown on the display, and steering wheel controls, if equipped ...
 Overview (Radio with CD/USB)
91011121314151617
O /VOL (Power/Volume)
Turns the system on or off and adjusts the volume.
Z (Eject)
Removes a disc from the CD slot.
Buttons 1−6
Radio: Saves a ...
Other materials:
Interior Care
To prevent dirt particle abrasions, regularly clean the vehicle's interior. Immediately
remove any soils. Note that newspapers or dark garments that can transfer color
to home furnishings can also permanently transfer color to the vehicle's interior.
Use a soft bristle brush to remove d ...
Vehicle Data Recording and Privacy
The vehicle has a number of computers that record information about the vehicle’s
performance and how it is driven. For example, the vehicle uses computer modules
to monitor and control engine and transmission performance, to monitor the conditions
for airbag deployment and deploy them in a ...
Meters and gauges
Basic information
Example
The instrument cluster in the Nissan Armada is designed to provide clear, real-time
information about vehicle performance and status. It combines modern digital displays
with traditional gauges to ensure the driver can monitor all critical systems efficiently.
...

0.0084