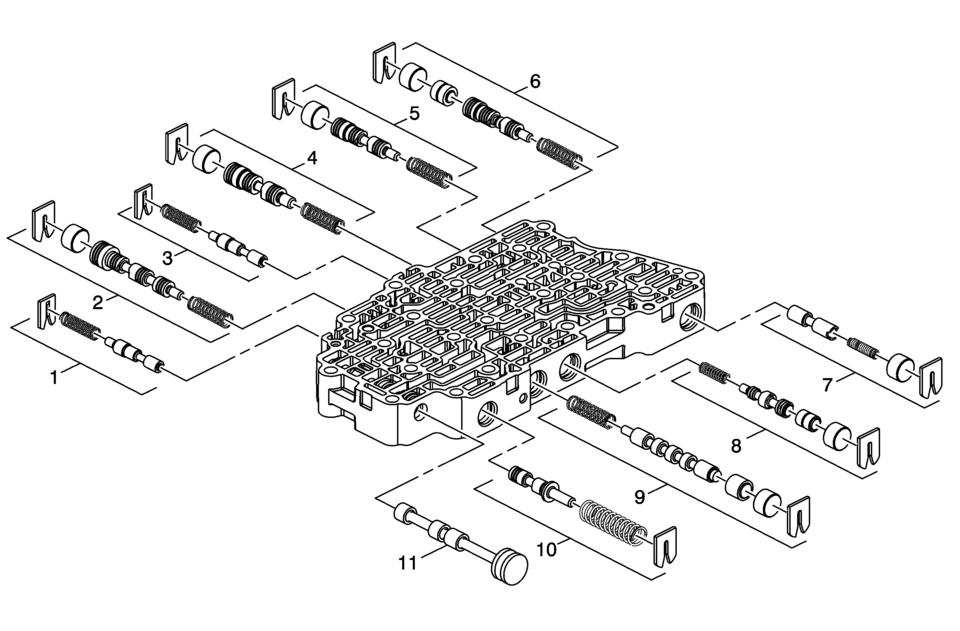
Chevrolet Sonic Repair Manual: Control Valve Body Cleaning and Inspection (Gen 2)

|
Callout |
Component Name |
|---|---|
|
Warning: Valve springs can be tightly compressed. Use care when removing retainers and plugs. Personal injury could result. Caution: After cleaning the transmission components, allow to air dry. Do not use cloth or paper towels in order to dry any transmission components. Lint from the towels can cause component failure. Caution: Do not reuse cleaning solvents. Previously used solvents may deposit sediment which may damage the component. Preliminary Procedure
Clean and inspect all valve components and the valve body. The control valve body assembly is only replaceable as an assembly. |
|
|
1 |
Low-Reverse and 4?? Clutch Boost Valve Train |
|
2 |
Low-Reverse and 4?? Clutch Regulator Valve Train |
|
3 |
1??? Clutch Boost Valve Train |
|
4 |
1??? Clutch Regulator Valve Train |
|
5 |
2? Clutch Regulator ValveTrain |
|
6 |
3? Reverse Clutch Regulator Valve Train |
|
7 |
Defualt Override Valve Train |
|
8 |
TCC Regulator Apply Valve Train |
|
9 |
Clutch Select Valve Train |
|
10 |
Actuator Feed Limit Valve Train |
|
11 |
Manual Valve |
 Control Valve Body Assembly Removal
Table 1:
Control Valve Body Cover Removal
Table 2:
Control Solenoid (With Body and TCM) Valve Assembly
Removal
Table 3:
Control Valve Body Assembly Removal
...
 Control Valve Body Cover Installation
Control Valve Body Cover Installation
Callout
Component Name
1
Input Speed Sensor Connector
2
...
Other materials:
Interior Glass
To clean, use a terry cloth fabric dampened with water. Wipe droplets left behind
with a clean dry cloth. Commercial glass cleaners may be used, if necessary, after
cleaning the interior glass with plain water.
Caution
To prevent scratching, never use abrasive cleaners on automotive glass. Abr ...
Front Seat Outboard Seat Back Airbag Replacement
Front Seat Outboard Seat Back Airbag Replacement
Callout
Component Name
Warning: Following the deployment of a side impact air bag,
inspect the following parts for damage. Replace these parts if necessary:
...
Rear Brake Caliper Replacement
Removal Procedure
Warning: Refer to Brake Dust Warning.
Warning: Refer to Brake Fluid Irritant Warning.
Raise and support the vehicle. Refer to Lifting and Jacking the Vehicle.
Remove the tire and wheel assembly. Refer to Tire and Wheel Removal
and Install ...
0.0064
