Chevrolet Sonic Repair Manual: Control Valve Body Assembly Removal
| Table 1: | Control Valve Body Cover Removal |
| Table 2: | Control Solenoid (With Body and TCM) Valve Assembly Removal |
| Table 3: | Control Valve Body Assembly Removal |
- Control Valve Body Cover Removal
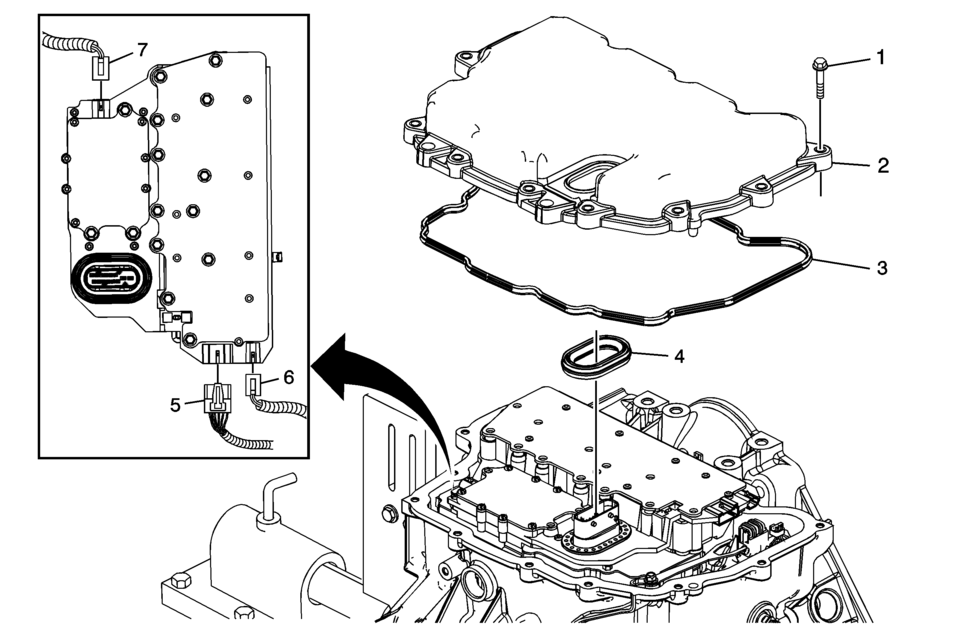
Control Valve Body Cover Removal Callout
Component Name
1
Control Valve Body Cover Bolts M6 x 30 (Qty: 13)
2
Control Valve Body Cover
3
Control Valve Body Gasket
Note:
Discard the seal. It is not reusable.
4
Control Valve Body Cover Wiring Connector Hole Seal
Caution:
Support the control solenoid valve assembly around the connector when removing the seal. Excessive pulling force can damage the internal electrical connections.
Note:
Discard the seal. It is not reusable.
5
Shift Position Switch Connector
6
Output Speed Sensor Connector
7
Input Speed Sensor Connector
- Control Solenoid (With Body and TCM) Valve Assembly Removal
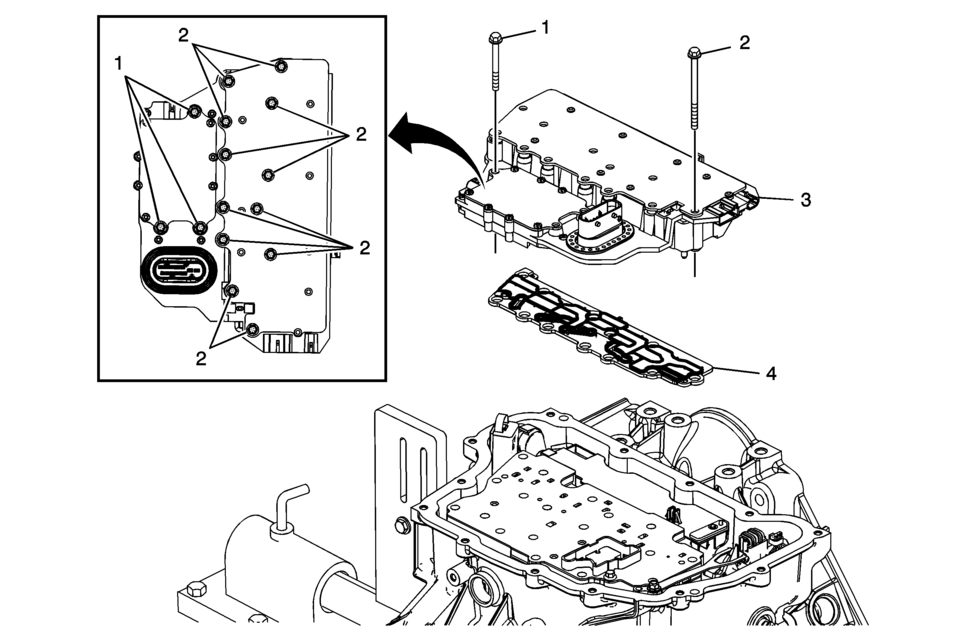
Control Solenoid (With Body and TCM) Valve Assembly Removal Callout
Component Name
1
Control Valve Body M5 x 40.5 (Qty: 3)
2
Control Valve Body Bolt M6 x 30 (Qty: 12)
3
Control Solenoid (with Body and TCM) Valve Assembly
4
Control Solenoid Valve Assembly Filter Plate
Caution:
Use care when removing or installing the filter plate assembly. A broken or missing retaining tab may not adequately secure the filter plate to the control solenoid valve assembly, resulting in possible damage or contamination.
Note:
Discard the filter plate. It is not reusable.
- Control Valve Body Assembly Removal
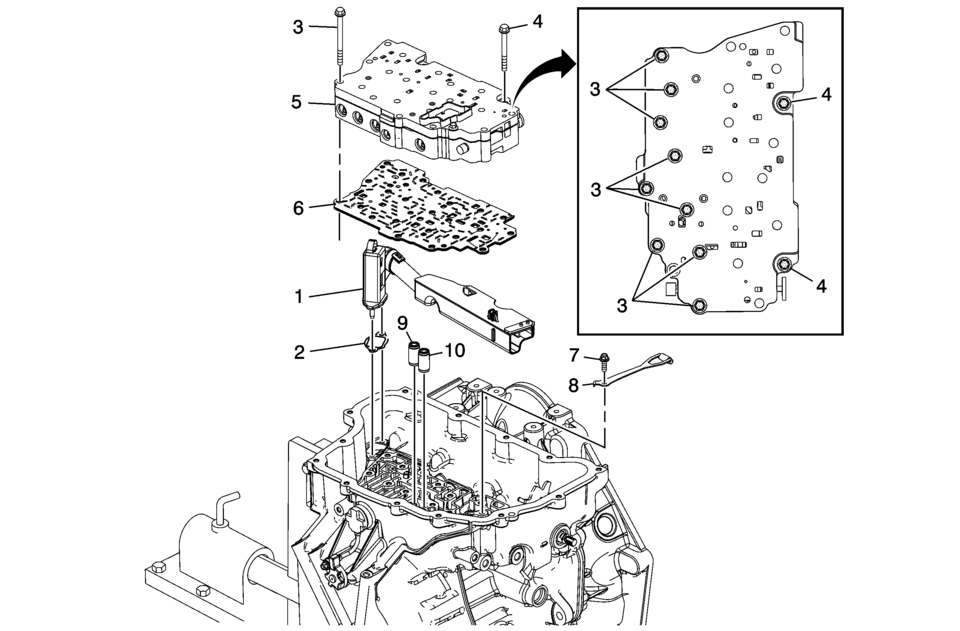
Control Valve Body Assembly Removal Callout
Component Name
1
Fluid Level Control Valve
2
Fluid Level Control Valve Gasket
3
Control Valve Body Bolt M6 x 60 (Qty: 9)
4
Control Valve Body Bolt M6 x 53 (Qty: 2)
5
Control Valve Body Assembly
6
Control Valve Body Spacer Plate Assembly
7
Manual Shaft Detent Spring Bolt M6 x 16 (Qty: 1)
8
Manual Shaft Detent Lever Spring Assembly
9
1-2-3-4 Clutch Fluid Passage Seal
Note:
Discard the seal. It is not reusable.
10
Low/Reverse Clutch Fluid Passage Seal
Note:
Discard the seal. It is not reusable.
 Control Valve Body Assembly Installation
Control Valve Body Assembly Installation
Callout
Component Name
1
Low and Reverse Clutch Fluid Passage Seal
...
 Control Valve Body Cleaning and Inspection (Gen 2)
Control Valve Body Cleaning and Inspection
Callout
Component Name
Warning: Valve springs can be tightly compressed. Use care
...
Other materials:
Conversions and Add-Ons
Add-On Electrical Equipment
Caution
Some electrical equipment can damage the vehicle or cause components to not
work and would not be covered by the warranty. Always check with your dealer before
adding electrical equipment.
Add-on equipment can drain the vehicle's 12-volt battery, even i ...
Transmission Assemble (Gen 1)
Special Tools
3-9506289 Universal Adapter
R-0007758 Holding Fixture
S-9407197 Differential Rotating Tool
S-9407198 Differential Bearing Race Wrench
For equivalent regional tools, refer to Special Tools.
Install the clutch and differential housing assembly (1)
onto ...
Transmission Rear Mount Bracket Replacement
Removal Procedure
Raise and support the vehicle. Refer to
Lifting and Jacking the Vehicle.
Remove the front suspension skid plate, if equipped.
Refer to Drivetrain and Front Suspension Frame Skid
Plate Replacement.
Using a suitable jack stand, support the rear of the ...

0.007