Chevrolet Sonic Repair Manual: Cooling System Draining and Filling
- Draining Procedure
-
- Remove the coolant pressure cap from the radiator surge tank.
- Raise and support the vehicle. Refer to Lifting and Jacking the Vehicle.
- Remove the front compartment front insulator cover. Refer to Front Compartment Front Insulator Cover Replacement.
- Place a drain pan under the drain cock.
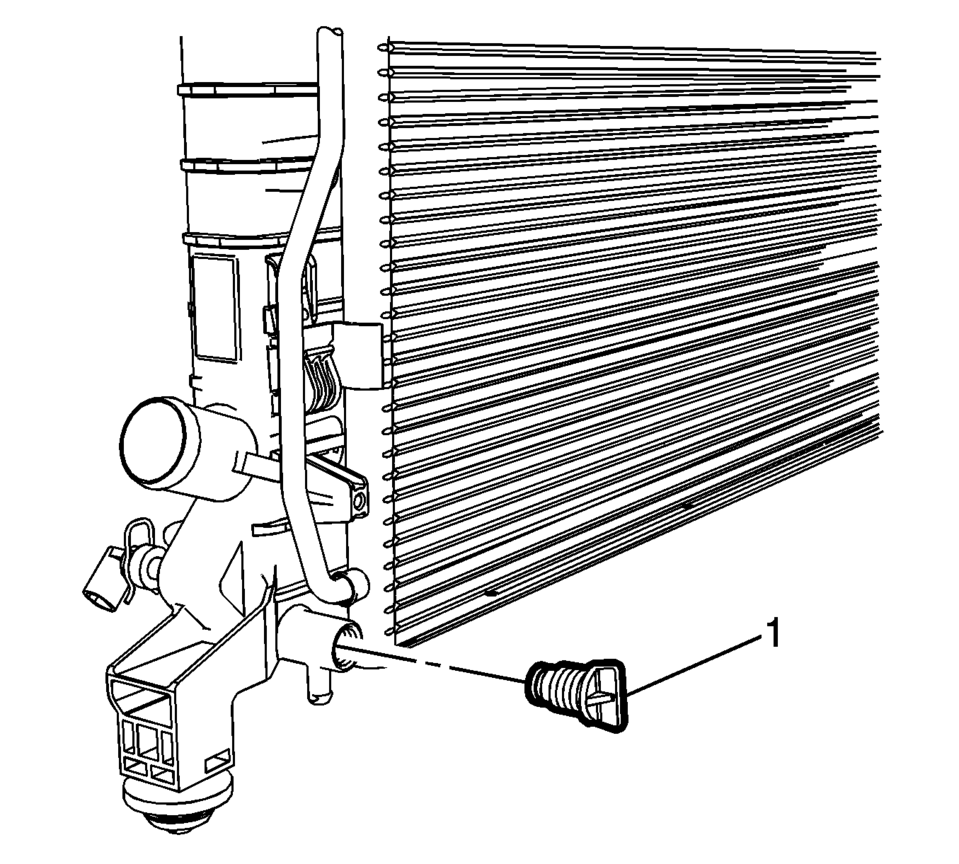
- Loosen the radiator drain cock (1).
- Drain the cooling system.
- Lower the vehicle.
- Inspect the coolant.
- Follow the appropriate procedure based on the condition of the coolant.
Warning:
To avoid being burned, do not remove the radiator cap or surge tank cap while the engine is hot. The cooling system will release scalding fluid and steam under pressure if radiator cap or surge tank cap is removed while the engine and radiator are still hot.
- Normal in appearanceŌĆöFollow the filling procedure.
- DiscoloredŌĆöFollow the flush procedure. Refer to Coolant System Flushing.
- Filling Procedure
-
- Raise and support the vehicle.
- Tighten the radiator drain cock (1) to 2 Y (18 lb in)
.
- Install the front compartment front insulator cover. Refer to Front Compartment Front Insulator Cover Replacement.
- Lower the vehicle.
- Slowly fill the radiator with a 50/50 coolant mixture until the coolant level reaches the base of the radiator surge tank. Refer to Approximate Fluid Capacities.
- Allow 30 seconds for the coolant level to stabilize and continue to fill the coolant filler neck until the level stabilizes for at least 2 minutes.
- Start the engine and allow to the engine to idle in PARK or NEUTRAL with the parking brake engaged.
- Slowly fill the coolant mixture until the level stabilizes at the base of the radiator surge tank.
- Install the coolant pressure cap.
- Raise the engine RPM to 2500 rpm for 30?E0 seconds.
- Shut the engine OFF.
- Allow the engine to cool, remove coolant fill cap and repeat steps 4?E0 until the coolant level has completely stabilized within the radiator surge tank.
- Inspect and if necessary, fill the coolant reservoir bottle as necessary.
- Rinse away any excess coolant from the engine and the engine compartment.
- Inspect the cooling system for leaks.
- Top off the radiator surge tank if necessary.
Caution:
The procedure below must be followed. Improper coolant level could result in a low or high coolant level condition, causing engine damage.
Caution:
Refer to Fastener Caution.
Note:
Use a 50/50 mixture of DEX-COOL antifreeze and clean drinkable water.
 Cooling System Description and Operation
Cooling System
The cooling system maintains the engine operating temperature at the efficient
level under any speed and operating condition. When the engine is cold, the
cooling system ...
 Engine Coolant Air Bleed Hose Replacement (LUV)
Engine Coolant Air Bleed Hose Replacement
Callout
Component Name
1
Engine Coolant Air Bleed Hose Clamp (Qty: 2)
...
Other materials:
Emblem/Nameplate Replacement
Caution: Refer to Exterior Trim Emblem Removal Caution.
The part and vehicle surface should be 21?┬░C (70?┬░F) prior to installation.
The vehicle should remain inside in a temperature range of 21?┬░C (70?┬░F) for
1 hour after assembly to allow the adhesive to develop sufficient bo ...
Front Brake Rotor Replacement
Special Tools
CH-41013 Rotor Resurfacing Kit
CH-42450-A Wheel Hub Resurfacing Kit
For equivalent regional tools, refer to Special Tools.
Removal Procedure
Warning: Refer to Brake Dust Warning.
Raise and support the vehicle. Refer to Lifting and Jacking the Vehicle.
...
Radiator Outlet Hose Replacement (LDE LUW)
Special Tools
BO-38185 Hose Clamp Pliers
For equivalent regional tools, Refer to Special Tools.
Removal Procedure
Drain the cooling system. Refer to Cooling System Draining and Filling.
Remove the radiator outlet hose clamp (1) at the engine using BO-38185 ...

0.0389