Chevrolet Sonic Repair Manual: Engine Front Cover with Oil Pump Replacement
- Removal Procedure
-
- Disconnect the battery negative cable. Refer to Battery Negative Cable Disconnection and Connection.
- Set the engine to TDC. Refer to Camshaft Timing Chain Inspection.
- Raise and support the vehicle. Refer to Lifting and Jacking the Vehicle.
- Remove the front wheelhouse liner extension, right side. Refer to Front Wheelhouse Liner Inner Front Extension Replacement.
- Remove the air conditioning compressor. Refer to Air Conditioning Compressor Replacement.
- Remove the air conditioning compressor bracket. Refer to Air Conditioning Compressor Bracket Removal.
- Remove the crankshaft balancer. Refer to Crankshaft Balancer Replacement.
- Remove the oil pan. Refer to Oil Pan Replacement.
- Lower vehicle.
- Remove the drive belt tensioner. Refer to Drive Belt Tensioner Replacement.
- Remove the generator from above. Refer to Generator Replacement.
- Remove the water pump pulley and the water pump. Refer to Water Pump Replacement.
- Remove the camshaft position actuator solenoid valves. Refer to Camshaft Position Actuator Solenoid Valve Removal.
- Loosen the camshaft sprocket bolts until the camshaft position exciter wheels are free to rotate. Refer to Camshaft Timing Chain Adjustment.
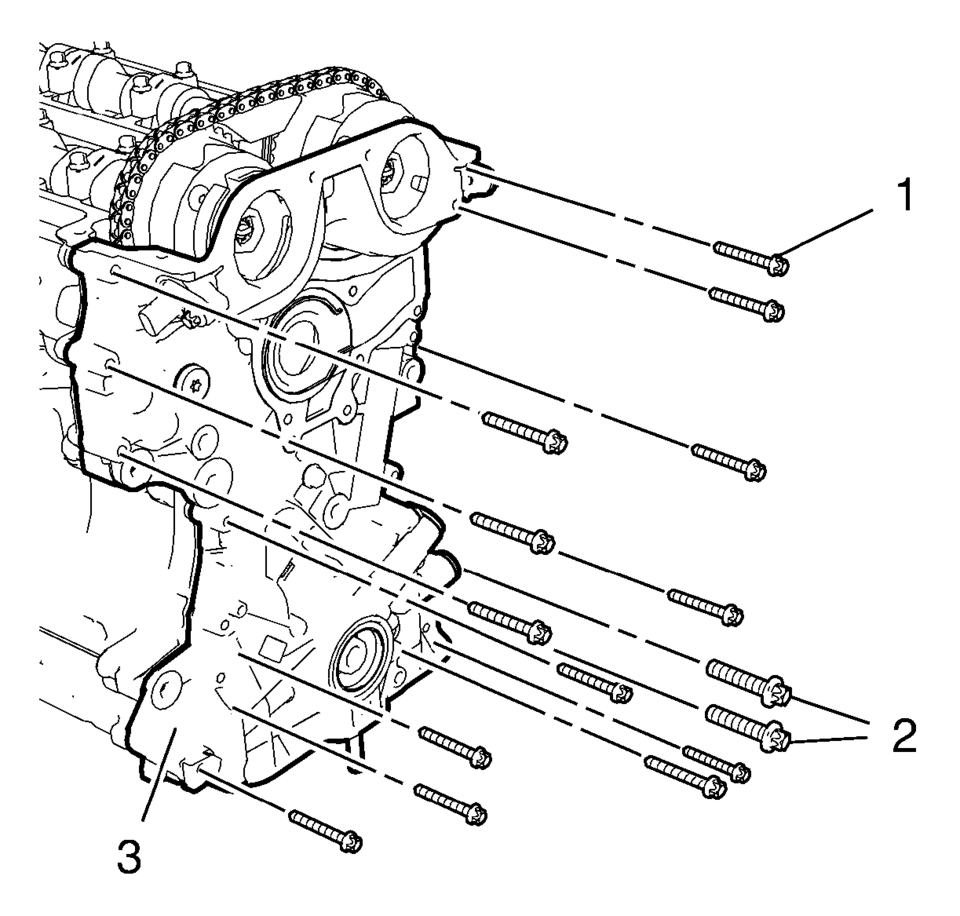
- Remove the 13 engine front cover bolts M6 (1).
- Remove the 2 engine front cover bolts M10 (2).
- Remove the engine front cover (3).
- Remove the camshaft timing chain. Refer to Camshaft Timing Chain Replacement.
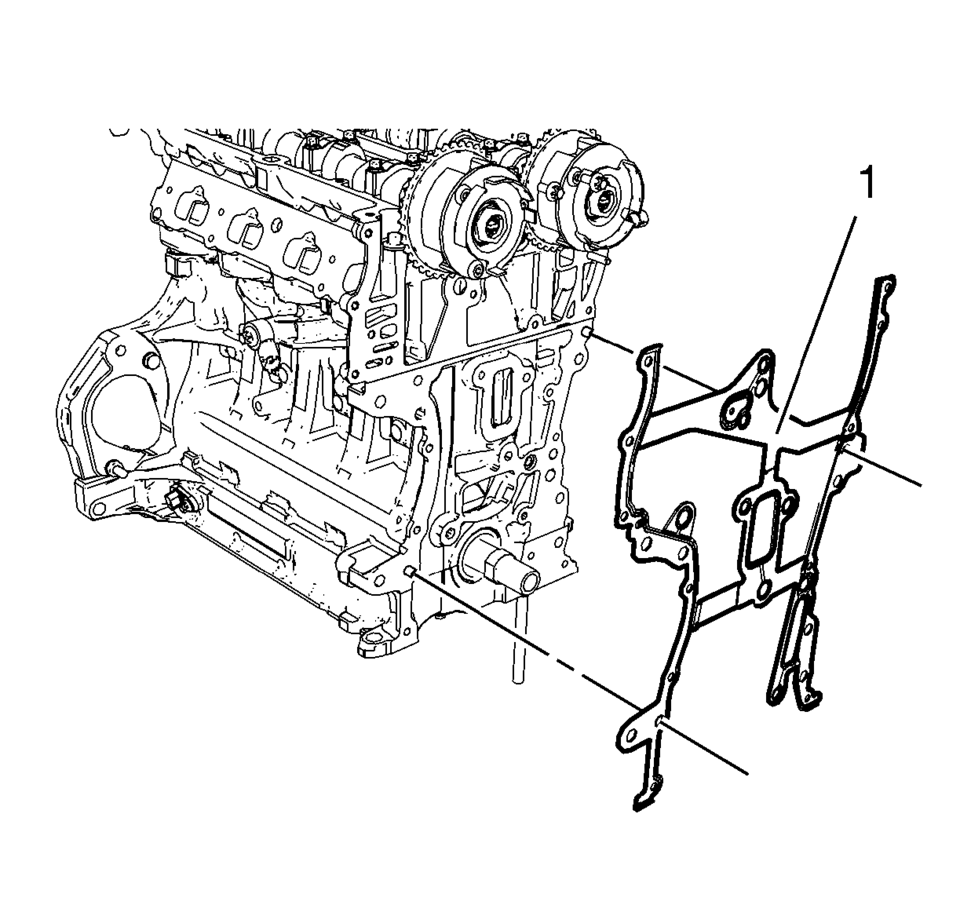
- Remove the engine front cover gasket (1).
- Remove the intake and exhaust camshaft position sensors from the engine front cover. Refer to Camshaft Position Sensor Replacement.
Note:
Removal of timing chain is necessary to get access to engine front cover gasket.
- Installation Procedure
-
- Install the intake and exhaust camshaft position sensors to the engine front cover. Refer to Camshaft Position Sensor Replacement.
- Clean the engine front cover sealing surfaces on engine block and cylinder head.
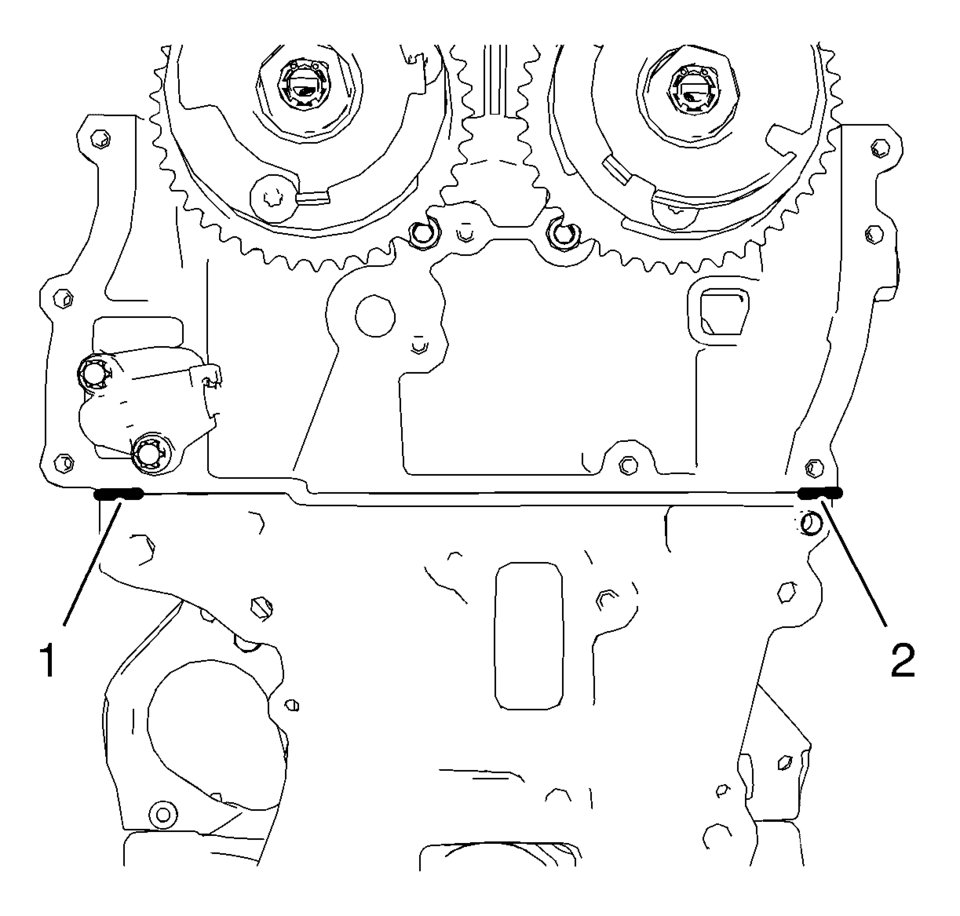
- Apply sealing compound to the shown areas (1) and (2). Refer to Adhesives, Fluids, Lubricants, and Sealers.
- Install a NEW engine front cover gasket (1).
- Install the timing chain. Refer to Camshaft Timing Chain Replacement.
- Install the engine front cover (3).
- Install the 13 engine front cover bolts M6 (1).
- Install the 2 engine front cover bolts M10 (2).
- Tighten the 13 engine front cover bolts M6 to 8 Y (71 lb in)
.
- Tighten the 2 engine front cover bolts M10 to 35 Y (26 lb ft)
.
- Tighten the camshaft sprockets, install the upper timing chain guide and remove all special tools. Refer to Camshaft Timing Chain Adjustment.
- Install the 2 camshaft position actuator solenoid valves. Refer to Camshaft Position Actuator Solenoid Valve Replacement.
- Install the water pump and the water pump pulley. Refer to Water Pump Replacement.
- Install the generator from above. Refer to Generator Replacement.
- Install the drive belt tensioner. Refer to Drive Belt Tensioner Replacement.
- Install the air conditioning compressor bracket. Refer to Air Conditioning Compressor Bracket Installation.
- Install the air conditioning compressor. Refer to Air Conditioning Compressor Replacement.
- Install the crankshaft balancer. Refer to Crankshaft Balancer Replacement.
- Install the drive belt. Refer to Drive Belt Replacement.
- Install the engine mount bracket. Refer to Engine Mount Bracket Replacement - Right Side.
- Install the engine mount. Refer to Engine Mount Replacement - Right Side.
- Install the camshaft cover. Refer to Camshaft Cover Replacement.
- Install the air cleaner assembly. Refer to Air Cleaner Assembly Replacement.
- Raise the vehicle.
- Install the oil pan. Refer to Oil Pan Replacement.
- Install the front wheelhouse liner extension, right side. Refer to Front Wheelhouse Liner Inner Front Extension Replacement.
- Lower the vehicle.
- Connect the battery negative cable. Refer to Battery Negative Cable Disconnection and Connection.
- Fill up engine oil. Refer to Engine Oil and Oil Filter Replacement.
Note:
The thickness of the sealing bead should be 2 mm (0.0787 in)
.
Note:
Mind the guide sleeves.
Note:
Mind the guide sleeves when installing the engine front cover. The complete installation procedure of the engine front cover should not take longer than 10 minutes.
Caution:
Refer to Fastener Caution.
Note:
Engine should be adjusted and fixed in TDC position.
 Engine Front Cover and Oil Pump Removal
Set engine to TDC. Refer to Camshaft Timing Chain Inspection.
Remove the 13 engine front cover bolts M6 (1).
Remove the 2 engine front cover bolts M10 (2).
...
 Piston and Connecting Rod Assemble
Special Tools
EN-49941 Remover / Installer Piston Retainer Ring
For equivalent regional tools, refer to Special Tools.
Note: Lubricate the piston pin with clean engine oil.
In ...
Other materials:
Refrigerant Recovery and Recharging
Special Tools
GE-45037 A/C Oil Injector
For equivalent regional tools, refer to Special Tools.
Warning: To prevent personal injury, avoid breathing A/C Refrigerant
and lubricant vapor or mist. Work in a well ventilated area. To remove refrigerant
from the A/C System, use service equip ...
Thrust Washer and Bearing Cleaning and Inspection
Warning: Wear safety glasses to avoid injury when using compressed
air or any cleaning solvent. Bodily injury may occur if fumes are inhaled
or if skin is exposed to chemicals.
Caution: Do not allow the bearings to spin. Turn them slowly by
hand. Spinning the beari ...
Warning/indicator lights (red)
Brake warning light
or
In the Nissan Armada, the brake warning light is a critical safety indicator
that helps monitor the condition of the braking system. When the ignition switch
is turned to the ON position, this light should illuminate briefly for a few seconds
and then turn off, ...

0.0069