Chevrolet Sonic Repair Manual: Exhaust Front Pipe Replacement (LUV,LUW)
- Removal Procedure
-
Warning:
Refer to Exhaust Service Warning.
- Remove the drivetrain and front suspension frame skid plate. Refer to Drivetrain and Front Suspension Frame Skid Plate Replacement.
- Disconnect the heated oxygen sensor-2. Refer to Heated Oxygen Sensor Replacement - Sensor 2.
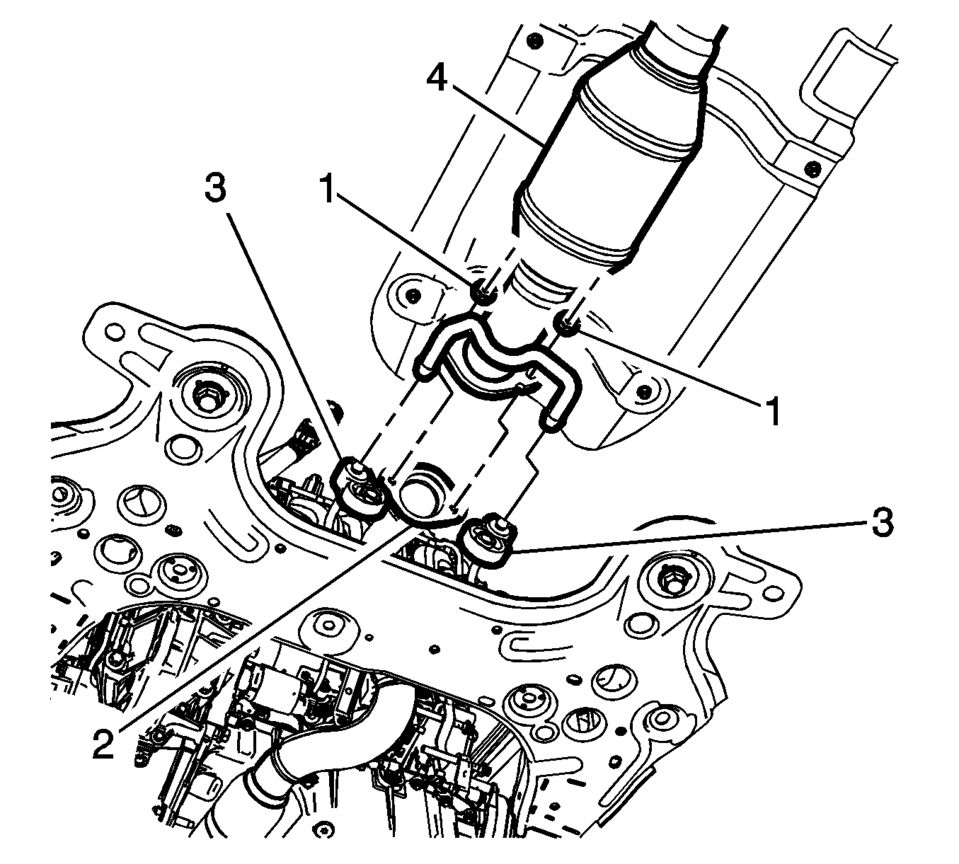
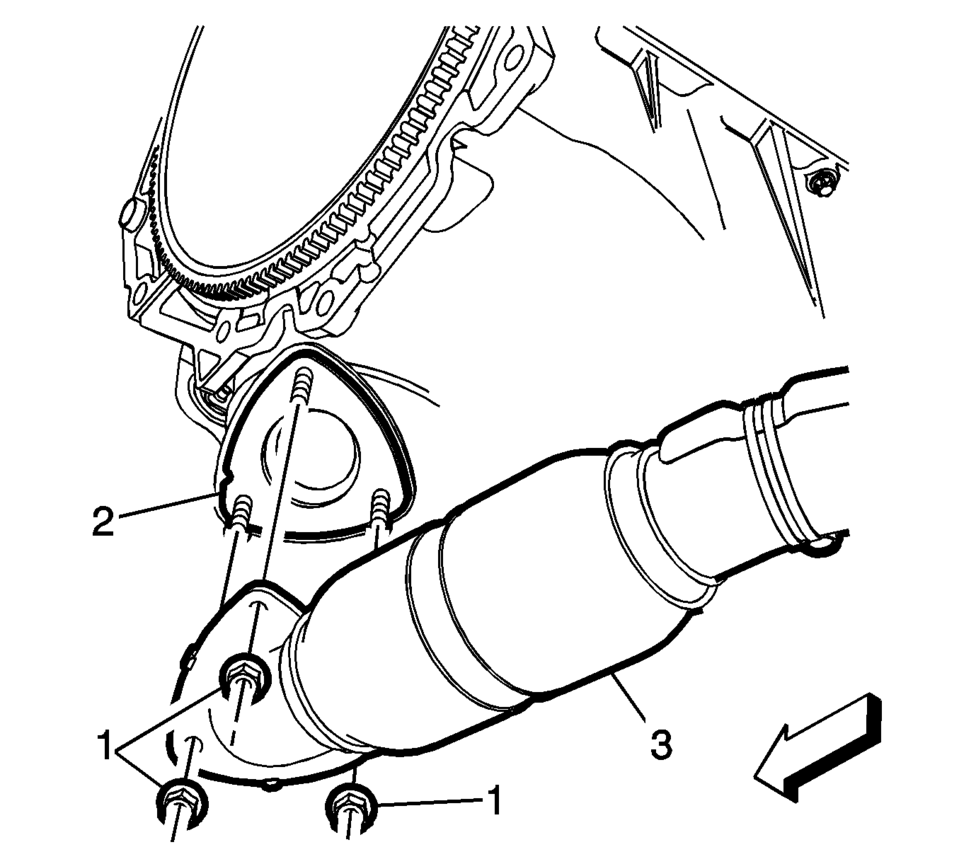
- Remove the 3–way catalytic converter fasteners (1) and disconnect the 3-way catalytic converter (4) from the front pipe.
- Discard the exhaust gasket (2).
- Remove the exhaust front pipe (3) to the catalytic converter fasteners (1).
- Remove the front pipe (3) from the catalytic converter and discard the exhaust gasket (2).
- Installation Procedure
-
- Install a NEW gasket (2) to the exhaust front pipe.
- Install the 3-way catalytic converter (4) to the exhaust isolators (3)
and tighten the fasteners (1) to 17 Y (13 lb ft)
.
- Position the exhaust front pipe (3) to the catalytic converter with a NEW gasket (2).
- Install the exhaust front pipe fasteners (1) to the catalytic converter
and tighten to 20 Y (15 lb ft)
.
- Connect the heated oxygen sensor-2. Refer to Heated Oxygen Sensor Replacement - Sensor 2.
- Install the drivetrain and front suspension frame skid plate. Refer to Drivetrain and Front Suspension Frame Skid Plate Replacement.
- Start the engine and check for exhaust leaks.
Caution:
Refer to Fastener Caution.
 Clutch Actuator Cylinder Front Pipe Replacement
Removal Procedure
Remove the battery tray. Refer to Battery Tray Replacement.
Remove as much brake fluid out of brake fluid reservoir as possible.
Unclip the clutch act ...
 Exhaust Rear Muffler Heat Shield Replacement
Exhaust Rear Muffler Heat Shield Replacement
Callout
Component Name
Preliminary Procedure
Disconnect the exhaust system hangers ...
Other materials:
Sun Load Temperature Sensor Replacement
Sun Load Temperature Sensor Replacement
Callout
Component Name
1
Sun Load Temperature Sensor Bezel
2
Sun Load Temperature Sensor
Procedure
Disconnect the electrical connector.
Twist ...
Air Conditioning Condenser Replacement (LUV)
Air Conditioning Condenser Replacement
Callout
Component Name
Preliminary Procedure
Drain the refrigerant. Refer to Refrigerant Recovery and Recharging
Remove the front bumper fascia assembly. Refer to Front Bumper Fascia ...
Air Conditioning Compressor Bracket Installation
Install the air conditioning compressor bracket (2).
Caution: Refer to Fastener Caution.
Install the 3 air conditioning compressor bracket bolts (1) and tighten
to 22 Y (16 lb ft).
...

0.0074