Chevrolet Sonic Repair Manual: Flushing
Special Tools
- BO 42220 Universal 12V Leak Detection Lamp
- GE 41447 R-134A A/C Tracer Dye Box of 24
- GE 45268 A/C Flush Adapter Kit
For equivalent regional tools, refer to Special Tools.
Note:
Flushing with the ACR 2000 is not intended to remove metal from the A/C system.
Flushing is intended to remove the following:
- Contaminated polyalkylene glycol (PAG) oil
- Desiccant, following a desiccant bag failure
- Overcharge of PAG oil
- Refrigerant contamination
- Forward Flushing Setup
-
- Install both GE 45268-9 fitting O-ring onto GE 45268-10 adapter .
- Install GE 45268-8 fitting O-ring onto suction side of GE 45268-10 adapter .
- Install GE 45268-7 fitting O-ring onto discharge side of GE 45268-10 adapter .
Note:
Forward flow refrigerant flushing is recommended for contaminated refrigerant or PAG oil.
Note:
Inspect and lubricate GE 45268 adapter kit fitting O-rings. Refer to Air Conditioning O-Ring Seal Replacement
- Reverse Flushing Setup
-
- Reverse flow refrigerant flush is recommended for desiccant bag failure. Replace condenser/receiver dehydrator assembly when A/C flush is complete and perform the following procedure:
- Inspect and lubricate GE 45268 adapter kit fitting O-rings. Refer to Air Conditioning O-Ring Seal Replacement
- Install both GE 45268-9 fitting O-ring onto GE 45268-10 adapter .
- Install GE 45268-8 fitting O-ring onto suction side of GE 45268-10 adapter .
- Install GE 45268-7 fitting O-ring onto discharge side of GE 45268-10 adapter .
Note:
- Flush Procedure
-
- Recover the refrigerant. Refer to Refrigerant Recovery and Recharging.
- Remove the thermal expansion valve (TXV). Refer to Air Conditioning Evaporator Thermal Expansion Valve Replacement.
- Install the TXV stud onto GE 45268-115 adapter .
- Install new sealing washers onto evaporator core. Refer to Air Conditioning O-Ring Seal Replacement.
- Install GE 45268-115 adapter in place of the TXV.
- Install the TXV mounting bolts and tighten to 7 Y (62 lb in)
.
- Install new washers onto liquid line and suction hose. Refer to Air Conditioning O-Ring Seal Replacement.
- Connect liquid line and suction hose to GE 45268-115 adapter .
- Install the TXV block fitting nut and tighten to 22 Y (16 lb ft)
.
- Remove the A/C compressor. Refer to Air Conditioning Compressor Replacement.
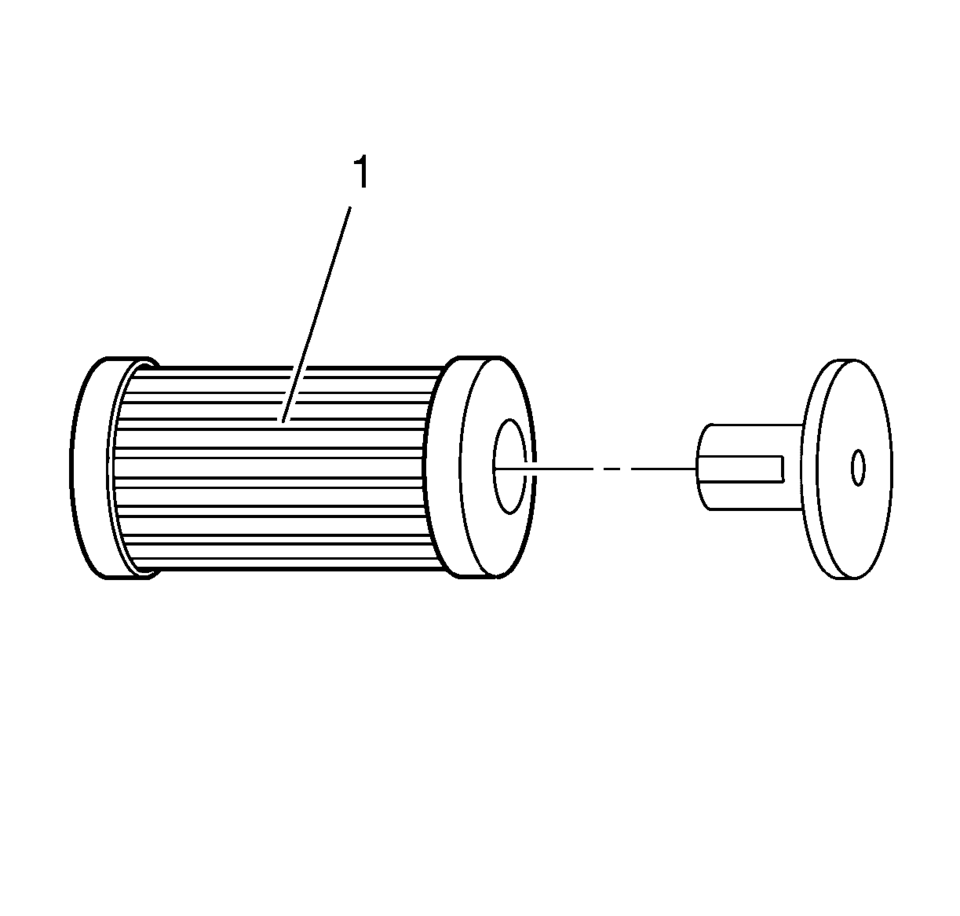
- Remove the A/C refrigerant filter (1). Refer to Air Conditioning (AC) Refrigerant Filter Replacement.
- Service the filter before each flush.
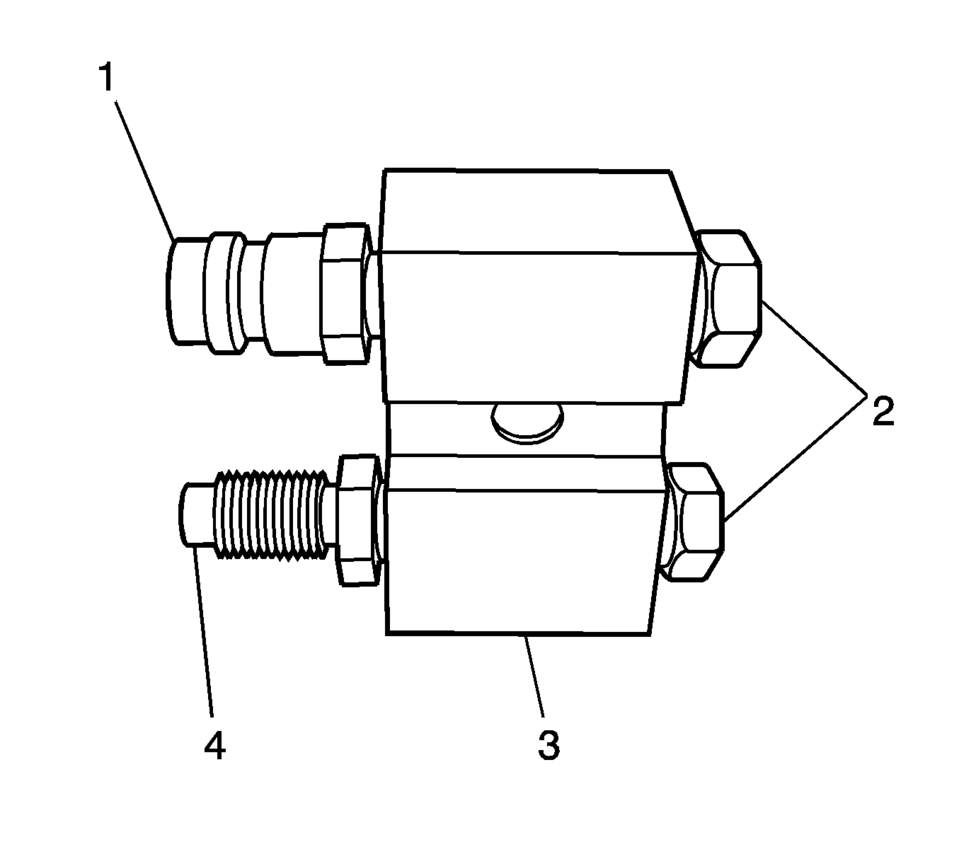
- Install new sealing washers onto A/C compressor and condenser hose. Refer to Air Conditioning O-Ring Seal Replacement. Assure that suction and discharge ports on GE 45268-10 adapter correspond to suction and discharge ports on A/C compressor to condenser hose.
- Install GE 45268-10 filter adapter to the A/C compressor to condenser hose.
- Connect GE 45268-1 filter to J 45268-7 adapter .
- Connect blue hose from A/C filling device to GE 45268 adapter .
- Connect red hose from A/C filling device to GE 45268 adapter .
- Disconnect blue hose from A/C filling device to GE 45268-1 adapter .
- Disconnect GE 45268-1 adapter from GE 45268-10 adapter .
- Remove GE 45268-10 adapter from the A/C compressor to condenser hose.
- If you will reinstall the removed A/C compressor, perform the following procedure:
Note:
Warmer engine or ambient temperatures decreases refrigerant recovery time during the A/C flush procedure.
Caution:
Refer to Fastener Caution.
Note:
The filter inside GE 45628-1 adapter is serviceable. Remove and discard check valve from the filter.
Note:
Assure that suction and discharge ports on J 45268-10 correspond to suction and discharge ports on compressor hose assembly.
Note:
Flushing will remove all PAG oil from the A/C system. The A/C system must be replenished with the correct amount of PAG oil.
- Drain PAG oil from the A/C compressor. Rotate compressor input shaft to assist in draining the PAG oil from compressor.
- Add the total system capacity of PAG oil to A/C compressor. Refer to Refrigerant System Specifications.
- Add one bottle of GE 41447 tracer dye .
Note:
Flushing will remove fluorescent leak detection dye from A/C system.
- Install the A/C compressor. Refer to Air Conditioning Compressor Replacement.
- Install new A/C refrigerant filter. Refer to Air Conditioning (AC) Refrigerant Filter Replacement.
- Remove the TXV block fitting nut.
- Disconnect liquid line and suction line from GE 45268-115 adapter .
- Remove the TXV bolts retaining GE 45268-115 adapter .
- Remove GE 45268-115 adapter .
- Inspect the TXV for debris. Clean or replace as needed.
- Install the TXV. Refer to Air Conditioning Evaporator Thermal Expansion Valve Replacement.
- Evacuate and recharge the A/C system. Refer to Refrigerant Recovery and Recharging.
- Leak test fittings using BO 42220 lamp .
 Floor Rear Air Outlet Duct Replacement - Right Side
Floor Rear Air Outlet Duct Replacement - Right Side
Callout
Component Name
Preliminary Procedure
Remove the front floor carpet. ...
 Heater Core Inlet Tube Replacement
Heater Core Inlet Tube Replacement
Callout
Component Name
Preliminary Procedures
Remove the Heater and Air Conditioning Evaporator ...
Other materials:
Front Wheel Drive Shaft Seal Replacement - Right Side
Front Wheel Drive Shaft Seal Replacement - Right Side
Callout
Component Name
Preliminary Procedures
Raise and support the vehicle. Refer to Lifting and Jacking the
Vehicle.
Remove the front wheel drive shaft from the tran ...
Shift Fork Cleaning and Inspection (Gen 1)
Warning: Wear safety glasses to avoid injury when using compressed
air or any cleaning solvent. Bodily injury may occur if fumes are inhaled
or if skin is exposed to chemicals.
Clean the following components with a suitable solvent.
Air dry all the parts.
3rd and ...
Memory seat
Basic information
The Nissan Armada memory seat system is designed to enhance comfort and personalization
by allowing drivers to store and recall their preferred driving positions effortlessly.
This advanced Nissan Armada feature includes:
Memory storage function
User profile linking to st ...

0.0082