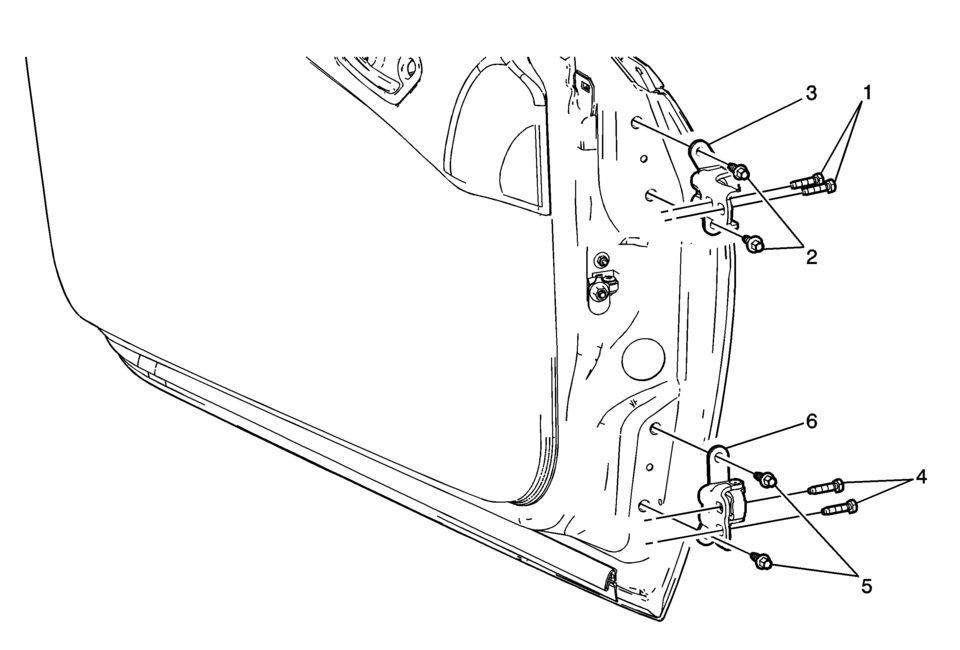
Chevrolet Sonic Repair Manual: Front Side Door Upper Hinge and Lower Hinge Replacement

|
Callout |
Component Name |
|---|---|
|
1 |
Front Side Door Upper Hinge to Body Bolt (Qty:?‚ā¨‚Äį2) Caution: Refer to Fastener Caution.
32?‚ā¨‚ÄįY (24?‚ā¨‚Äįlb?‚ā¨‚Äįft) |
|
2 |
Front Side Door Upper Hinge to Door Bolt (Qty:?‚ā¨‚Äį2) Tighten
25?‚ā¨‚ÄįY (18?‚ā¨‚Äįlb?‚ā¨‚Äįft) |
|
3 |
Front Side Door Upper Hinge |
|
4 |
Front Side Door Lower Hinge to Body Bolt (Qty:?‚ā¨‚Äį2) Tighten
32?‚ā¨‚ÄįY (24?‚ā¨‚Äįlb?‚ā¨‚Äįft) |
|
5 |
Front Side Door Lower Hinge to Door Bolt (Qty:?‚ā¨‚Äį2) Tighten
25?‚ā¨‚ÄįY (18?‚ā¨‚Äįlb?‚ā¨‚Äįft) |
|
6 |
Front Side Door Lower Hinge Procedure
If the door striker needs adjust. Refer to Front Side Door Lock Striker Adjustment. |
 Front Side Door Replacement
Front Side Door Replacement
Callout
Component Name
Warning: Refer to SIR Warning.
Preliminary Procedures
Mark the ...
 Front Side Door Weatherstrip Replacement - Body Side
Front Side Door Weatherstrip Replacement - Body Side
Callout
Component Name
Preliminary Procedures
Remove the upper center pillar t ...
Other materials:
Exhaust Manifold Heat Shield Installation
Install the exhaust manifold heat shield (2).
Caution: Refer to Fastener Caution.
Install the 3 exhaust manifold heat shield bolts (1) and the washers and
tighten to 8 Y (71 lb in).
...
Timing Belt Removal
Special Tools
EN-6333 Locking Pin
EN-6340 Locking Tool
For equivalent regional tools, refer to Special Tools.
Note: The timing belt drive gear and oil pump housing must align.
Turn the crankshaft in the direction of engine rotation, by the crankshaft
balancer bolt ...
Transmission Fluid Pump, Front Differential Carrier Baffle, and Front Differential
Ring Gear Removal (6T30)
Transmission Fluid Pump, Front Differential Carrier Baffle, and Front
Differential Ring Gear Removal
Callout
Component Name
1
Front Differential Carrier Baffle Bolts M6 x 25 (Qty: 2)
...
0.0055
