Chevrolet Sonic Repair Manual: Hydraulic Clutch System Bleeding
Warning:
Refer to Brake Fluid Irritant Warning.
Caution:
Brake fluid must not come in contact with mineral oils and greases. The smallest amount of such could lead to malfunction or breakdown of the clutch.
Caution:
Refer to Brake Fluid Effects on Paint and Electrical Components Caution.
Note:
The hydraulic clutch actuation must only be bled from "below", i.e. from the bleeder valve.
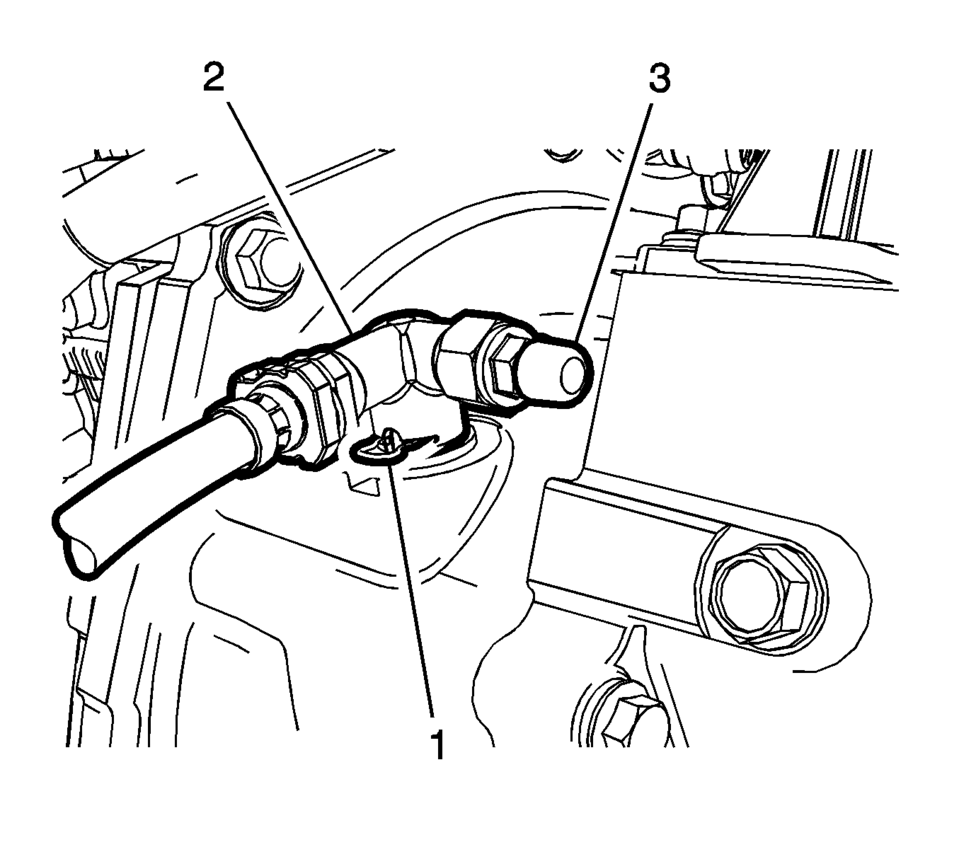
- Bleed pressure line between the clutch master cylinder and the clutch actuator cylinder using the following procedure:
- Remove the valve cap (3) from the bleeder valve.
- Fill brake fluid reservoir up to "MAX" marking.
- Press and hold clutch pedal.
- Open bleeder valve until air or air/brake fluid mixture emerges.
- Close the bleeder valve.
- Release the clutch pedal slowly.
- Wait approximately 5 seconds.
- Repeat this bleeding process 4 times.
- Tighten bleeder valve .
- Push valve cap on to bleeder valve to protect the bleeder valve.
- Check shifting for ease of movement with vehicle stationary, with engine running and with clutch disengaged.
- Road test the vehicle to ensure proper operation.
Undertake road test using varying RPM ranges and frequent gear changes, bring vehicle to operating temperature during this process. Ensure the brake and clutch system is operating correctly.
Note:
The following operational stages must be undertaken to fill the pressure line between the master cylinder and the clutch actuator cylinder. When bleeding, ensure that the brake fluid reservoir is always full and does not run dry.
Note:
Do not close the bleeder valve too fast.
 Clutch System Description and Operation
Clutch Spin Down Time
Inspect the clutch spin down time as follows:
Apply the parking brake and block the vehicle wheels.
Shift the manual transmission into NEUTRAL.
Start the eng ...
 Clutch Master Cylinder Replacement
Removal Procedure
Remove the battery tray. Refer to
Battery Tray Replacement.
Remove as much brake fluid out of brake fluid reservoir
as possible.
Remove the clutch ...
Other materials:
Rear Window Wiper/ Washer
If equipped with the rear wiper/ washer, the controls are on the end of the windshield
wiper lever.
ON: Press the upper portion of the button for continuous rear window wipes.
OFF: The rear wiper turns off when the button is returned to the middle position.
INT (Intermittent Rear Wipes): Pres ...
Fastener Tightening Specifications - Wheels
Fastener Tightening Specifications
Application
Specification
Metric
English
Clamp Fit TPM Stem Locknut
7 Y Dynamically
62 lb in
Clamp ...
Air Conditioning Refrigerant Service Valve Core Replacement
Special Tools
GE-39400-A Halogen Leak Detector
GE-46246 Valve Core Removal Tool
For equivalent regional tools, refer to Special Tools.
Removal Procedure
Recover the refrigerant. Refer to Refrigerant Recovery and Recharging.
Remove the service port valve cor ...

0.0053