Chevrolet Sonic Repair Manual: Manual Transmission Shift Lever and Selector Lever Cable Replacement
- Removal Procedure
-
- Remove the battery tray. Refer to Battery Tray Replacement.
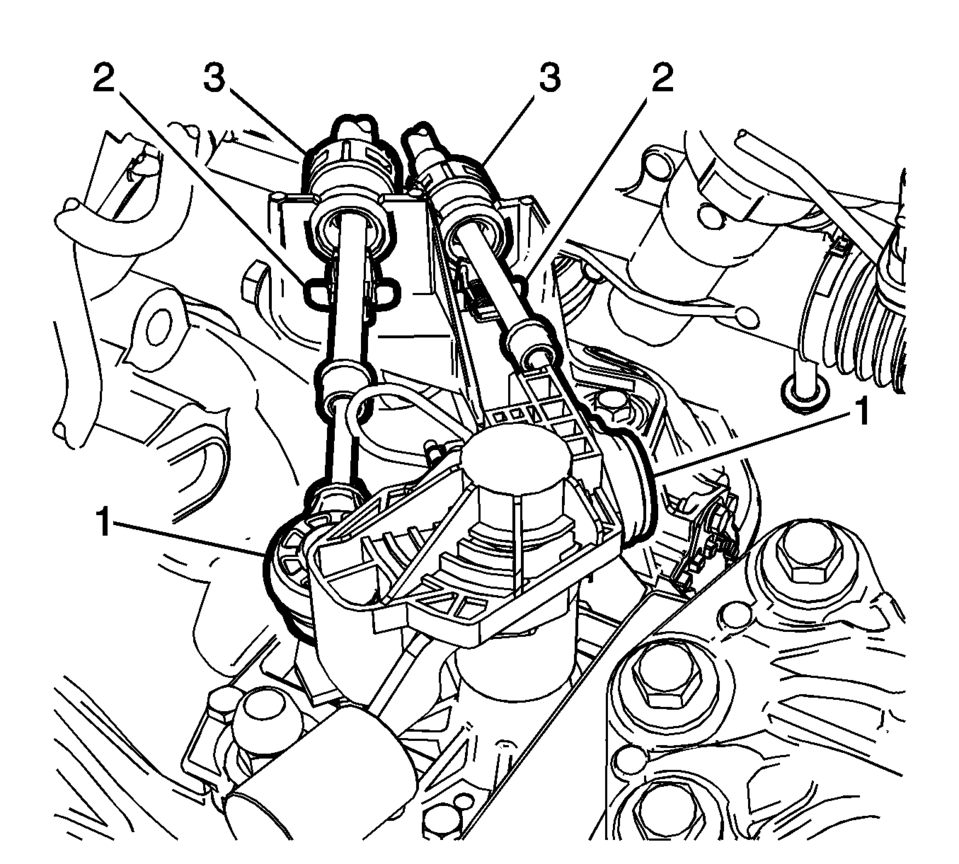
- Disconnect the shift lever and selector cable ends (1) from the transmission shift lever and selector levers.
- Pull the cable retainers (2) to release the shift lever and selector cable from the shift lever and selector cable bracket.
- Disconnect the shift lever and selector cables (3) from the shift lever and selector cable bracket.
- Remove the floor console. Refer to Front Floor Console Replacement.
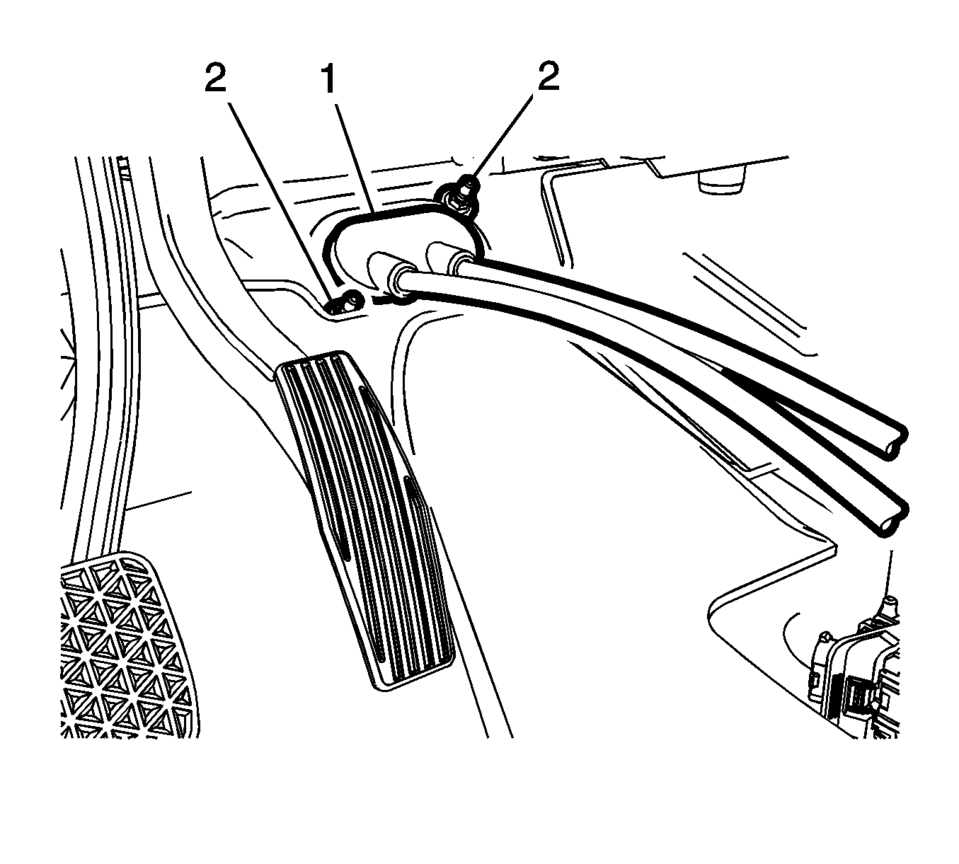
- Move the floor carpet in order to get access to the gear shift lever and selector cable grommet (1).
- Remove the grommet nuts (2).
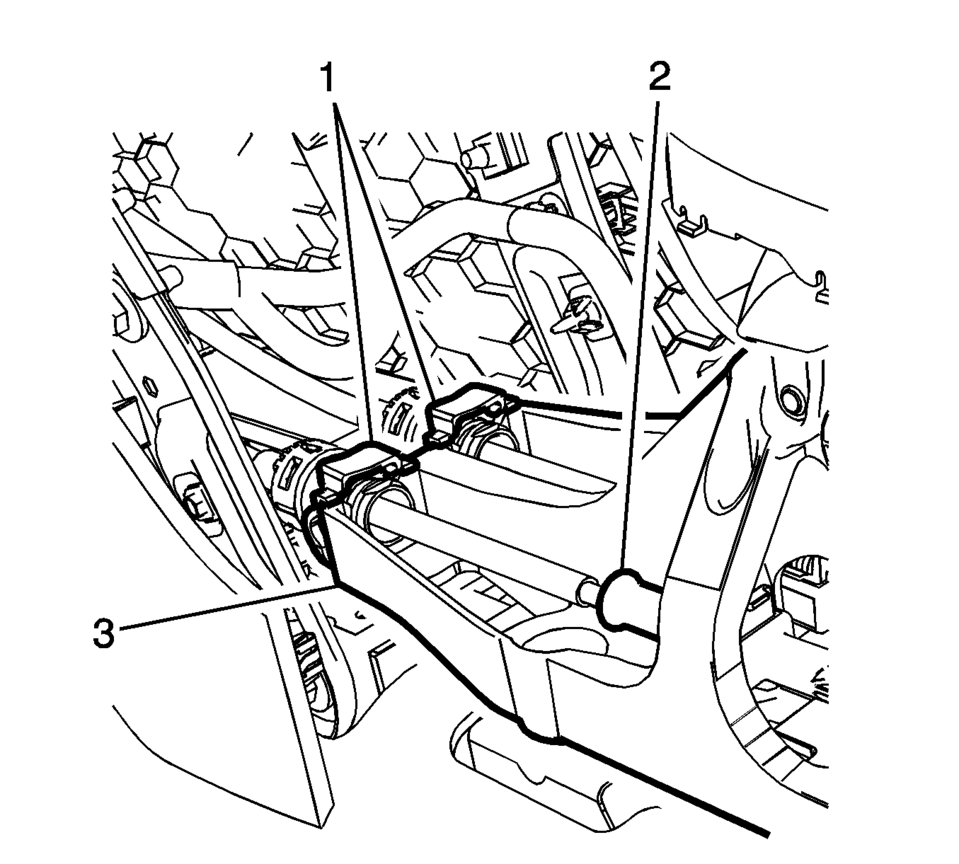
- Lift both cable adjustment retainers (1), one for each cable, to release the shift lever and selector cable.
- Pull the shift lever and selector cable retainers (1) from the transmission control assembly (3)
- Remove the shift lever and selector cable from the shift lever and selector control.
- Pull the shift lever and selector cable assembly through the cowl into the passenger compartment.
- Remove the shift lever and selector cable assembly from the vehicle.
\i

.1
- Installation Procedure
-
- Position the shift lever and selector cable assembly in the vehicle.
- Gently pull the shift lever and selector cable assembly through the cowl into the engine compartment.
- Connect the shift lever and selector cable ends (1) to the transmission shift lever and selector lever.
- Install the shift lever and the selector lever cable (3) to the shift lever and selector lever cable bracket.
- Move the floor carpet in order to get access to the shaft lever and selector lever cable grommet (1).
- Install the grommet nuts and tighten to 9 Y
(80 lb in)
- Connect the shift lever and selector lever cables to the shaft and selector control adjusters (2).
- Install the shift lever and selector lever cable retainers (1) to the transmission control (3).
- Press down and Lock both cable adjustment retainers (1) one for each cable, to adjust the shift lever and selector lever cable.
- Adjust the shift lever and selector lever cables. Refer to Manual Transmission Shift Lever Cable Adjustment.
- Install the floor console. Refer to Front Floor Console Replacement.
- Install the battery tray. Refer to Battery Tray Replacement.
- Verify correct operation of the transmission control assembly.
\i
Caution:
Refer to Component Fastener Tightening Caution.
.1
 Manual Transmission Shift Lever and Selector Lever Cable Adjustment
Remove the floor console. Refer to
Front Floor Console Replacement.
Lift upward and disengage (do not remove) both cable lock
adjusters (1) to release the internal cable asse ...
 Selector and Shift Lever Cable Bracket Replacement
Removal Procedure
Remove the battery tray. Refer to
Battery Tray Replacement.
Disconnect the shift lever and selector lever cable
end (1) from the transmissio ...
Other materials:
Liftgate Strut Replacement
Liftgate Strut Replacement
Callout
Component Name
1
Liftgate Strut
Warning: When a lift gate hold open device is being removed
or installed, provide alternate support to avoid the possibility of
damage ...
Mode Control Cable Replacement (LHD)
Mode Control Cable Replacement
Callout
Component Name
Preliminary Procedures
Remove the heater and air conditioning control.Refer to Heater and
Air Conditioning Control Replacement
Remove the instrument panel lower trim p ...
How to activate/deactivate the automatic brake hold function
To enable the automatic brake hold feature in your Nissan Armada, ensure the
ignition switch is in the ON position, then press the automatic brake hold switch
1. Once activated, the indicator light on the switch 2 will illuminate, confirming
that the system is ready for operation.
When ...

0.0063