Chevrolet Sonic Repair Manual: Rear Brake Backing Plate Replacement
- Removal Procedure
-
Warning:
Refer to Brake Dust Warning.
- Raise and support the vehicle. Refer to Lifting and Jacking the Vehicle.
- Remove the tire and wheel assembly. Refer to Tire and Wheel Removal and Installation.
- Remove the rear wheel speed sensor, if equipped. Refer to Rear Wheel Speed Sensor Replacement.
- Remove the rear brake cylinder. Refer to Rear Brake Cylinder Replacement.
- Remove the brake shoes. Refer to Brake Shoe Replacement.
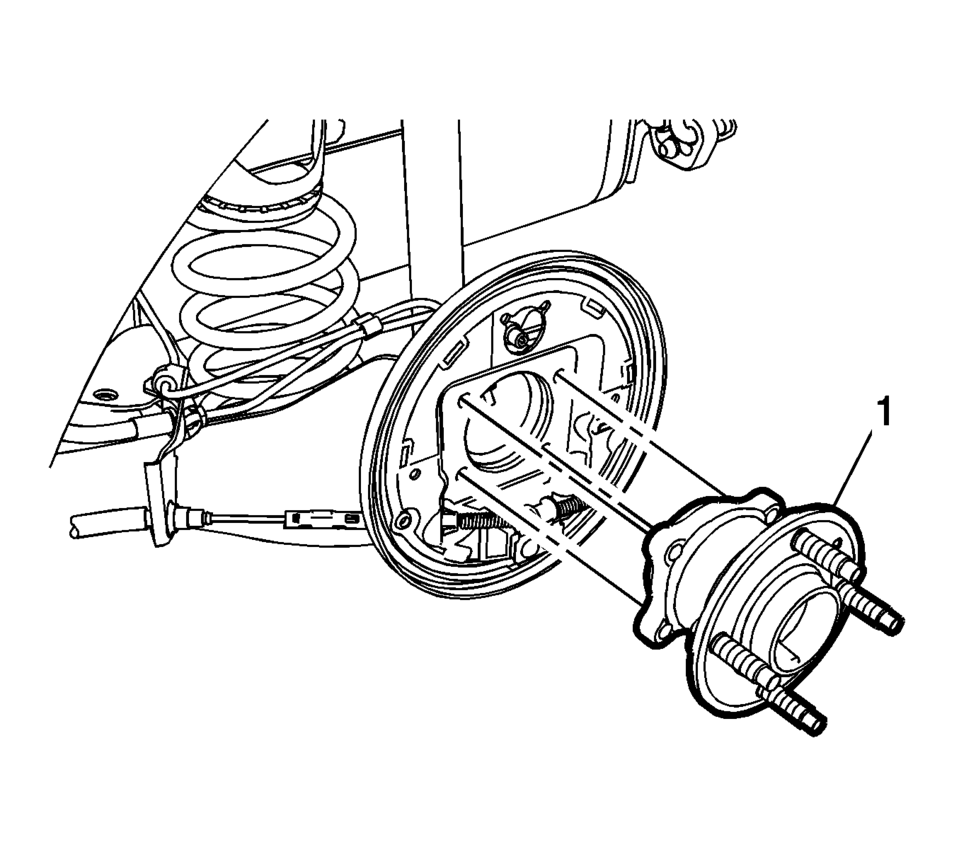
- Remove the rear wheel bearing and hub assembly (1). Refer to Rear Wheel Bearing and Hub Replacement.
- Disconnect the front park brake cable from the park brake cable connector (1).
- Remove the rear brake backing plate (2).
- If necessary, remove the park brake cable from the rear brake backing plate by compressing the park brake cable locking tab.

Note:
The park brake cable connector is part of the cable attached to the rear brake backing plate.
- Installation Procedure
-
- If removed, install the park brake cable to the rear brake backing plate.
- Ensure the park brake cable locking tab is fully engaged in the rear brake backing plate.
- Insert the front park brake cable into the park brake cable connector (1).
- Install the rear brake backing plate (2).
- Install the rear wheel bearing and hub assembly (1). Refer to Rear Wheel Bearing and Hub Replacement.
- Install the rear wheel speed sensor, if equipped. Refer to Rear Wheel Speed Sensor Replacement.
- Install the rear brake cylinder. Refer to Rear Brake Cylinder Replacement.
- Install the brake shoes. Refer to Brake Shoe Replacement.
- Install the tire and wheel assembly. Refer to Tire and Wheel Removal and Installation.
 Parking Brake Cable Replacement (Drum Brake)
Removal Procedure
Remove the front floor console. Refer to Front Floor Console Replacement.
Ensure that the parking brake lever is in the fully released position.
Us ...
 Rear Brake Cylinder Overhaul
Disassembly Procedure
Warning: Refer to Brake Dust Warning.
Warning: Refer to Brake Fluid Irritant Warning.
Raise and support the vehicle. Refer to Lifting and J ...
Other materials:
Tire Pressure Monitor Operation
This vehicle may have a Tire Pressure Monitor System (TPMS). The TPMS is designed
to warn the driver when a low tire pressure condition exists. TPMS sensors are mounted
onto each tire and wheel assembly, excluding the spare tire and wheel assembly.
The TPMS sensors monitor the air pressure in ...
Exhaust Manifold Installation
Clean the exhaust manifold sealing surface.
Install a NEW exhaust manifold gasket (1) to the cylinder head.
Caution: Refer to Fastener Caution.
Caution: Refer to Torque-to-Yield Fastener Caution.
Install the exhaust manifold (3) and tighten the NEW nu ...
Types of tires
Basic information
WARNING
When replacing tires on your Nissan Armada, always ensure that all four
tires are identical in type (for example: Summer, All Season, or Snow) as well
as in construction.
Using mismatched tires can negatively impact vehicle stability, handling,
and safety ...

0.0112