Chevrolet Sonic Repair Manual: Rear Side Door Trim Replacement (Hatchback)
|
Callout |
Component Name |
|---|---|
|
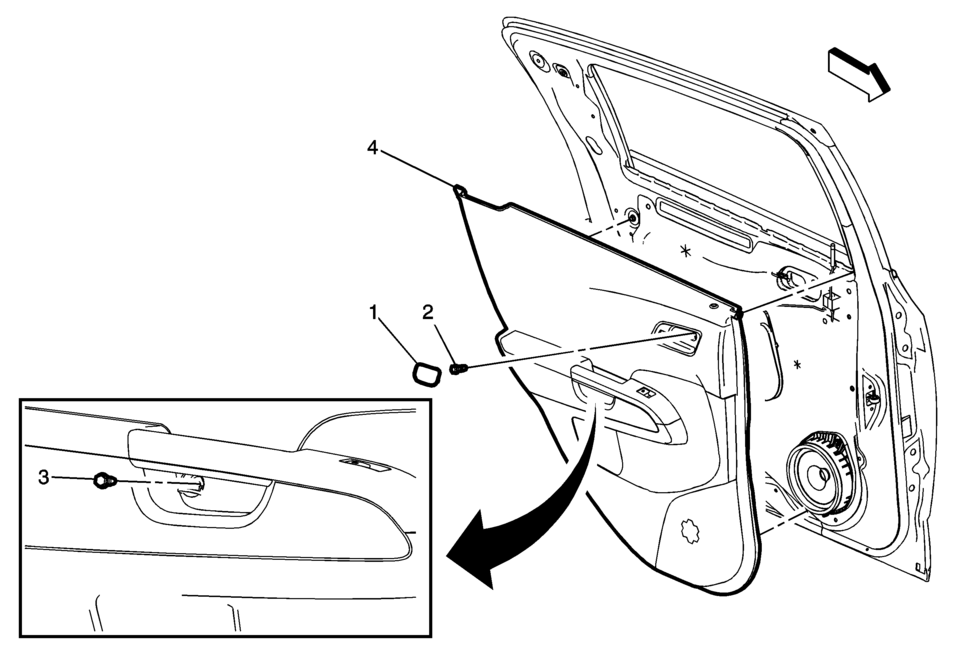
Preliminary Procedure
Remove the rear side door upper rear trim panel. Refer to Rear Side Door Upper Rear Trim Panel Replacement. |
|
|
1 |
Rear Side Door Inside Handle Bolt Cap |
|
2 |
Rear Side Door Inside Handle Fastener Caution: Refer to Fastener Caution. Procedure
Pull handle back to remove cap. Use suitable tool to unsnap. |
|
3 |
Rear Side Door Trim Fastener Procedure
Use a small flat-bladed tool to open the rear side door trim integral cap to access the fastener. |
|
4 |
Rear Side Door Trim Assembly Procedure
|
 Rear Compartment Stowage Shelf Replacement (Hatchback)
Rear Compartment Stowage Shelf Replacement
Callout
Component Name
1
Rear Compartment Stowage Shelf Assembly
...
 Rear Side Door Trim Replacement (Sedan)
Rear Side Door Trim Replacement
Callout
Component Name
1
Rear Side Door Inside Handle Bolt Cap
2
...
Other materials:
Where to Put the Restraint
According to accident statistics, children and infants are safer when properly
restrained in a child restraint system or infant restraint system secured in a rear
seating position.
Whenever possible, children aged 12 and under should be secured in a rear seating
position.
Never put a rear-fa ...
Rear Vision Camera (RVC)
This vehicle may have the RVC system. Read this entire section before using it.
The RVC system can assist the driver when backing up by displaying a view of
the area behind the vehicle.
Warning
The RVC system does not display children, pedestrians, bicyclists, animals,
or any other object loc ...
Rear Side Door Window Replacement (Hatchback)
Rear Side Door Window Replacement
Callout
Component Name
Warning: Refer to Glass and Sheet Metal Handling Warning.
Preliminary Procedures
Remove the rear side door trim panel. Refer to Rear Side Door Trim
...

0.0057