Chevrolet Sonic Repair Manual: Stabilizer Shaft Link Replacement
|
Callout |
Component Name |
|---|---|
Preliminary Procedure
|
|
|
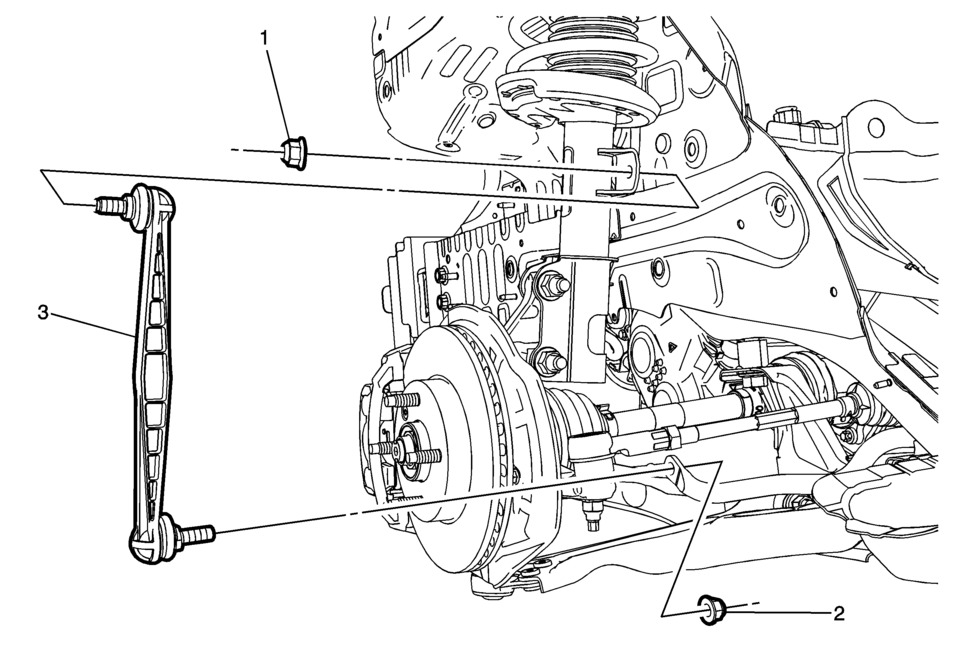
1 |
Front Stabilizer Shaft Link Upper Nut Caution: Refer to Fastener Caution. Procedure
Use the proper size Allen wrench to hold the stabilizer shaft link stud when loosening or tightening the stabilizer shaft link nut. Tighten
65 Y (48 lb ft) |
|
2 |
Front Stabilizer Shaft Link Lower Nut Procedure
Use the proper size Allen wrench to hold the stabilizer shaft link stud when loosening or tightening the stabilizer shaft link nut. Tip: When removing the stabilizer shaft link lower nut, remove both of the upper nuts first and the lift up the stabilizer ends in order to get the tool access to the lower nut.
65 Y (48 lb ft) |
|
3 |
Front Stabilizer Shaft Link |
 Rear Spring, Insulator, and Jounce Bumper Replacement
Rear Spring, Insulator, and Jounce Bumper Replacement
Callout
Component Name
Preliminary Procedure
Raise and support the vehicl ...
 Stabilizer Shaft Replacement
Removal Procedure
Remove the intermediate steering shaft lower bolt. Refer to Intermediate
Steering Shaft Replacement.
Raise and support the vehicle. Refer to Lifting and Jacking ...
Other materials:
CD Player
The CD player can play audio CDs and MP3 CDs.
The CD player will not play 8 cm (3 in) CDs.
Care of CDs
Sound quality can be reduced due to disc quality, recording method, quality of
the music recorded, and how the disc has been handled. Handle discs carefully and
store them in their original ...
Body Hinge Pillar Lower Reinforcement Replacement
Removal Procedure
Warning: Refer to Approved Equipment for Collision Repair
Warning.
Disable the SIR system. Refer to SIR Disabling and Enabling.
Disconnect the negative battery cable. Refer to Battery Negative Cable
Disconnection and Connection.
Remove all ...
Front Side Door Window Regulator Motor Replacement
Front Side Door Window Regulator Motor Replacement
Callout
Component Name
Warning: Refer to Glass and Sheet Metal Handling Warning.
Preliminary Procedure
Remove the front side door window regulator. Front Side ...

0.0055