Chevrolet Sonic Repair Manual: Timing Belt Tensioner Replacement
Special Tools
- EN-6333 Timing Belt Tensioner Locking Pin
- EN-6340 Camshaft Locking Tool
- EN-45059 Torque Angle Sensor Kit
For equivalent regional tools, refer to Special Tools.
- Removal Procedure
-
- Remove the air cleaner assembly. Refer to Air Cleaner Assembly Replacement.
- Remove the drive belt tensioner. Refer to Drive Belt Tensioner Replacement.
- Remove the timing belt upper front cover. Refer to Timing Belt Upper Front Cover Removal.
- Set crankshaft balancer in direction of engine rotation to cylinder 1 TDC of combustion stroke (1).
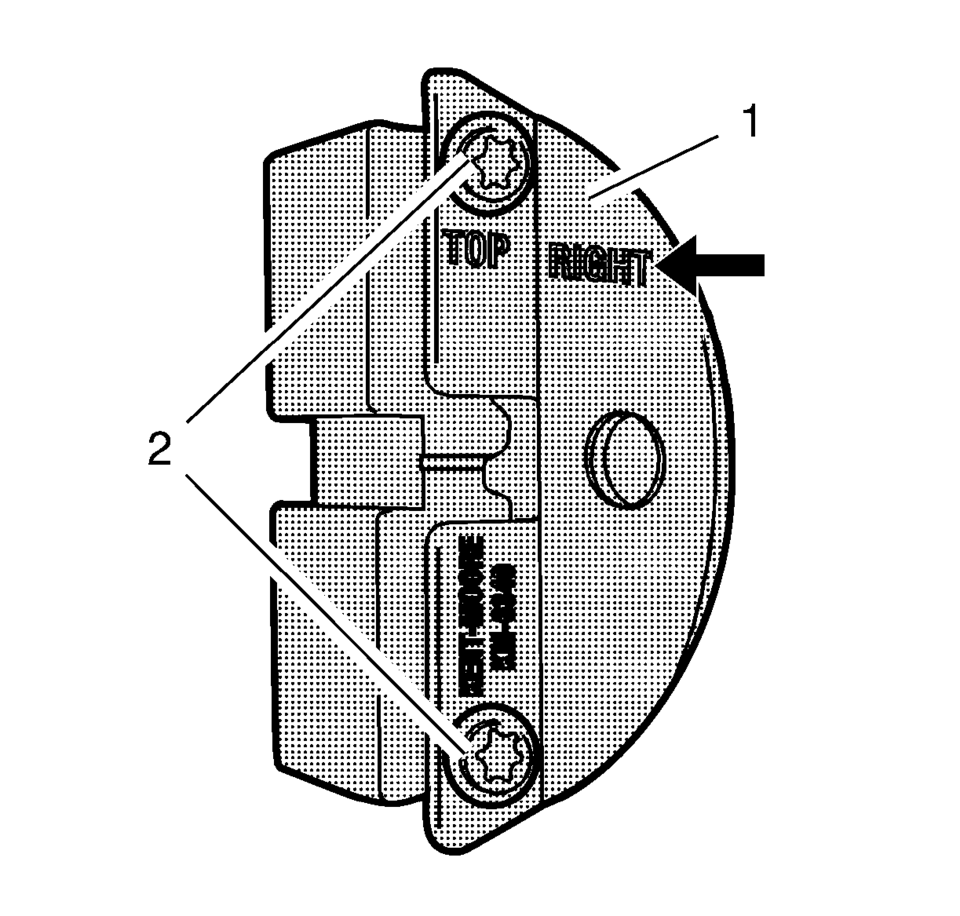
- Prepare the right half of the EN-6340 locking tool.
- Remove the 2 bolts (2).
- Remove the front panel (1).
- Install the EN-6340 locking tool into the camshaft adjusters.
- Install the EN-6340-left locking tool (1) in the camshaft adjusters as shown.
- Install EN-6340-right locking tool (2) in the camshaft adjusters as shown.
- Remove EN-6340 locking tool.
- Remove the crankshaft balancer. Refer to Crankshaft Balancer Replacement.
- Remove the engine mount bracket. Refer to Engine Mount Bracket Replacement.
- Remove the timing belt center front cover. Refer to Timing Belt Center Front Cover Removal.
- Remove the timing belt lower front cover. Refer to Timing Belt Lower Front Cover Removal.
- Loosen the timing belt tensioner bolt.
- Apply tension to the drive belt tensioner (2) in the direction of the arrow, using an allen key (1).
- Install the EN-6333 locking pin (3).
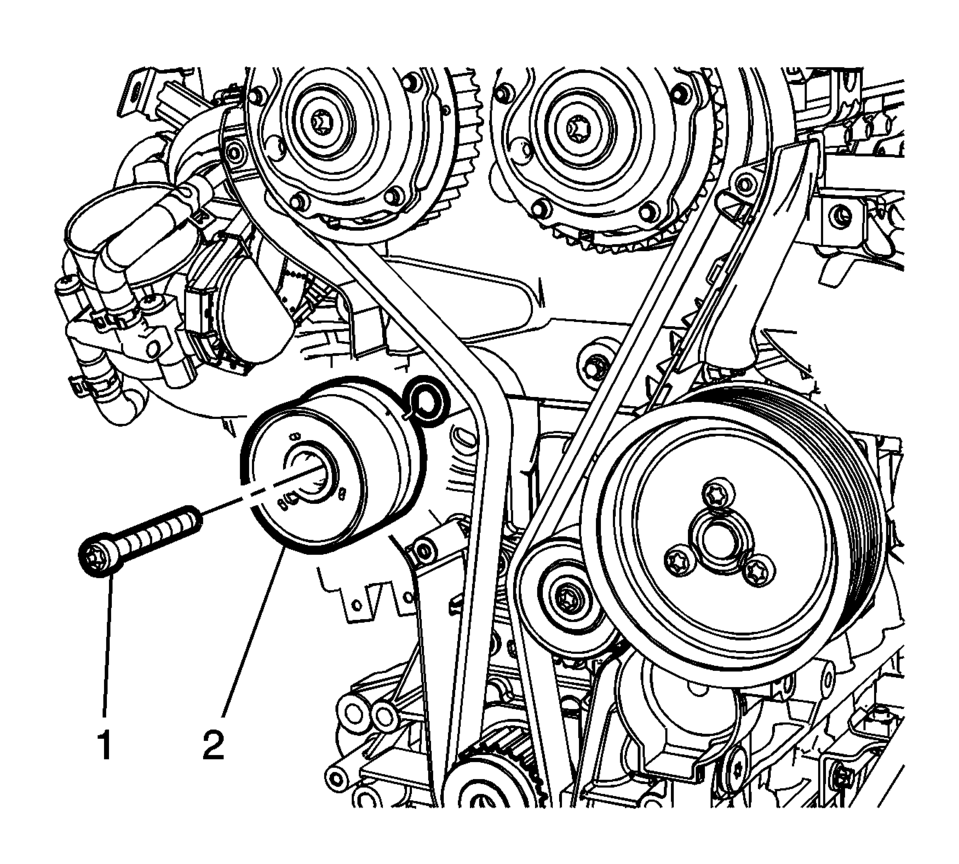
- Remove the timing belt tensioner bolt (1) and the timing belt tensioner (2).
- Discard the timing belt tensioner bolt (1).

Note:
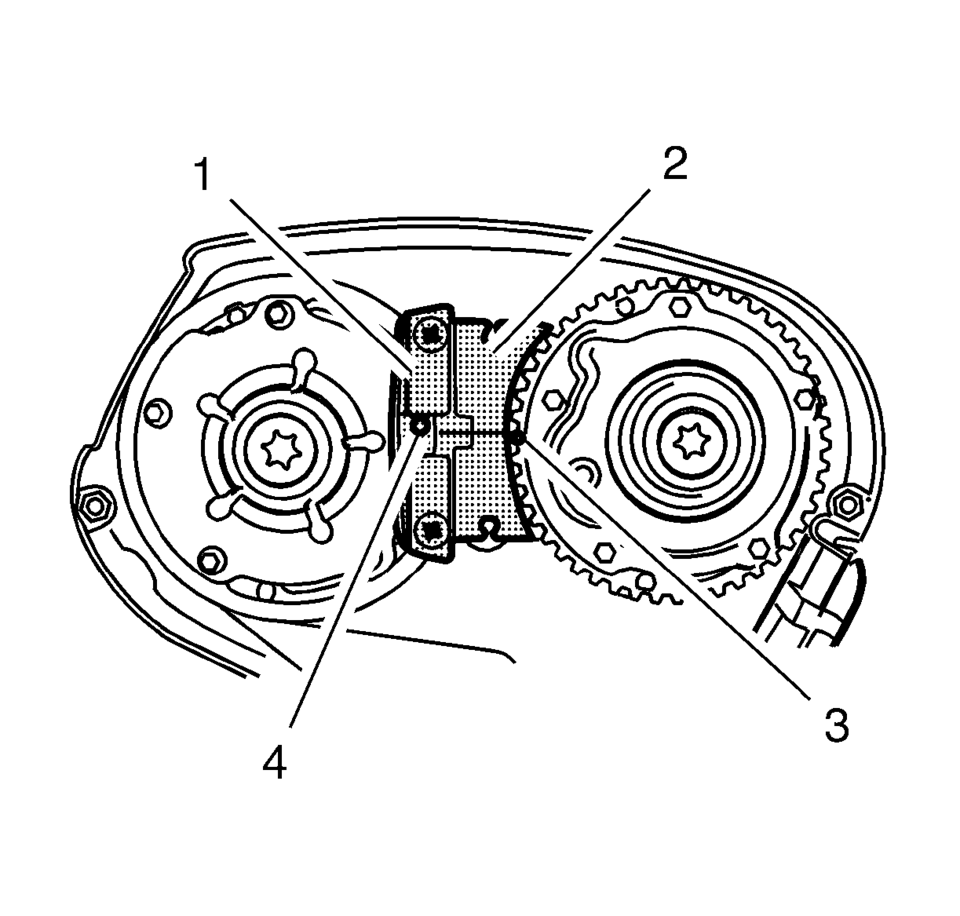
The spot type marking (4) on the intake camshaft adjuster does not correspond to the groove of EN-6340-left during this process but must be somewhat above as shown.
Note:
The spot type marking (3) on the exhaust camshaft adjuster must correspond to the groove on EN-6340-right.

- Installation Procedure
-
- Clean the timing belt tensioner thread.
- Install the timing belt tensioner (2).
- Install a new timing belt tensioner bolt (1).
- Apply tension to the drive belt tensioner (2) in the direction of the arrow, using an allen key (1).
- Remove the EN-6333 locking pin (3).
- Release tension on timing belt tensioner.
- Tighten the timing belt tensioner bolt in three passes using the EN-45059 torque angle:
- First pass tighten to 20 Y (15 lb ft)
.
- Second pass to 120 degrees
.
- Third pass to 15 degrees
.
- Install the timing belt lower front cover. Refer to Timing Belt Lower Front Cover Installation.
- Install the timing belt center front cover. Refer to Timing Belt Center Front Cover Installation.
- Install the engine mount bracket. Refer to Engine Mount Bracket Replacement.
- Install the crankshaft balancer. Refer to Crankshaft Balancer Replacement.
- Check the timing.
- Turn the crankshaft 720 degrees in the direction of engine rotation by the bolt on the crankshaft balancer.
- Install EN-6340-left locking tool (1) into the camshaft adjusters as shown.
- Install EN-6340-right locking tool (2) into the camshaft adjusters as shown.
- Install the drive belt tensioner. Refer to Drive Belt Tensioner Replacement.
- Remove the EN-6340 locking tool.
- Install the timing belt upper front cover. Refer to Timing Belt Upper Front Cover Installation.
- Install the air cleaner assembly. Refer to Air Cleaner Assembly Replacement.
Note:
The timing belt tensioner moves automatically to the correct position.
Caution:
Refer to Fastener Caution.
Note:
Note the marking at the camshaft sprockets.
Note:
The spot type marking (4) on the intake camshaft adjuster does not correspond to the groove of EN-6340-left during this process but must be somewhat above as shown.
Note:
The spot type marking (3) on the exhaust camshaft adjuster must correspond to the groove on EN-6340-right.
Note:
Note the marking at the crankshaft balancer and the cover (1) must align before installing the drive belt.
 Timing Belt Tensioner Removal
Remove the tensioner bolt (1).
Remove the timing belt tensioner (2).
...
 Timing Chain Tensioner Installation
Install the timing chain tensioner (2).
Caution: Refer to Fastener Caution.
Install the 2 timing chain tensioner bolts (1) and tighten to 8 Y (71 ...
Other materials:
Front and Rear Suspension Modification Kit Installation
Installation Instruction Part Number
23158166
23158167
Tools Required
CH 49375 Strut Rod Nut Socket
For equivalent regional tools, refer to Vehicle Service Manual.
Front Strut Removal Procedure
Remove the air inlet grille panel. Refer to Vehicle Service Manual.
Raise a ...
Reverse (Gen 1)
When the gear selector lever is moved to the Reverse (R) position (from the Park
position) the normally-high 35R pressure control solenoid 2 is commanded ON and
the following changes occur in the transmission? hydraulic and electrical systems:
3-5-Reverse Clutch Applies
Manual Valv ...
Resetting the seat positions
Basic information
The Nissan Armada is equipped with a memory system for 3rd row power seats, allowing
them to retain their original positions. However, under certain conditions such
as power interruption, the stored position may be lost and require recalibration.
WARNING
During the reset pro ...

0.0052