Chevrolet Sonic Repair Manual: Transmission Control Replacement
- Removal Procedure
-
- Remove the floor console. Refer to Front Floor Console Replacement.
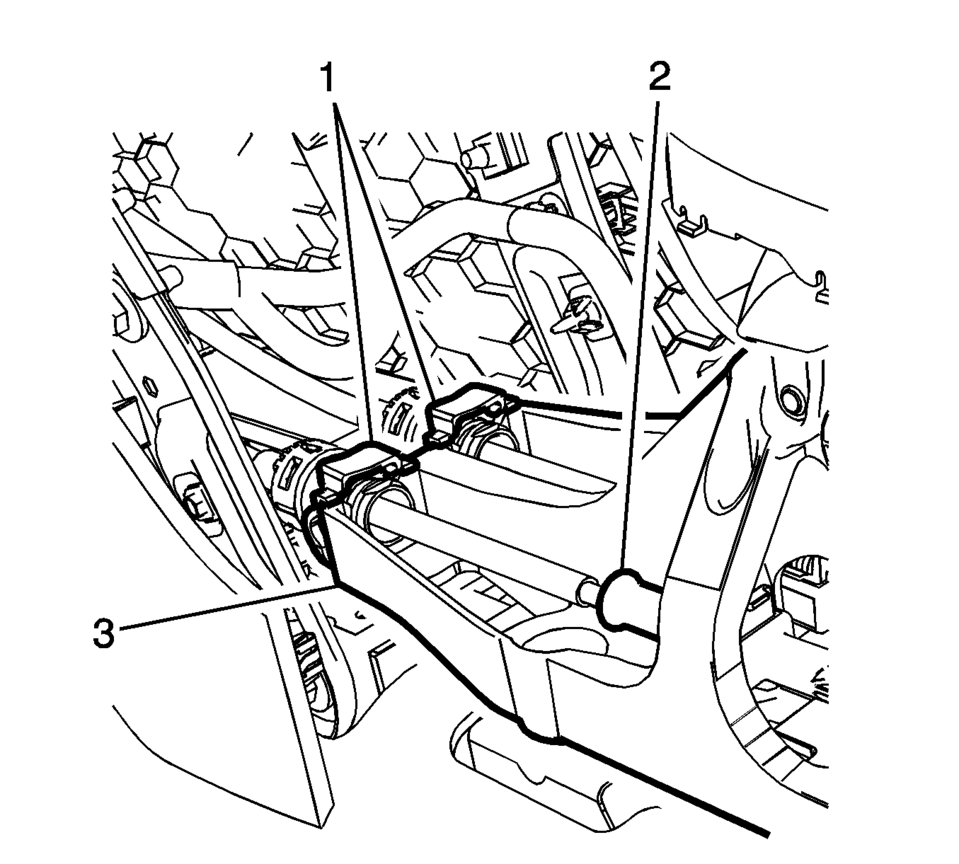
- Lift both cable adjustment retainers (1), one for each cable, to release the shift lever and selector lever cable.
- Pull the shift lever and selector lever cable retainers (1) from the transmission control assembly (3).
- Remove the shift lever and selector cable from the shift and selector control
- Remove the 4 transmission control bolts (1).
- Remove the transmission control from the vehicle.

.1

- Installation Procedure
-
- Position the transmission control in the vehicle.
- Install the 4 transmission control bolts (1) and tighten
to 9 Y (80 lb in)
.
- Connect the shift lever and selector lever cables to the shift and selector control adjusters (2).
- Install the shift lever and selector lever cable retainers (1) to the transmission control (3)
- Press down and lock both cable adjustment retainers (1), one for each cable, to adjust the shift lever and selector lever cable.
- Adjust the shift lever and selector level cables. Refer to Manual Transmission Shift Lever Cable Adjustment.
- Install the floor console. Refer to Front Floor Console Replacement.
- Verify the correct operation of the transmission control assembly.
Caution:
Refer to Fastener Caution.
.1
 Transmission Control Lever Boot Replacement
Transmission Control Lever Boot Replacement
Callout
Component Name
Preliminary Procedure
Remove the front floor console. Refer ...
 Transmission Disassemble (Gen 1)
Special Tools
3-9506289 Universal Adapter
R-0007758 Holding Fixture
S-9407198 Differential Bearing Race Wrench
For equivalent regional tools, refer to Special Tools.
Attach R-0 ...
Other materials:
SiriusXM Radio Messages
UPDATING: The encryption code in the receiver is being updated, and no action
is required. This process should take no longer than 30 seconds.
NO SIGNAL: The system is functioning correctly, but the vehicle is in a location
that is blocking the SiriusXM signal. When the vehicle is moved into an ...
Headlining Trim Panel Replacement (Sedan without Sunroof)
Headlining Trim Panel Replacement
Callout
Component Name
Warning: Do not attempt to repair or alter the head impact
energy-absorbing material glued to the headliner or to the garnish trims.
If the material is damaged ...
Drive Range, First Gear Engine Braking (Gen 1)
When the gear selector lever is moved to the Drive (D) range from the Neutral
(N) position, the transmission will provide engine braking. In this operating range,
the normally-low 1234 pressure control solenoid 5 is commanded ON and, in the engine
braking mode, the following changes occur with ...

0.0093