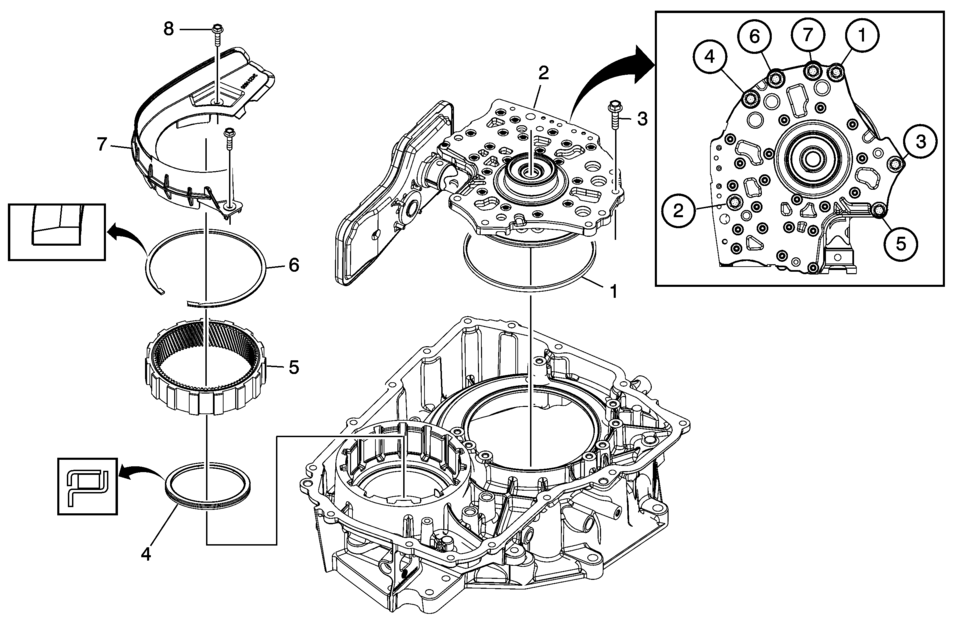
Chevrolet Sonic Repair Manual: Transmission Fluid Pump, Front Differential Carrier Baffle, and Front Differential Ring Gear Installation (6T30)
|
Callout |
Component Name |
|---|---|
|
1 |
Torque Converter and Differential Housing Seal |
|
2 |
Fluid Pump Assembly |
|
3 |
Fluid Pump Bolts M8 x 33 (Qty: 7) Caution: Refer to Fastener Caution.
10 Y (89 lb in) then rotate the bolt an additional 45 degrees Special Tool
EN-45059 Angle Meter or equivalent For equivalent regional tools, refer to Special Tools. |
|
4 |
Front Differential Carrier Bearing Assembly |
|
5 |
Front Differential Ring Gear |
|
6 |
Front Differential Ring Gear Retainer Note: Install the retainer with the taper facing away from the ring gear. |
|
7 |
Front Differential Carrier Baffle |
|
8 |
Front Differential Carrier Baffle Bolts M6 x 25 (Qty: 2) Tighten
12 Y (106.21 lb in) |
 Transmission Fluid Pump Disassemble (6T40/45/50)
Table 1:
Fluid Filter Assembly and Torque Converter Fluid
Seal Disassemble
Table 2:
Fluid Pump Disassemble
Fluid Filter Assembly and Torque
Converter Fluid Seal ...
 Transmission Fluid Pump, Front Differential Carrier Baffle, and Front Differential
Ring Gear Installation (6T40/45)
Transmission Fluid Pump, Front Differential Carrier Baffle, and Front Differential
Ring Gear Installation (6T40/45)
Transmission Fluid Pump, Front Differential Carrier Baffle, and Front
Differential Ring Gear Installation
Callout
Component Name
...
Other materials:
Safety Belt Use During Pregnancy
Safety belts work for everyone, including pregnant women. Like all occupants,
they are more likely to be seriously injured if they do not wear safety belts.
A pregnant woman should wear a lap-shoulder belt, and the lap portion should
be worn as low as possible, below the rounding, throughout ...
Conference Calling
Conference calling and three-way calling must be supported on the Bluetooth phone
and enabled by the wireless service carrier to work.
To start a conference while in a current call:
1. Turn or press the Push/MENU/ TUNE knob.
2. Select Enter Number.
3. Enter the character sequence then select C ...
Special Tools
Illustration
Tool Number/Description
EN-471
KM-471
J-42070
J-36649
Adapter
iiiiiiiiiiiii[iii]!!!iiiiiiiiillllliiiiii1/iiii
EN-6327-A
KM-6327-A
J-24460
J-42401
Cooling System ...

0.006