
Chevrolet Sonic Repair Manual: Control Solenoid Valve and Transmission Control Module Assembly Inspection
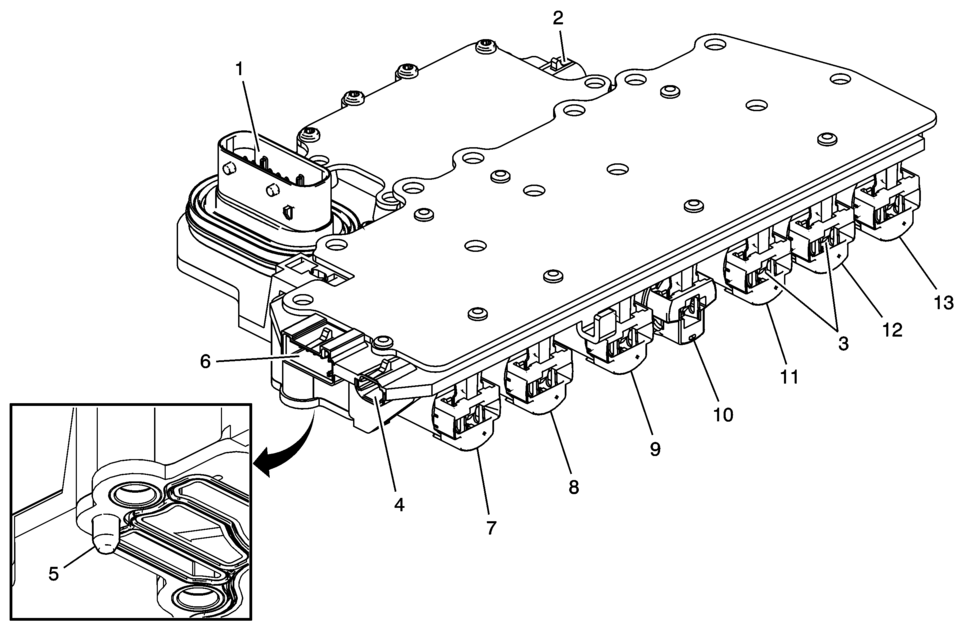
- Verify the conditions listed below do not exist. Carefully inspect the control solenoid valve assembly connectors and pins (1, 2, 4, 6) for the condition. Repair or replace as necessary.
- Damage
- Bent pins
- Debris
- Broken retaining tab
- Contamination
|
Solenoid Name |
Illustration Number |
Expected Resistance Ω |
|---|---|---|
|
Pressure Control Solenoid 3 |
7 |
3.42?.18 |
|
Pressure Control Solenoid 2 |
8 |
3.42?.18 |
|
TCC Pressure Control Solenoid Valve |
9 |
3.42?.18 |
|
Shift Solenoid Valve 1 |
10 |
16.2?9.8 |
|
Pressure Control Solenoid 5 |
11 |
3.42?.18 |
|
Pressure Control Solenoid 4 |
12 |
3.42?.18 |
|
Line Pressure Control Solenoid Valve |
13 |
3.42?.18 |

 Control Solenoid Valve and Transmission Control Module Assembly Installation
Control Solenoid Valve and Transmission Control Module Assembly Installation
Callout
Component Name
1
Control Solenoid V ...
Other materials:
Replacing Safety Belt System Parts after a Crash
Warning
A crash can damage the safety belt system in the vehicle. A damaged safety
belt system may not properly protect the person using it, resulting in serious injury
or even death in a crash. To help make sure the safety belt systems are working
properly after a crash, have them inspected ...
Certification Label
Label Example
A vehicle-specific Certification label is attached to the vehicle's center pillar
(B-pillar). The label tells the gross weight capacity of the vehicle, called the
Gross Vehicle Weight Rating (GVWR). The GVWR includes the weight of the vehicle,
all occupants, fuel, and carg ...
File menu
The file menu in the Nissan Armada driving recorder system allows users to conveniently
manage all recorded content, including photos and video files. Through this interface,
you can view, organize, and delete stored media directly from the touchscreen display,
making it easy to maintain stora ...

0.0074