Chevrolet Sonic Repair Manual: Control Valve Body Replacement
|
Callout |
Component Name |
|---|---|
|
Preliminary Procedure
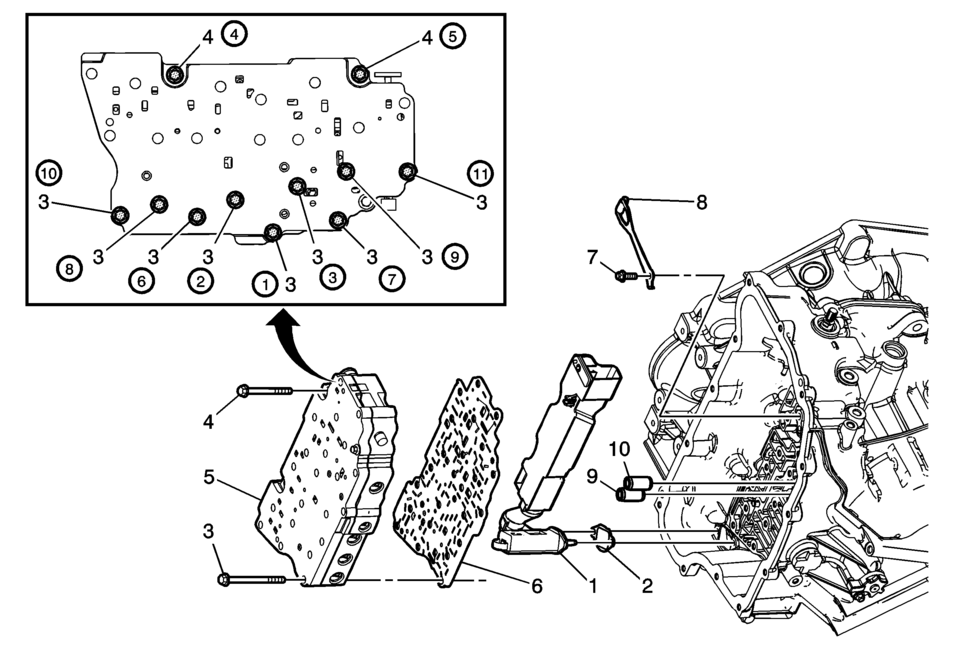
Remove the control solenoid valve and transmission control module assembly. Refer to Control Solenoid Valve and Transmission Control Module Assembly Replacement. |
|
|
1 |
Fluid Level Control Valve |
|
2 |
Fluid Level Control Valve Gasket Procedure
DISCARD the Gasket. Use a NEW gasket ONLY. |
|
3 |
Control Valve Body Bolt M6 x 60 (Qty: 9) Caution: Refer to Fastener Caution. Tip: Tighten in specified sequence.
11 Y (97 lb in) |
|
4 |
Control Valve Body Bolt M6 x 53 (Qty: 2) Tip: Tighten in specified sequence.
11 Y (97 lb in) |
|
5 |
Control Valve Body Assembly Procedure
|
|
6 |
Control Valve Body Spacer Plate Assembly |
|
7 |
Manual Shaft Detent Spring Bolt M6 x 16 (Qty: 1) Tighten
12 Y (106 lb in) |
|
8 |
Manual Shaft Detent Lever Spring Assembly |
|
9 |
1-2-3-4 Clutch Fluid Passage Seal Tip: Discard the seal. It is not reusable. |
|
10 |
Low/Reverse Clutch Fluid Passage Seal Tip: Discard the seal. It is not reusable. |
 Control Valve Body Cover Replacement
Removal Procedure
Disconnect the battery negative cable. Refer to
Battery Negative Cable Disconnection and Connection.
Raise and support the vehicle. Refer to
Lifting and Jac ...

Other materials:
Fuel Pump Flow Control Module Replacement
Fuel Pump Flow Control Module Replacement
Callout
Component Name
Preliminary Procedures
Disconnect the battery negative cable. Refer to Battery Negative
Cable Disconnection and Connection.
Remove the right rear compartmen ...
Throttle Body Assembly Replacement
Removal Procedure
Disconnect the throttle body wiring harness connector.
Remove the charge air cooler outlet air hose from
the throttle body. Refer to Charge Air Cooler Outlet
Air Hose Replacement.
Remove the 4 throttle body fasteners (3).
Remo ...
Drive Range, Sixth Gear (Gen 2)
As vehicle speed increases, the transmission control module (TCM) processes input
signals from the automatic transmission input and output speed sensors, the throttle
position sensor and other vehicle sensors to determine the precise moment to command
ON the normally-low 26 pressure control so ...

0.0109