Chevrolet Sonic Repair Manual: Low and Reverse and 1-2-3-4 Clutch Housing Assemble (6T30)
| Table 1: | 1??? Clutch Piston Installation |
| Table 2: | Low and Reverse Clutch Piston Installation |
- 1??? Clutch Piston Installation
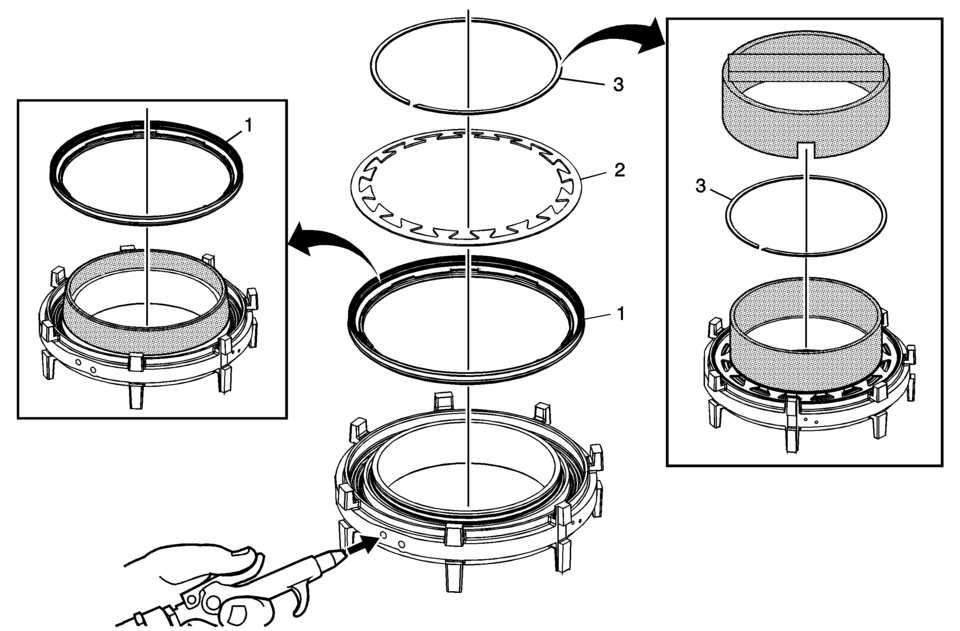
1??? Clutch Piston Installation Callout
Component Name
1
1??? Clutch Piston
Note:
DT-48273 seal protector prevents the piston seal lip from damage during installation. Apply a thin coat of ATF to the I.D. of DT-48273 seal protector to ease the installation of the piston.
Special Tool
DT-48273 Seal Protector
For equivalent regional tools, refer to Special Tools.
2
1??? Clutch Spring
3
1??? Clutch Spring Retainer
Caution:
Regulate the air pressure to 276 kPa (40 psi) maximum. High pressure could cause the piston to over travel and damage the piston seals.
Note:
- Place the retainer onto DT-48274-1 which is part of DT-48274 spring installer. Compressing the spring using DT-48274-2 which is part of DT-48274 spring installer, will install the retainer into the retainer groove.
- Apply shop air to the clutch fluid feed hole in the clutch housing to verify proper piston operation.
Special Tool
DT-48274 Clutch Piston Spring Installer
For equivalent regional tools, refer to Special Tools.
- Low and Reverse Clutch Piston Installation
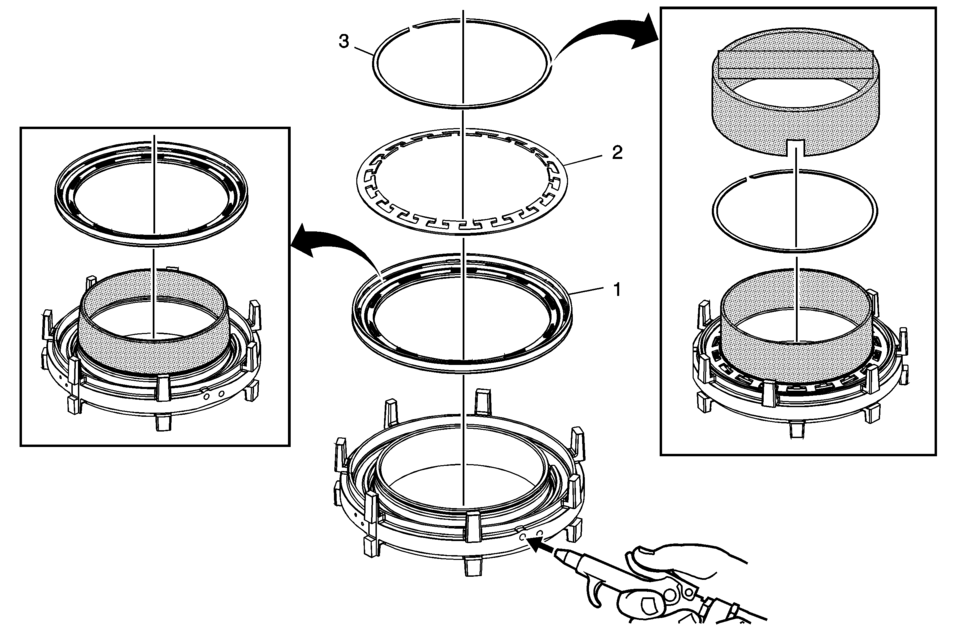
Low and Reverse Clutch Piston Installation Callout
Component Name
1
Low and Reverse Clutch Piston
Note:
DT-48273 seal protector prevents the piston seal lip from damage during installation. Apply a thin coat of ATF to the I.D. of DT-48273 seal protector to ease the installation of the piston.
Special Tool
DT-48273 Clutch Piston Seal Protector
For equivalent regional tools, refer to Special Tools.
2
Low and Reverse Clutch Spring
3
Low and Reverse Clutch Spring Retainer
Caution:
Regulate the air pressure to 276 kPa (40 psi) maximum. High pressure could cause the piston to over travel and damage the piston seals.
Note:
- Place the retainer onto DT-48274-1 which is part of DT-48274 spring installer. Compressing the spring using DT-48274-2 which is part of DT-48274 spring installer, will install the retainer into the retainer groove.
- Apply shop air to the clutch fluid feed hole in the clutch housing to verify proper piston operation.
Special Tool
DT-48274 Spring Installer
For equivalent regional tools, refer to Special Tools.
 Torque Converter Housing with Fluid Pump Assembly Removal (Non Hybrid)
Torque Converter Housing with Fluid Pump Assembly Removal
Callout
Component Name
1
Torque Converter and Differential Hou ...
 Low and Reverse and 1-2-3-4 Clutch Housing Assemble (6T40/45/50)
Table 1:
1??? Clutch Piston Installation
Table 2:
Low and Reverse Clutch Piston Installation
1??? Clutch Piston Installation
1??? Clutch Piston Installa ...
Other materials:
Overview (Radio with Touchscreen)
z VOL
y (Volume)
Press to decrease or increase the volume.
O (Power)
Press and hold to turn the power on or off.
D (Home Page)
Press to go to the Home Page. See Home Page.
...
Multi-Axis Acceleration Sensor Module Programming and Setup
Note:
DO NOT program a control module unless directed to by a service procedure
or a service bulletin. If the Multi-axis Acceleration Sensor or Inertia
Sensor Module (IMU) is not properly configured with the correct calibration
software, the Electronic Brake Control Module will ...
ProPILOT Assist displays and indicators
ProPILOT Assist and ProPILOT Assist 1.1
ProPILOT activation
Appears once the Nissan Armada ProPILOT Assist system is enabled, confirming
that the driver assistance features are ready to operate and support the driver
during travel.
Steering Assist indicator
Displays the current S ...

0.0067